<?xml version="1.0" encoding="utf-8"?>
<feed xmlns="http://www.w3.org/2005/Atom">
  <author>
    <name>Johnny Qian</name>
  </author>
  <generator uri="https://hexo.io/">Hexo</generator>
  <id>https://johnnyqian.net/</id>
  <link href="https://johnnyqian.net/" rel="alternate"/>
  <link href="https://johnnyqian.net/atom.xml" rel="self"/>
  <rights>All rights reserved 2026, Johnny Qian</rights>
  <subtitle>技术·人生</subtitle>
  <title>蓝色的飘漂</title>
  <updated>2026-11-04T15:17:54.165Z</updated>
  <entry>
    <author>
      <name>Johnny Qian</name>
    </author>
    <category term="Orca" scheme="https://johnnyqian.net/tags/Orca/"/>
    <category term="Git Worktree" scheme="https://johnnyqian.net/tags/Git-Worktree/"/>
    <category term="Agentic Coding" scheme="https://johnnyqian.net/tags/Agentic-Coding/"/>
    <category term="多智能体" scheme="https://johnnyqian.net/tags/%E5%A4%9A%E6%99%BA%E8%83%BD%E4%BD%93/"/>
    <content>
      <![CDATA[<p>在当今的多智能体（Multi-Agent）系统设计中，诸如 AutoGen、CrewAI 等传统框架大多采用“逻辑状态机”或“中心化路由器”的方案来处理智能体之间的对话交接。然而，当多智能体真正落地到<strong>复杂软件工程（Software Engineering Loop）</strong>场景时，这类基于纯代码逻辑的交接往往会因为代码冲突、环境污染和开发者缺乏感知（黑盒运行）而难以推进。</p><a id="more"></a><p>近日，我在研究 <strong>Orca 智能体开发环境（ADE, Agent Development Environment）</strong> 时，发现其内置的 <strong>Handoff（移交/交接）机制</strong> 提供了一种令人眼前一亮的桌面级研发解法。它不是一个纯粹的软件库，而是通过 <strong><code>orca-cli</code> 工具链注入</strong>、<strong>Git Worktree 物理隔离</strong> 以及 <strong>IDE/终端 UI 联动</strong> 的组合拳，实现了真正并行且具备全感知、高隔离的多智能体协同。</p><p>以下是针对 Orca Handoff 机制的深层工程设计与落地逻辑的全面解构。</p><h2 id="一、核心痛点：传统的-Agent-交接在软件工程中为何失效？"><a href="#一、核心痛点：传统的-Agent-交接在软件工程中为何失效？" class="headerlink" title="一、核心痛点：传统的 Agent 交接在软件工程中为何失效？"></a>一、核心痛点：传统的 Agent 交接在软件工程中为何失效？</h2><p>在编写代码的 Coding Agent（如 Claude Code、Cursor CLI 等）场景下，让 Agent A 把任务“转交”给 Agent B 存在三大致命工程难题：</p><ol><li><strong>智能体无法自感知环境：</strong> 第三方 Coding Agent 原生并不知道什么是 “Orca” 或是复杂的编排调度协议，它们缺乏发起交接的“抓手”。</li><li><strong>工作区状态污染：</strong> 如果两个 Agent 在同一个工作目录下并发运行，Agent A 正在重构模块，Agent B 突然被唤醒去修改同一份文件的测试，其结果必然导致本地代码极其混乱或直接发生未提交冲突。</li><li><strong>黑盒运行缺乏掌控感：</strong> 开发者在终端里只能看到一行行日志滚屏，无法清晰感知到“当前任务已经转交到了新 Agent 并且新环境已经就绪”。</li></ol><h2 id="二、解法破局：Orca-Handoff-的三大工程支柱"><a href="#二、解法破局：Orca-Handoff-的三大工程支柱" class="headerlink" title="二、解法破局：Orca Handoff 的三大工程支柱"></a>二、解法破局：Orca Handoff 的三大工程支柱</h2><p>Orca 并没有停留在应用层去写死交接逻辑，而是通过将控制权下沉到系统级与 UI 层，设计了一套丝滑的闭环。</p><h3 id="1-协议化武器：通过-orca-cli-向-Agent-强注入-Skills"><a href="#1-协议化武器：通过-orca-cli-向-Agent-强注入-Skills" class="headerlink" title="1. 协议化武器：通过 orca-cli 向 Agent 强注入 Skills"></a>1. 协议化武器：通过 <code>orca-cli</code> 向 Agent 强注入 Skills</h3><p>正如在实际安装过程中所发现的，Handoff 的第一步发生于 <code>orca-cli</code> 的 Onboarding/安装阶段。Orca 会基于类似 <strong>MCP（Model Context Protocol，模型上下文协议）</strong> 的规范，将控制技能注入到本地各个 Coding Agent 的 Skills 或 Tools 目录中（例如 <code>~/.agent/skills/</code>）。</p><ul><li><strong>从幻觉到硬调用：</strong> 注入后，Agent 的 JSON schema 中会多出一个原生的工具定义，例如 <code>orca_handoff(target_agent, reason, context_snapshot)</code>。</li><li><strong>听懂人类指令：</strong> 当我们在终端或上下文中暗示 <strong>handoff to another agent</strong>，或者 Agent 判定自身卡在某个测试报错中需要换人时，它能够通过自主调用该 Skill，直接触发底层的 <code>orca-cli</code>。</li></ul><h3 id="2-空间隔离术：Git-Worktree-的“隐形守护”"><a href="#2-空间隔离术：Git-Worktree-的“隐形守护”" class="headerlink" title="2. 空间隔离术：Git Worktree 的“隐形守护”"></a>2. 空间隔离术：Git Worktree 的“隐形守护”</h3><p>为了解决多智能体并发导致的代码污染，Orca 在 Handoff Skill 被触发的瞬间，利用了 Git 极其高效但常被忽视的特性——<strong>Git Worktree</strong>。</p><p>当 <code>orca-cli</code> 接收到交接指令后，它会在后台悄悄创建一个干净的物理隔离分支环境。新接班的 Agent B 启动后，面对的是全新的 Worktree 路径。这使得多个 Agent 可以实现<strong>真正物理级别的并行（Parallel Run）</strong>，完美规避了文件写冲突与死锁。</p><figure class="highlight text"><table><tr><td class="gutter"><pre><span class="line">1</span><br><span class="line">2</span><br><span class="line">3</span><br><span class="line">4</span><br><span class="line">5</span><br><span class="line">6</span><br></pre></td><td class="code"><pre><span class="line">项目目录/</span><br><span class="line">├── project.git/                 &lt;-- Bare Repo：共享 Git 对象与仓库元数据</span><br><span class="line">├── main/                        &lt;-- 主工作树</span><br><span class="line">└── orca-workspaces/</span><br><span class="line">    ├── agent-a/                 &lt;-- Agent A 的独立 Worktree</span><br><span class="line">    └── agent-b/                 &lt;-- Agent B 的独立 Worktree</span><br></pre></td></tr></table></figure><h3 id="3-UI-视窗魔术：基于-IPC-的新-Tab-Session-热注入"><a href="#3-UI-视窗魔术：基于-IPC-的新-Tab-Session-热注入" class="headerlink" title="3. UI 视窗魔术：基于 IPC 的新 Tab / Session 热注入"></a>3. UI 视窗魔术：基于 IPC 的新 Tab / Session 热注入</h3><p>这是 Orca 作为桌面级工作台最直观、也是最具魔力的地方：<strong>当你眼前的 Agent A 结束工作，你会看到 IDE 或终端界面自动“弹”出了一个新的面板或分屏。</strong></p><ul><li><strong>跨进程通信（IPC）：</strong> <code>orca-cli</code> 作为后台 Daemon 进程，通过 WebSocket 或 Unix Domain Socket 与 Orca 桌面端 UI（基于 Electron/Tauri 搭建的 xterm.js 终端）保持长连接。</li><li><strong>断点续传与热注入：</strong> 收到 Handoff 信号后，<code>orca-cli</code> 可检查现有工作区状态，按任务策略复用原 Worktree 或创建新 Worktree，然后操控 UI 新开一个 Terminal Tab 或垂直分割视窗（Split Session），并在唤醒 Agent B 的瞬间，将前序自动生成的上下文文件（如 <code>SESSION_STATUS.md</code>、最新的 Commit Hash、测试通过率及当前环境变量）<strong>热注入（Hot Injection）</strong> 到新会话中，Agent B 即可“无缝接班”。</li></ul><h2 id="三、深度思考：Handoff-机制的边界与下一个演进深水区"><a href="#三、深度思考：Handoff-机制的边界与下一个演进深水区" class="headerlink" title="三、深度思考：Handoff 机制的边界与下一个演进深水区"></a>三、深度思考：Handoff 机制的边界与下一个演进深水区</h2><p>尽管 Orca 靠 “CLI 注入 + 隔离分支 + UI 唤醒” 跑通了软件工程的高效多智能体流，但在更前沿、复杂的研发场景中，这种机制依然存在一个行业级的高难度挑战：<strong>状态同步的“脏数据”与内存跨越问题（State Pollution &amp; Memory Migration）</strong>。</p><p>当 <code>orca-cli</code> 成功在另一个 Tab 开辟新工作区时，Agent B 虽然继承了 Git 源码和持久化的状态文件，但它<strong>无法轻易接管前一个 Agent 的运行时内存（Runtime State）</strong>：</p><blockquote><p>💡 <em>举个例子：Agent A 在前一个 PTY 会话中，已经在内存里启动了一个 Local Web Server，或者通过 Python 交互式环境在 GPU 里加载了一个 70B 的大模型。此时发生 Handoff，新 Tab 里的 Agent B 无法直接拿走这段内存，甚至可能因为端口被 A 持续占用而导致新会话直接报错崩溃。</em></p></blockquote><p>从工程角度看，Handoff 中传递的状态可以分成两类：</p><table><thead><tr><th><strong>状态类型</strong></th><th>示例</th><th>新 Agent 能否直接继承</th></tr></thead><tbody><tr><td>代码与持久化上下文</td><td>Git 提交、未提交文件、任务摘要、测试结果</td><td>可以通过工作树或文件传递</td></tr><tr><td>进程运行时状态</td><td>活跃服务、PTY、内存对象、GPU 中加载的模型</td><td>通常不能通过新会话直接继承</td></tr></tbody></table><p>因此，状态文件或内存快照应保存可恢复的任务数据和启动说明，而不是把访问令牌、密钥或完整环境变量无筛选地复制给下一个 Agent。系统也应区分“上下文已传递”和“运行时资源已接管”，避免把新会话启动误认为进程或内存已经迁移。</p><p>目前 Orca 推荐的工程最佳实践是让 Agent 在执行 Handoff 前，先通过 Skill 机制执行<strong>优雅退出、释放端口资源、并做内存快照持久化（Snapshot to File）</strong>。但如何在未来的演进中实现更低延迟、更智能的进程级/内存级迁移，将是该技术栈迈向深水区的重要看点。</p><h2 id="四、结语"><a href="#四、结语" class="headerlink" title="四、结语"></a>四、结语</h2><p>Orca ADE 的 Handoff 设计给所有智能体开发者提供了一个清晰的工程示范：<strong>AI Agent 的编排与协同，绝不仅仅是多提示词（Prompt）的串联，而是一场对操作系统、Git 工具链、进程控制以及前端 UI 的综合工程压榨。</strong> 这套机制仍有边界：工作树能隔离代码，却不会自动隔离端口和外部服务；状态文件能传递上下文，却不会迁移前一个进程的内存。通过把 Handoff 做成一种“具备界面掌控力”的系统级 Skill，多智能体协同才真正告别了黑盒与玩具阶段，走向工业级可用的开发者工作台。</p><p>关于 Git Worktree 与 Orca 工作区的基础布局，可参阅<a href="/blog/git-worktree-bare-repo-orca-agent-workflow.html">Git Worktree + Bare Repo + Orca 智能体开发环境搭建指南</a>。</p>]]>
    </content>
    <id>https://johnnyqian.net/blog/orca-ade-handoff.html</id>
    <link href="https://johnnyqian.net/blog/orca-ade-handoff.html"/>
    <published>2026-10-25T10:30:00.000Z</published>
    <summary>
      <![CDATA[<p>在当今的多智能体（Multi-Agent）系统设计中，诸如 AutoGen、CrewAI 等传统框架大多采用“逻辑状态机”或“中心化路由器”的方案来处理智能体之间的对话交接。然而，当多智能体真正落地到<strong>复杂软件工程（Software Engineering Loop）</strong>场景时，这类基于纯代码逻辑的交接往往会因为代码冲突、环境污染和开发者缺乏感知（黑盒运行）而难以推进。</p>]]>
    </summary>
    <title>解构 Orca Handoff 机制：基于 CLI 注入、Git Worktree 与 UI 联动的多智能体协同方案</title>
    <updated>2026-11-04T15:17:54.165Z</updated>
  </entry>
  <entry>
    <author>
      <name>Johnny Qian</name>
    </author>
    <category term="Orca" scheme="https://johnnyqian.net/tags/Orca/"/>
    <category term="Git" scheme="https://johnnyqian.net/tags/Git/"/>
    <category term="Git Worktree" scheme="https://johnnyqian.net/tags/Git-Worktree/"/>
    <category term="Agentic Coding" scheme="https://johnnyqian.net/tags/Agentic-Coding/"/>
    <content>
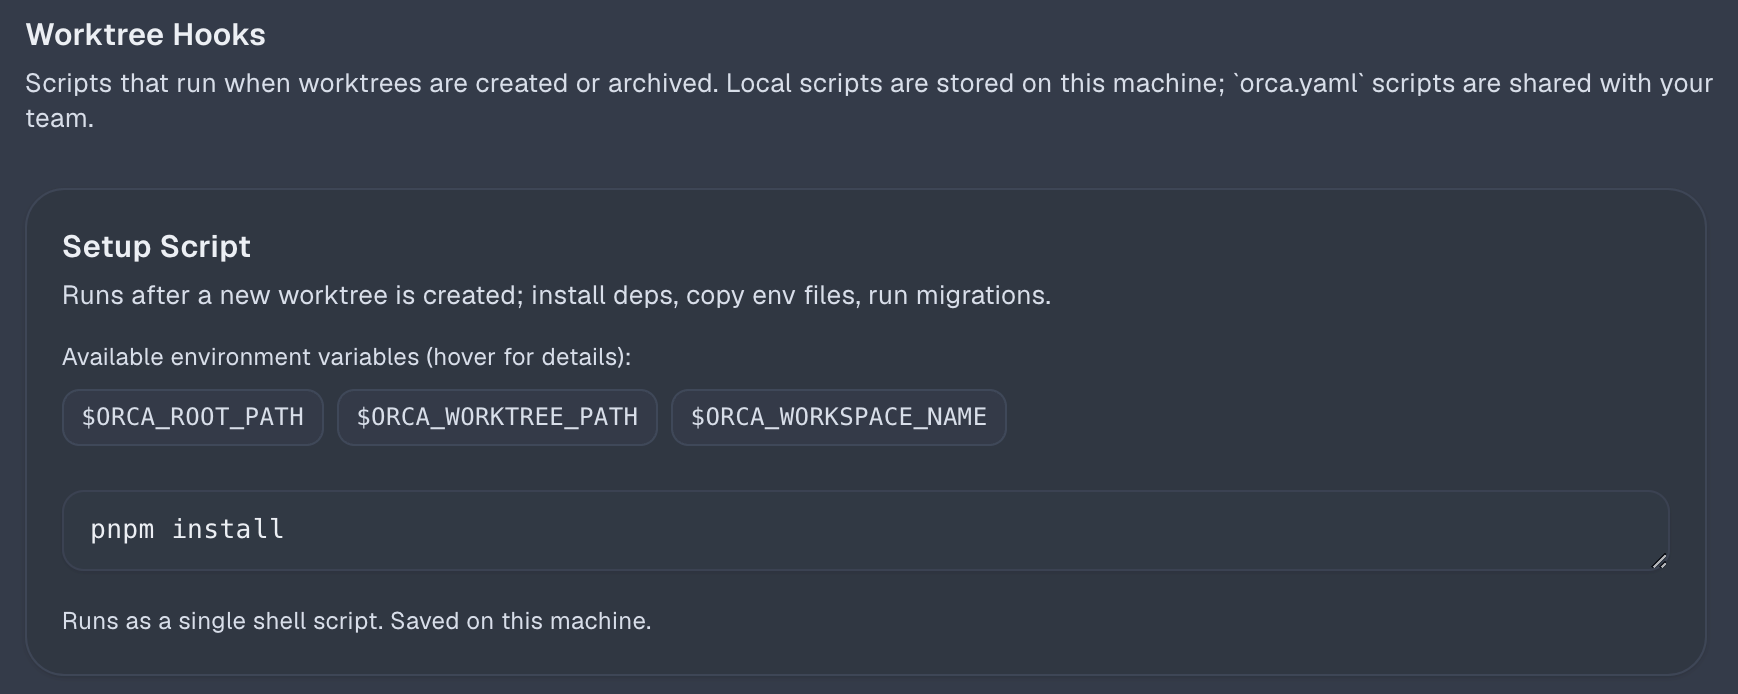
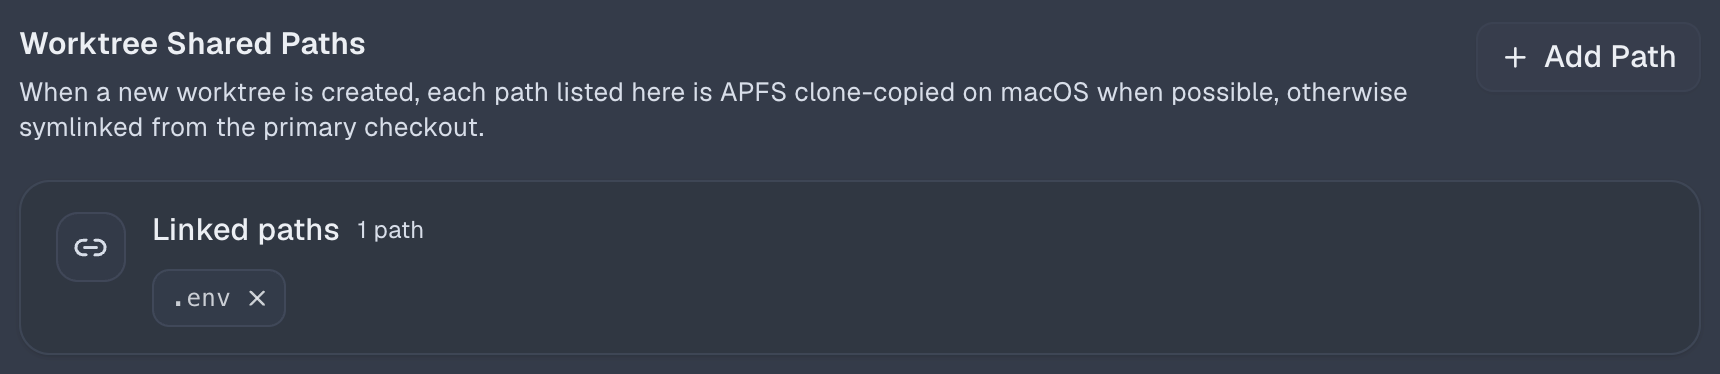
      <![CDATA[<p>在 2026 年以 Claude Code、Codex为代表的 AI 智能体（Agent）爆发时代，传统的 git checkout 分支切换模式已经成为历史。当多个 AI 智能体在后台帮你并行赛跑、重构、修 Bug 时，如何保证本地代码库既高效又绝对安全？</p><p>本文将为你深度拆解 Git Worktree 的底层演进、Bare Repository（空仓库） 的物理隔离黑科技，以及如何将它们与 Orca UI 完美结合的终极极客工作流。</p><a id="more"></a><h2 id="Git-Worktree-的前世今生"><a href="#Git-Worktree-的前世今生" class="headerlink" title="Git Worktree 的前世今生"></a>Git Worktree 的前世今生</h2><h3 id="早期阶段（2005-2015）：单仓库-单工作目录"><a href="#早期阶段（2005-2015）：单仓库-单工作目录" class="headerlink" title="早期阶段（2005 - 2015）：单仓库 = 单工作目录"></a>早期阶段（2005 - 2015）：单仓库 = 单工作目录</h3><p>在 Git 诞生的前十年里，一个 .git 文件夹严格对应一个物理代码目录（Working Directory）。如果你想同时处理两个不相干的任务，你只有两种痛苦的选择：</p><ul><li>不停地切换分支 (git stash / git checkout)： 必须强行中断当前写到一半的代码，极度打断思路。</li><li>在本地 git clone 两次： 复制出两个一模一样的庞大项目夹，不仅浪费硬盘，本地数据还完全不互通。</li></ul><h3 id="现代阶段（2015-至今）：多工作树时代的到来"><a href="#现代阶段（2015-至今）：多工作树时代的到来" class="headerlink" title="现代阶段（2015 至今）：多工作树时代的到来"></a>现代阶段（2015 至今）：多工作树时代的到来</h3><p>为了解决这个痛点，Git 官方在 2015 年（Git 2.5） 引入了革命性的命令：git worktree。<br>从此，Git 官方正式定义了两个全新术语：</p><ul><li>🏢 Main Worktree（主工作树）： 特指包含 .git/ 真实数据文件夹的那个最初的根目录（大本营）。</li><li>🏕️ Linked Worktree（链接工作树）： 通过 git worktree add 从主仓库“派生”出去的影子目录（前线阵地）。它们在物理上是独立的文件夹，但内部没有独立的 .git 文件夹，而是只有一个指针文件指回 Main Worktree。</li></ul><h2 id="Bare-Repo（空仓库）——-git-与代码的物理隔离"><a href="#Bare-Repo（空仓库）——-git-与代码的物理隔离" class="headerlink" title="Bare Repo（空仓库）—— .git 与代码的物理隔离"></a>Bare Repo（空仓库）—— .git 与代码的物理隔离</h2><p>既然 Linked Worktree 都要指回 Main Worktree，那么在单仓并行模式下，我们能否把那个冷冰冰的、装满历史记录的 .git 目录，与我们（以及 AI）日常读写的代码文件彻底进行物理隔离？<br>答案是：完全可以，而且这正是最优雅的终极形态——Bare Repository（空仓库模式）。</p><h3 id="什么是-Bare-Repo？"><a href="#什么是-Bare-Repo？" class="headerlink" title="什么是 Bare Repo？"></a>什么是 Bare Repo？</h3><p>普通仓库（Non-Bare）包含代码文件和隐藏的 .git 文件夹。而 Bare 仓库只有 Git 的核心管理数据，在物理上不包含任何一行可读的代码文件。</p><p>当我们用它作为“中央数据大本营”时，物理层级会变得极其干净：</p><figure class="highlight plaintext"><table><tr><td class="gutter"><pre><span class="line">1</span><br><span class="line">2</span><br><span class="line">3</span><br><span class="line">4</span><br><span class="line">5</span><br></pre></td><td class="code"><pre><span class="line">D:/MyDev/</span><br><span class="line">  ├── 📂 project.git/          &lt;-- 这是一个 Bare 仓库（纯粹的数据大本营，不含代码）</span><br><span class="line">  │     ├── config, HEAD, objects/, refs/...</span><br><span class="line">  ├── 📂 main/                 &lt;-- 你的主工作树（人类工程师在这个物理目录写代码）</span><br><span class="line">  └── 📂 orca-workspaces/      &lt;-- 链接工作树（AI智能体工作在这个物理目录）</span><br></pre></td></tr></table></figure><h3 id="物理隔离给-AI-编程带来的好处"><a href="#物理隔离给-AI-编程带来的好处" class="headerlink" title="物理隔离给 AI 编程带来的好处"></a>物理隔离给 AI 编程带来的好处</h3><ol><li>大本营绝对安全： AI 智能体在后台由于幻觉，有可能会错误触发恶意的垃圾清理或硬回滚命令。物理隔离后，AI 的工作树里只有一个微弱的、指向 project.git 的指针文件。无论 AI 在它的隔离区怎么折腾，都绝对摸不到、也破坏不了你真正的 Git 数据库。</li><li>消灭扭曲的上下级层级： 在传统的单仓 Worktree 模式下，主目录是一个“高高在上的老大”，AI 的工作区是一群“依附的小弟”。一旦主目录被删或破坏，小弟全部瘫痪。而基于 Bare 仓库衍生出来的 main（人类）和 feature-ai（AI），在地位上完全平级。</li></ol><h2 id="与-Orca-UI-的协作方式"><a href="#与-Orca-UI-的协作方式" class="headerlink" title="与 Orca UI 的协作方式"></a>与 Orca UI 的协作方式</h2><p>Orca UI 的设计哲学是 Project &gt; Workspace &gt; Agent。它并不是为了隔离“文件”，而是为了隔离 “AI 智能体的注意力、上下文和任务生命周期”。<br>当 Bare Repo 物理隔离 遇到 Orca 的三层看板逻辑，便组成了 2026 年最强的工作流：</p><figure class="highlight plaintext"><table><tr><td class="gutter"><pre><span class="line">1</span><br><span class="line">2</span><br><span class="line">3</span><br><span class="line">4</span><br></pre></td><td class="code"><pre><span class="line">📂 [第 1 层] Project Group (电商海外版大项目)</span><br><span class="line">   └── 📐 [第 2 层] Workspace (任务: 修复 Bug-404)</span><br><span class="line">          ├── 🤖 Agent 1: Claude Code  --&gt; [内部映射物理目录 A]</span><br><span class="line">          └── 🤖 Agent 2: Devin        --&gt; [内部映射物理目录 B]</span><br></pre></td></tr></table></figure><h2 id="避坑指南：多-Worktree-的注意事项"><a href="#避坑指南：多-Worktree-的注意事项" class="headerlink" title="避坑指南：多 Worktree 的注意事项"></a>避坑指南：多 Worktree 的注意事项</h2><p>当你在 Orca 里拉起 3 个 AI 针对同一个仓库赛跑时，会遇到两个最痛的物理限制。请按照以下方案进行极客配置：</p><h3 id="痛点-1：node-modules-重复安装"><a href="#痛点-1：node-modules-重复安装" class="headerlink" title="痛点 1：node_modules 重复安装"></a>痛点 1：node_modules 重复安装</h3><ul><li>解法： 使用 pnpm，利用它的全局内容寻址存储复用已下载的包内容，减少多个工作树重复下载和占用的存储空间。</li><li>需要注意： pnpm 的全局 store 不等于多个工作树共用同一个 <code>node_modules</code>。每个工作树仍应独立安装依赖，生成自己的 <code>node_modules</code> 链接结构。pnpm 通常会在同一文件系统上通过硬链接复用 store 中的文件，跨文件系统时则可能复制文件。</li><li>自动安装： 在项目的 Worktree Hooks 设置中，将 <code>pnpm install</code> 配置为 Setup Script。这样每个新建的 Worktree 都会安装自己的依赖，同时复用 pnpm 的全局 store。</li></ul><p><img src="/images/202610/orca-worktree-hooks-setup-script.png" alt="Orca 的 Worktree Hooks Setup Script 设置示例"></p><h3 id="痛点-2：-env-等配置文件没有自动同步到新的工作树"><a href="#痛点-2：-env-等配置文件没有自动同步到新的工作树" class="headerlink" title="痛点 2：.env 等配置文件没有自动同步到新的工作树"></a>痛点 2：.env 等配置文件没有自动同步到新的工作树</h3><p>由于 <code>.env</code> 通常在 <code>.gitignore</code> 中，新建的 Worktree 不会通过 Git 自动获得这类本地文件；如果测试依赖它们，就需要为新工作树提供相应配置。</p><ul><li>配置方式： 在 Orca 的 Settings → Repository → Worktree Shared Paths 中，将需要带入新 Worktree 的 gitignored 路径（例如 <code>.env</code>、<code>.env.local</code>）加入共享路径。</li><li>注意： Orca 会将这些路径从主工作树带到新 Worktree；macOS 上可能使用 APFS 克隆复制，其他情况下可能使用符号链接。</li></ul><p><img src="/images/202610/orca-worktree-shared-paths.png" alt="Orca 的 Worktree Shared Paths 设置示例"></p><h2 id="改造实战：迁移到-Bare-仓库与-Orca"><a href="#改造实战：迁移到-Bare-仓库与-Orca" class="headerlink" title="改造实战：迁移到 Bare 仓库与 Orca"></a>改造实战：迁移到 Bare 仓库与 Orca</h2><p>如果你现有一个普通的单仓项目，想把它改造成 「Bare 仓库数据分离 + Orca 看板控制」 的终极形态，请在终端执行以下操作：</p><h3 id="第一步：将现有仓库克隆为-Bare-仓库"><a href="#第一步：将现有仓库克隆为-Bare-仓库" class="headerlink" title="第一步：将现有仓库克隆为 Bare 仓库"></a>第一步：将现有仓库克隆为 Bare 仓库</h3><figure class="highlight bash"><table><tr><td class="gutter"><pre><span class="line">1</span><br><span class="line">2</span><br></pre></td><td class="code"><pre><span class="line"><span class="comment"># 克隆一个纯数据大本营（假设你的项目叫 my-app）</span></span><br><span class="line">git <span class="built_in">clone</span> --bare git@github.com:yourname/my-app.git my-app.git</span><br></pre></td></tr></table></figure><h3 id="第二步：创建主工作树"><a href="#第二步：创建主工作树" class="headerlink" title="第二步：创建主工作树"></a>第二步：创建主工作树</h3><figure class="highlight bash"><table><tr><td class="gutter"><pre><span class="line">1</span><br><span class="line">2</span><br><span class="line">3</span><br></pre></td><td class="code"><pre><span class="line"><span class="built_in">cd</span> my-app.git</span><br><span class="line"><span class="comment"># 在同级目录下新建一个名为 main 的工作区，并绑定到 main 分支</span></span><br><span class="line">git worktree add ../main main</span><br></pre></td></tr></table></figure><h3 id="第三步：在-Orca-中导入项目"><a href="#第三步：在-Orca-中导入项目" class="headerlink" title="第三步：在 Orca 中导入项目"></a>第三步：在 Orca 中导入项目</h3><p>打开 Orca UI，点击左侧 Projects 面板顶部的 + (Add Project)：</p><ol><li>选择 Browse Folder，直接选中包含了 my-app.git、main/ 的父级文件夹。</li><li>Orca 会智能识别出这是一个多工作区项目，UI 会弹窗询问你：“检测到嵌套与隔离仓库，是否作为 Group 导入？”</li><li>点击 Yes, import as group。</li></ol><p>至此，大功告成。你拥有了一个绝对安全、依赖共享、AI 互不干扰、界面干净清爽的 2026 顶级 AI 编码环境！</p><h2 id="总结"><a href="#总结" class="headerlink" title="总结"></a>总结</h2><p>在全自动 AI 智能体编码的 2026 年，环境隔离和任务编排是效率的分水岭。通过本文的探究，我们可以得出以下核心结论：</p><ol><li>解耦是核心： 传统的开发环境已经无法承载多智能体带来的高频代码变动。将 .git 演变成独立的 Bare Repo 数据库，将开发环境演变成由 Orca 统一调度的 Worktrees 阵地，能彻底将人类资产与 AI 幻觉沙盒进行安全隔离。</li><li>UI 承载认知： Orca UI 并不是一个单纯的编辑器，它是高维的任务聚合看板。它通过在第二层（Workspace）将物理上完全隔绝的多个 AI 分支合并展示，让人类以最低的认知负载，完美行使“AI 赛跑终极裁判”的权利。</li><li>软硬件协同调优： 享受多 Agent 并行红利的前提是解决物理副作用。熟练配合 pnpm 共享存储 与 Orca 的 Symlink 覆盖技术，才能真正消除重复安装与配置丢失的痛点，让并行开发流程丝滑无缝，把时间真正留给高维度的核心业务设计。</li></ol>]]>
    </content>
    <id>https://johnnyqian.net/blog/git-worktree-bare-repo-orca-agent-workflow.html</id>
    <link href="https://johnnyqian.net/blog/git-worktree-bare-repo-orca-agent-workflow.html"/>
    <published>2026-10-18T14:40:00.000Z</published>
    <summary>
      <![CDATA[<p>在 2026 年以 Claude Code、Codex为代表的 AI 智能体（Agent）爆发时代，传统的 git checkout 分支切换模式已经成为历史。当多个 AI 智能体在后台帮你并行赛跑、重构、修 Bug 时，如何保证本地代码库既高效又绝对安全？</p>
<p>本文将为你深度拆解 Git Worktree 的底层演进、Bare Repository（空仓库） 的物理隔离黑科技，以及如何将它们与 Orca UI 完美结合的终极极客工作流。</p>]]>
    </summary>
    <title>Git Worktree + Bare Repo + Orca 智能体开发环境搭建指南</title>
    <updated>2026-11-04T15:17:54.165Z</updated>
  </entry>
  <entry>
    <author>
      <name>Johnny Qian</name>
    </author>
    <category term="AI 编程" scheme="https://johnnyqian.net/tags/AI-%E7%BC%96%E7%A8%8B/"/>
    <category term="文件系统" scheme="https://johnnyqian.net/tags/%E6%96%87%E4%BB%B6%E7%B3%BB%E7%BB%9F/"/>
    <category term="VS Code" scheme="https://johnnyqian.net/tags/VS-Code/"/>
    <category term="OpenCode" scheme="https://johnnyqian.net/tags/OpenCode/"/>
    <content>
      <![CDATA[<p>在文件系统中，路径是访问资源的入口。常规目录树要求资源「物理上」位于某棵子树之下；<strong>符号链接（symbolic link，常简称 symlink）</strong> 则在该树之上增加一层<strong>间接引用</strong>：一个路径名指向另一个路径（可以是文件，也可以是目录），由操作系统在解析时完成跳转。<a id="more"></a></p><h2 id="一、符号链接是什么"><a href="#一、符号链接是什么" class="headerlink" title="一、符号链接是什么"></a>一、符号链接是什么</h2><p>理解 symlink 的关键是区分两类链接：</p><table><thead><tr><th>类型</th><th>本质</th><th>跨文件系统</th><th>目标删除后</th></tr></thead><tbody><tr><td><strong>硬链接</strong></td><td>同一 inode 的额外目录项</td><td>通常不行</td><td>只要还有硬链接，数据仍在</td></tr><tr><td><strong>符号链接</strong></td><td>独立的小文件，内容为目标路径字符串</td><td>可以</td><td>链接变为「悬空」（dangling）</td></tr></tbody></table><pre><code class="mermaid">flowchart LR    subgraph 硬链接        A[文件名 A] --&gt; I[(inode)]        B[文件名 B] --&gt; I    end    subgraph 符号链接        C[link.txt] --&gt; S[symlink file]        S --&gt;|&quot;指向路径&quot;| D[目标文件]    end    I ~~~ C    style 硬链接 fill:#f0f8ff,stroke:#4682b4,stroke-width:2px    style 符号链接 fill:#fff3e0,stroke:#ffb74d,stroke-width:2px</code></pre><ul><li><strong>硬链接</strong>：多个文件名指向同一个 inode（数据块），删除任意一个不影响其他名称访问数据。</li><li><strong>符号链接</strong>：一个独立的小文件，其内容是目标路径的字符串。操作系统在打开/读取时自动跟随跳转。</li></ul><p>下文默认讨论<strong>符号链接</strong>（软链接），因为目录操作、跨卷链接与「虚拟工作区」场景几乎都依赖它。</p><h3 id="核心用途"><a href="#核心用途" class="headerlink" title="核心用途"></a>核心用途</h3><ul><li><strong>解耦位置与名称</strong>：工具、脚本、配置可以稳定引用一个「逻辑路径」，而真实数据可迁移或分布在别处。</li><li><strong>跨目录聚合</strong>：在不复制数据的前提下，把分散的资源呈现为同一目录下的兄弟项。</li><li><strong>兼容遗留约定</strong>：例如将 <code>~/project/data</code> 链到大盘上的实际数据目录，避免改代码里的路径。</li></ul><h2 id="二、创建与解析"><a href="#二、创建与解析" class="headerlink" title="二、创建与解析"></a>二、创建与解析</h2><h3 id="Unix-macOS-Linux"><a href="#Unix-macOS-Linux" class="headerlink" title="Unix / macOS / Linux"></a>Unix / macOS / Linux</h3><figure class="highlight bash"><table><tr><td class="gutter"><pre><span class="line">1</span><br><span class="line">2</span><br><span class="line">3</span><br><span class="line">4</span><br><span class="line">5</span><br><span class="line">6</span><br><span class="line">7</span><br><span class="line">8</span><br><span class="line">9</span><br></pre></td><td class="code"><pre><span class="line"><span class="comment"># 为目录创建符号链接（最常见）</span></span><br><span class="line"><span class="built_in">ln</span> -s /path/to/real-project ./my-app</span><br><span class="line"></span><br><span class="line"><span class="comment"># 查看链接本身</span></span><br><span class="line"><span class="built_in">ls</span> -l ./my-app</span><br><span class="line"><span class="comment"># my-app -&gt; /path/to/real-project</span></span><br><span class="line"></span><br><span class="line"><span class="comment"># 解析：多数命令会跟随链接访问目标</span></span><br><span class="line"><span class="built_in">cd</span> ./my-app &amp;&amp; <span class="built_in">pwd</span>   <span class="comment"># 可能显示真实路径，取决于 shell 与 pwd 选项</span></span><br></pre></td></tr></table></figure><h3 id="Windows"><a href="#Windows" class="headerlink" title="Windows"></a>Windows</h3><p>Windows 自 Vista 起也支持目录符号链接（<code>mklink /D</code>）与联结点（junction）；WSL 与 macOS/Linux 行为一致，便于跨平台团队统一策略。</p><h3 id="关键注意事项"><a href="#关键注意事项" class="headerlink" title="关键注意事项"></a>关键注意事项</h3><ul><li><strong>相对路径 vs 绝对路径</strong>：相对 symlink 随「链接所在目录」解析，移动虚拟工作区根目录时容易断链；对可移植的「聚合根」更推荐<strong>绝对路径</strong>创建链接。</li><li><strong>权限</strong>：创建链接需要对链接父目录有写权限；访问目标仍受目标路径权限约束。</li><li><strong>循环链接</strong>：A → B → A 会导致部分工具无限递归，需要人工避免。</li></ul><h2 id="三、典型工程场景"><a href="#三、典型工程场景" class="headerlink" title="三、典型工程场景"></a>三、典型工程场景</h2><ol><li><strong>Monorepo 边缘</strong>：主仓 check out 在 CI，本地把子包链到独立 git 仓，便于 Agent 或 IDE 同时索引。</li><li><strong>共享配置</strong>：<code>.editorconfig</code>、<code>scripts/</code> 链到团队 dotfiles 仓，避免复制漂移。</li><li><strong>大资产外置</strong>：模型权重、数据集放在高速盘或 NFS，项目内只保留 symlink。</li><li><strong>版本切换</strong>：<code>current -&gt; releases/v2.3.1</code>，部署脚本始终读 <code>current</code>。</li></ol><pre><code class="mermaid">flowchart LR    subgraph workspace[&quot;虚拟工作区&quot;]        E[~&#x2F;ws&#x2F;com.project.workspace&#x2F;]        F[api&#x2F;]        G[web&#x2F;]        H[protos&#x2F;]        I[docs&#x2F;]    end    subgraph disk[&quot;磁盘分布&quot;]        A[~&#x2F;Codebase&#x2F;service-api]        B[~&#x2F;Codebase&#x2F;web-app]        C[~&#x2F;Codebase&#x2F;shared-protos]        D[~&#x2F;Documents&#x2F;team-runbooks]    end    F -.-&gt;|symlink| A    G -.-&gt;|symlink| B    H -.-&gt;|symlink| C    I -.-&gt;|symlink| D    E --&gt; F    E --&gt; G    E --&gt; H    E --&gt; I</code></pre><h3 id="风险与对策"><a href="#风险与对策" class="headerlink" title="风险与对策"></a>风险与对策</h3><ul><li><strong>悬空链接</strong>：目标目录被删或重命名后，链接仍在但无效——用脚本或 CI 检查 <code>test -e link</code>。</li><li><strong>工具不跟随链接</strong>：少数安全扫描、打包工具默认不解析 symlink，需在文档中说明。</li><li><strong>Git</strong>：Git 可以跟踪 symlink 本身（模式 <code>120000</code>），但跨平台克隆时行为需团队约定；本地临时聚合链接通常应加入 <code>.gitignore</code>。</li></ul><h2 id="四、AI-编程中的多根困境"><a href="#四、AI-编程中的多根困境" class="headerlink" title="四、AI 编程中的多根困境"></a>四、AI 编程中的多根困境</h2><h3 id="单根限制"><a href="#单根限制" class="headerlink" title="单根限制"></a>单根限制</h3><p>当前多数<strong>独立 Coding Agent</strong>（CLI 里的代码助手、自主 Agent 等）在启动时只接受<strong>一个根目录（Root Directory）</strong>或单一工作区路径。这与 VS Code <strong>Multi-root Workspace</strong>（一个窗口内多个顶层文件夹）不同：编辑器可以为每个 root 配置解析、搜索范围与文件监听，而许多 Agent 的实现等价于把自身”关”在一个文件夹里——它只能看到这个文件夹内部的内容，看不到外面的世界。</p><blockquote><p>单根限制：Agent 的活动范围被限定在指定的根目录下，无法直接访问根目录之外的文件。</p></blockquote><p>当实际开发涉及<strong>多个仓库、多个服务、共享库与文档仓</strong>时，单根会带来：</p><ul><li>无法在同一轮对话中合法读取另一个 repo 下的实现；</li><li>全局搜索、重构范围被人为截断；</li><li>子模块在父仓之外时，Agent 对「真实依赖关系」缺乏上下文。</li></ul><p>在不能修改 Agent 产品的前提下，需要在操作系统层构造一个<strong>逻辑上统一、物理上分散</strong>的视图——符号链接是最通用的一种。</p><h2 id="五、用-Symlink-构造「虚拟工作区」"><a href="#五、用-Symlink-构造「虚拟工作区」" class="headerlink" title="五、用 Symlink 构造「虚拟工作区」"></a>五、用 Symlink 构造「虚拟工作区」</h2><h3 id="1-操作步骤"><a href="#1-操作步骤" class="headerlink" title="1. 操作步骤"></a>1. 操作步骤</h3><p>创建一个空的文件夹作为「虚拟工作区」，然后将需要的多个项目目录通过软链接映射进来：</p><figure class="highlight bash"><table><tr><td class="gutter"><pre><span class="line">1</span><br><span class="line">2</span><br><span class="line">3</span><br><span class="line">4</span><br><span class="line">5</span><br><span class="line">6</span><br><span class="line">7</span><br><span class="line">8</span><br><span class="line">9</span><br><span class="line">10</span><br><span class="line">11</span><br></pre></td><td class="code"><pre><span class="line"><span class="built_in">mkdir</span> -p ~/ws/com.project.workspace</span><br><span class="line"><span class="built_in">cd</span> ~/ws/com.project.workspace</span><br><span class="line"></span><br><span class="line"><span class="built_in">ln</span> -s ~/Codebase/service-api    ./api</span><br><span class="line"><span class="built_in">ln</span> -s ~/Codebase/web-app        ./web</span><br><span class="line"><span class="built_in">ln</span> -s ~/Codebase/shared-protos  ./protos</span><br><span class="line"><span class="built_in">ln</span> -s ~/Documents/team-runbooks ./docs</span><br><span class="line"></span><br><span class="line"><span class="comment"># 将 Agent 的 root 指向虚拟工作区</span></span><br><span class="line"><span class="built_in">cd</span> ~/ws/com.project.workspace</span><br><span class="line"><span class="comment"># opencode / claude / cursor-agent --cwd .  等</span></span><br></pre></td></tr></table></figure><p>对 Agent 而言，目录树类似：</p><figure class="highlight text"><table><tr><td class="gutter"><pre><span class="line">1</span><br><span class="line">2</span><br><span class="line">3</span><br><span class="line">4</span><br><span class="line">5</span><br></pre></td><td class="code"><pre><span class="line">com.project.workspace/    ← 唯一 root</span><br><span class="line">├── api/                  → ~/Codebase/service-api</span><br><span class="line">├── web/                  → ~/Codebase/web-app</span><br><span class="line">├── protos/               → ~/Codebase/shared-protos</span><br><span class="line">└── docs/                 → ~/Documents/team-runbooks</span><br></pre></td></tr></table></figure><p>在<strong>目录列表与路径展示</strong>上，Agent 会把 <code>api/</code>、<code>web/</code> 看成同一根下的兄弟目录，便于你在 prompt 里组织多项目上下文。但是否能<strong>静默读写</strong>，还取决于具体产品的<strong>信任边界</strong>实现——不能默认「链进来就等于自动授权」。</p><h3 id="2-信任边界：为什么-symlink-不能绕过安全校验"><a href="#2-信任边界：为什么-symlink-不能绕过安全校验" class="headerlink" title="2. 信任边界：为什么 symlink 不能绕过安全校验"></a>2. 信任边界：为什么 symlink 不能绕过安全校验</h3><p>实践中常见一种落差：虚拟工作区已经建好，用<strong>OpenCode</strong>打开根目录（例如 <code>com.project.workspace</code>），通过 <code>api -&gt; ../com.project.api</code> 这类 symlink 访问兄弟仓库时，仍会<strong>弹出要求授权的对话框</strong>。</p><p>原因在于 OpenCode（及同类设计）的安全模型大致如下：</p><ul><li><strong>权限判断依据的是真实文件系统路径</strong>（canonical / resolved path），而不是你在树里看到的 symlink 路径。</li><li>你显式打开的<strong>工作区根目录</strong>构成信任边界：根目录以内的真实路径通常视为「已信任工作区」。</li><li>Symlink 若指向<strong>根目录之外</strong>的路径，工具在解析链接后会判定为<strong>外部目录（external directory）</strong>，需要用户确认或按配置规则 <code>allow</code> / <code>ask</code> / <code>deny</code>。</li><li>这是<strong>有意为之</strong>：防止通过 symlink 在未经用户同意的情况下扩大可访问范围，减轻 <strong>confused deputy</strong>（用户信任了 A 目录，Agent 却借链接读到 B 目录）类风险。</li></ul><pre><code class="mermaid">flowchart TD    User[用户打开 ~&#x2F;ws&#x2F;com.project.workspace]    Agent[Agent 请求访问 api&#x2F;foo.ts]    Symlink{解析 symlink}    Logical[&quot;逻辑路径:\n~&#x2F;ws&#x2F;com.project.workspace&#x2F;api&#x2F;foo.ts&quot;]    Resolved[&quot;真实路径:\n&#x2F;Users&#x2F;johnny&#x2F;Codebase&#x2F;service-api&#x2F;foo.ts&quot;]    Check{是否在信任边界内?}    Allow[✅ 静默允许]    Deny[⚠️ 弹窗 ask &#x2F; 拒绝 deny]    User --&gt; Agent    Agent --&gt; Symlink    Symlink --&gt; Logical    Logical --&gt; Resolved    Resolved --&gt; Check    Check --&gt;|&quot;真实路径在根内&quot;| Allow    Check --&gt;|&quot;真实路径在根外&quot;| Deny</code></pre><p>因此：</p><figure class="highlight text"><table><tr><td class="gutter"><pre><span class="line">1</span><br><span class="line">2</span><br></pre></td><td class="code"><pre><span class="line">逻辑视图：  com.project.workspace/api/foo.ts   （看起来像根内路径）</span><br><span class="line">安全判定：  /Users/.../com.project.api/foo.ts   （根外真实路径 → 可能每次 ask）</span><br></pre></td></tr></table></figure><p><strong>即使你用 symlink 做「多根」组织，工具仍把「当前打开的工作区根」当作信任边界</strong>；symlink 不能绕过这一层，只能改善导航与心智模型。</p><h3 id="3-配置授权策略（以-OpenCode-为例）"><a href="#3-配置授权策略（以-OpenCode-为例）" class="headerlink" title="3. 配置授权策略（以 OpenCode 为例）"></a>3. 配置授权策略（以 OpenCode 为例）</h3><p>在 OpenCode 中，可通过 <code>permission.external_directory</code> 按<strong>真实路径模式</strong>放宽或收紧（需重启生效），例如在项目或全局 <code>opencode.json</code> 中：</p><figure class="highlight json"><table><tr><td class="gutter"><pre><span class="line">1</span><br><span class="line">2</span><br><span class="line">3</span><br><span class="line">4</span><br><span class="line">5</span><br><span class="line">6</span><br><span class="line">7</span><br><span class="line">8</span><br><span class="line">9</span><br></pre></td><td class="code"><pre><span class="line"><span class="punctuation">&#123;</span></span><br><span class="line">  <span class="attr">&quot;$schema&quot;</span><span class="punctuation">:</span> <span class="string">&quot;https://opencode.ai/config.json&quot;</span><span class="punctuation">,</span></span><br><span class="line">  <span class="attr">&quot;permission&quot;</span><span class="punctuation">:</span> <span class="punctuation">&#123;</span></span><br><span class="line">    <span class="attr">&quot;external_directory&quot;</span><span class="punctuation">:</span> <span class="punctuation">&#123;</span></span><br><span class="line">      <span class="attr">&quot;~/Codebase/com.project.*/**&quot;</span><span class="punctuation">:</span> <span class="string">&quot;allow&quot;</span><span class="punctuation">,</span></span><br><span class="line">      <span class="attr">&quot;*&quot;</span><span class="punctuation">:</span> <span class="string">&quot;ask&quot;</span></span><br><span class="line">    <span class="punctuation">&#125;</span></span><br><span class="line">  <span class="punctuation">&#125;</span></span><br><span class="line"><span class="punctuation">&#125;</span></span><br></pre></td></tr></table></figure><p>注意：规则按<strong>对象键顺序</strong>匹配，<strong>最后一条命中规则生效</strong>——应把更具体的模式放在后面、宽泛的 <code>*</code> 放在前面（与 OpenCode 文档一致）。<code>external_directory</code> 的路径模式若要匹配仓库内<strong>任意子目录与文件</strong>，需在目录段后加上 <code>/**</code>（例如 <code>~/Codebase/com.project.api/**</code>），否则可能只匹配到单层路径、深层文件仍触发 <code>ask</code>。仅当你明确信任这些外部仓时再用 <code>allow</code>；否则保持 <code>ask</code> 更安全。</p><p>其它 Agent 未必有同名配置项，但「解析 symlink 后按真实路径做沙箱/授权」的做法并不罕见；部署虚拟工作区前应在目标工具里<strong>试读一条链到外仓的文件</strong>，确认是静默允许、弹窗还是直接拒绝。</p><h3 id="4-与其他策略对比"><a href="#4-与其他策略对比" class="headerlink" title="4. 与其他策略对比"></a>4. 与其他策略对比</h3><table><thead><tr><th>策略</th><th>优点</th><th>缺点</th></tr></thead><tbody><tr><td><strong>Symlink 虚拟根</strong></td><td>统一入口与路径叙事；无数据复制；对列表/浏览友好</td><td>根外目标常触发外部目录授权；需维护链接；安全策略需单独配置</td></tr><tr><td><strong>Git submodule/subtree</strong></td><td>版本钉死、可复现</td><td>更新与子仓权限复杂；Agent 仍可能只 clone 父仓</td></tr><tr><td><strong>父目录作为 root</strong></td><td>配置简单</td><td>暴露过多兄弟目录；搜索噪音大；越权读取风险</td></tr><tr><td><strong>Monorepo 合并</strong></td><td>单仓体验最佳</td><td>组织与 CI 成本高，非短期可落地</td></tr></tbody></table><pre><code class="mermaid">quadrantChart    title 多根策略权衡    x-axis &quot;低实施成本&quot; --&gt; &quot;高实施成本&quot;    y-axis &quot;低暴露面&quot; --&gt; &quot;高暴露面&quot;    &quot;Git submodule&quot;: [0.7, 0.3]    &quot;Symlink 虚拟根&quot;: [0.3, 0.3]    &quot;Monorepo 合并&quot;: [0.8, 0.8]    &quot;父目录作为 root&quot;: [0.7, 0.7]</code></pre><p>在「多个已有仓库、短期要让 Agent 横跳读代码」的场景，<strong>symlink 虚拟工作区</strong>仍是常见折中，但必须同时规划<strong>external_directory / 授权策略</strong>，否则体验会变成频繁点确认。</p><h3 id="5-实践建议"><a href="#5-实践建议" class="headerlink" title="5. 实践建议"></a>5. 实践建议</h3><ol><li><strong>命名稳定</strong>：链接名用团队约定的短名（<code>api</code>、<code>web</code>），避免用临时路径名，便于在 prompt 里引用「见 <code>web/src/...</code>」。</li><li><strong>绝对路径创建</strong>：虚拟工作区若会移动，仍建议 <code>ln -s &quot;$(pwd)/../real&quot; ./name</code> 在创建时转为绝对路径，减少断链。</li><li><strong>忽略规则</strong>：在虚拟根放 <code>.gitignore</code>（若该目录被 git 管理）忽略 <code>*</code> 仅跟踪 <code>README</code> 说明链接清单；或完全不纳入 git，只作本地 Agent 入口。</li><li><strong>安全边界</strong>：不要把 <code>~</code> 或含密钥的整个目录链进来；最小暴露原则与单根 chroot 精神一致。</li><li><strong>文档化</strong>：在虚拟根维护 <code>WORKSPACE.md</code>，列出每个 symlink 指向的真实路径、负责人与更新命令，方便 onboarding。</li><li><strong>与 IDE 配合</strong>：VS Code 可仍用 multi-root；CLI Agent 用 symlink 根时，要区分「IDE 多根已授权」与「Agent 外部路径需配置」两套模型。</li><li><strong>OpenCode 用户</strong>：若虚拟根下的链接全部指向根外，预期会出现授权弹窗；在 <code>permission.external_directory</code> 中为<strong>真实仓库路径</strong>配置 <code>allow</code>，或改为在<strong>共同父目录</strong>上打开根（接受更大暴露面），二选一。</li></ol><h3 id="6-常见故障排查"><a href="#6-常见故障排查" class="headerlink" title="6. 常见故障排查"></a>6. 常见故障排查</h3><ul><li><strong>反复弹出授权（OpenCode）</strong>：用 <code>ls -l</code> 看链接目标是否在根外；在 <code>external_directory</code> 中为解析后的真实路径添加规则，或把各仓 clone 到根目录内的子路径（物理上位于根下，而非 symlink 跳出）。</li><li><strong>Agent 报文件不存在</strong>：检查链接是否悬空 <code>ls -l</code>；WSL 与 Windows 路径混用时注意盘符映射。</li><li><strong>搜索过慢</strong>：虚拟根若链到巨大 <code>node_modules</code> 树，考虑只链 <code>packages/foo</code> 子路径，或配合 <code>.ignore</code> / ripgrep 排除。</li><li><strong>写操作落点</strong>：通过 symlink 修改文件会写回<strong>目标仓库</strong>的真实文件，这正是期望；提交 git 时需在<strong>各真实仓库</strong>分别 commit，而非在虚拟根提交。</li></ul><h2 id="六、结语"><a href="#六、结语" class="headerlink" title="六、结语"></a>六、结语</h2><p>符号链接是 Unix 哲学中「间接层」的轻量实现：不移动数据，只增加一个可遍历的名字空间。对于<strong>仍以单根为契约的 AI 编程工具</strong>，用空目录加若干 symlink 搭建<strong>虚拟工作区</strong>，可以改善多仓路径组织与 prompt 表达，但<strong>不能替代</strong>产品自身的信任模型——以 OpenCode 为例，<strong>根外 symlink 目标仍按真实路径做外部目录校验</strong>，需要配置 <code>external_directory</code> 或接受交互式授权。把它当作工作区基础设施来维护（清单、绝对路径、最小暴露、与安全规则对齐），才能在减少「单仓视野」断裂的同时，不误以为 symlink 已自动获得跨项目访问权限。</p>]]>
    </content>
    <id>https://johnnyqian.net/blog/symbolic-links-and-ai-multi-root-workspace.html</id>
    <link href="https://johnnyqian.net/blog/symbolic-links-and-ai-multi-root-workspace.html"/>
    <published>2026-06-06T12:00:00.000Z</published>
    <summary>
      <![CDATA[<p>在文件系统中，路径是访问资源的入口。常规目录树要求资源「物理上」位于某棵子树之下；<strong>符号链接（symbolic link，常简称 symlink）</strong> 则在该树之上增加一层<strong>间接引用</strong>：一个路径名指向另一个路径（可以是文件，也可以是目录），由操作系统在解析时完成跳转。]]>
    </summary>
    <title>符号链接（Symbolic Links）：原理、实践与 AI 编程中的多根工作区</title>
    <updated>2026-11-04T15:17:54.165Z</updated>
  </entry>
  <entry>
    <author>
      <name>Johnny Qian</name>
    </author>
    <category term="设计原则" scheme="https://johnnyqian.net/tags/%E8%AE%BE%E8%AE%A1%E5%8E%9F%E5%88%99/"/>
    <category term="DDD" scheme="https://johnnyqian.net/tags/DDD/"/>
    <category term="CQS" scheme="https://johnnyqian.net/tags/CQS/"/>
    <category term="REST" scheme="https://johnnyqian.net/tags/REST/"/>
    <content>
      <![CDATA[<p>讨论一个常见却容易被忽略的设计问题：<strong>更新父资源时，是否应该在同一个请求里提交一整份子资源的关联 ID 列表？</strong></p><a id="more"></a><h2 id="1-一个-Save-按钮，两类变更"><a href="#1-一个-Save-按钮，两类变更" class="headerlink" title="1. 一个 Save 按钮，两类变更"></a>1. 一个 Save 按钮，两类变更</h2><p>在项目协作、订单履约、组织架构等系统里，很常见<strong>父子层级</strong>：例如<strong>项目</strong>下有多个<strong>任务</strong>，<strong>部门</strong>下有多个<strong>成员</strong>，<strong>订单</strong>下有多条<strong>行项目</strong>。子记录往往通过外键（Foreign Key）指向父记录（如 <code>tasks.project_id</code>）——关联的持久化真相通常在<strong>子表的外键</strong>，而不是父表上再存一列「关联 ID 列表」。</p><p>产品需求很直观：在「编辑项目」页多选任务，点保存，项目信息和成员任务一起生效。</p><p>实现上也「顺手」：扩展 <code>UpdateProject</code> 接口，请求体里增加 <code>taskIds</code>，先更新项目字段，再对当前挂在该项目下的任务做集合 diff（移除不在列表中的、挂上新增的）。</p><p><strong>但用户心智往往是两件事：</strong></p><ol><li>我在改<strong>父实体本身</strong>（名称、状态、负责人……）</li><li>我在管<strong>谁和它有关联</strong>（下列表、成员、子任务）</li></ol><p>把它们绑进同一个 HTTP 请求、同一个应用服务方法，短期能交付，长期却会在语义、并发和失败恢复上持续付利息。下面用业界常见的设计原则说明原因，并给出可落地的拆分方向。</p><hr><h2 id="2-原则一：一个命令，只讲一种一致性故事（DDD-聚合）"><a href="#2-原则一：一个命令，只讲一种一致性故事（DDD-聚合）" class="headerlink" title="2. 原则一：一个命令，只讲一种一致性故事（DDD 聚合）"></a>2. 原则一：一个命令，只讲一种一致性故事（DDD 聚合）</h2><p>在领域驱动设计（Domain-Driven Design，DDD）里，<strong>聚合（Aggregate）</strong>划定了一次事务内必须保持一致的边界。</p><ul><li><strong>项目聚合（Project Aggregate）</strong>：名称、状态、周期等，以项目为聚合根（Aggregate Root）。</li><li><strong>任务聚合（Task Aggregate）</strong>：任务内容、以及「属于哪个项目」——外键在任务侧，改关联往往意味着更新<strong>多个任务聚合</strong>（或多次领域行为），而不是在父表上维护一份冗余 ID 列表。</li></ul><p>当你在「更新项目」用例里既改项目属性又全量同步 <code>taskIds</code>，应用层在做<strong>跨聚合编排</strong>。编排本身合理，但若对外仍叫「更新项目」，会带来：</p><ul><li>接口语义与真实写库位置不一致（大量更新发生在任务表）；</li><li>失败时可能出现「项目已保存、部分任务已改关联」的半状态；</li><li>客户端常被迫每次提交<strong>全量</strong> ID 列表，并在 <code>null</code>、空数组、省略字段之间做易错的约定。</li></ul><p><strong>可引用的设计口号：</strong></p><blockquote><p><strong>Don’t bundle cross-aggregate writes.</strong><br>跨聚合的写操作，宜有独立的命令与界面，而不是贴在单聚合的 Save 上。</p></blockquote><pre><code class="mermaid">graph TD    classDef default rx:10,ry:10    subgraph ProjectAggregate[&quot;项目聚合 (Project Aggregate)&quot;]        P(项目 Project&lt;br&#x2F;&gt;名称、状态、周期)    end    subgraph TaskAggregate1[&quot;任务聚合 (Task Aggregate)&quot;]        T1(任务 Task A&lt;br&#x2F;&gt;内容、project_id)    end    subgraph TaskAggregate2[&quot;任务聚合 (Task Aggregate)&quot;]        T2(任务 Task B&lt;br&#x2F;&gt;内容、project_id)    end    P -.-&gt;|FK| T1    P -.-&gt;|FK| T2    style ProjectAggregate fill:#e1f5e1,stroke:#2e7d2e,stroke-width:2px    style TaskAggregate1 fill:#e3f2fd,stroke:#1565c0,stroke-width:2px    style TaskAggregate2 fill:#e3f2fd,stroke:#1565c0,stroke-width:2px</code></pre><hr><h2 id="3-原则二：外键在哪张表，命令从哪条边界进来"><a href="#3-原则二：外键在哪张表，命令从哪条边界进来" class="headerlink" title="3. 原则二：外键在哪张表，命令从哪条边界进来"></a>3. 原则二：外键在哪张表，命令从哪条边界进来</h2><p>当关联由子表的 <code>project_id</code>（可空外键）表达时，<strong>写关联更自然的入口</strong>通常是：</p><ul><li>在子资源上更新外键（例如「编辑任务 → 选择所属项目」），或</li><li>显式的 <strong>Link / Unlink</strong> 用例（「将任务 A 加入项目 P」「将任务 A 从项目 P 移除」），</li></ul><p>而不是「更新父资源时附带一串子 ID，由服务端遍历改写子表」。</p><p>父资源代管子资源关联，常见后果包括：</p><table><thead><tr><th>现象</th><th>原因</th></tr></thead><tbody><tr><td>误清空关联</td><td>空列表与「未传字段」的语义在前后端难以统一</td></tr><tr><td>双入口冲突</td><td>详情页改关联 vs 编辑页整单保存，互相覆盖</td></tr><tr><td>测试成本高</td><td>同一接口需覆盖「只改属性」「只改关联」「两者都改」</td></tr></tbody></table><p><strong>可引用的设计口号：</strong></p><blockquote><p><strong>Truth lives on the write side of the FK.</strong><br>外键所在的一侧，宜作为关联变更的主用例入口。</p></blockquote><hr><h2 id="4-原则三：不是所有-Write-都要叫-Update（CQS-用例切片）"><a href="#4-原则三：不是所有-Write-都要叫-Update（CQS-用例切片）" class="headerlink" title="4. 原则三：不是所有 Write 都要叫 Update（CQS / 用例切片）"></a>4. 原则三：不是所有 Write 都要叫 Update（CQS / 用例切片）</h2><p><strong>命令查询分离（Command Query Separation，CQS）</strong> 常被理解为查询不改状态；更广的用法是：<strong>按用例拆分写命令</strong>。</p><ul><li><code>UpdateProject</code> —— 仅项目属性；</li><li><code>LinkTaskToProject</code> / <code>UnlinkTaskFromProject</code>（或对任务的 <code>PATCH</code> 只改 <code>project_id</code>）—— 仅关联。</li></ul><p>在 REST 风格 API 中，更接近把关联建模为<strong>子资源（Sub-resource）</strong>或<strong>对子资源的局部更新</strong>，例如：</p><figure class="highlight http"><table><tr><td class="gutter"><pre><span class="line">1</span><br><span class="line">2</span><br></pre></td><td class="code"><pre><span class="line">PATCH /tasks/&#123;taskId&#125;</span><br><span class="line">&#123; &quot;projectId&quot;: &quot;proj-123&quot; &#125;</span><br></pre></td></tr></table></figure><p>或：</p><figure class="highlight http"><table><tr><td class="gutter"><pre><span class="line">1</span><br><span class="line">2</span><br></pre></td><td class="code"><pre><span class="line">POST /projects/&#123;projectId&#125;/tasks</span><br><span class="line">&#123; &quot;taskId&quot;: &quot;task-456&quot; &#125;</span><br></pre></td></tr></table></figure><p>而不是把所有关系塞进一个「万能」的父资源更新体：</p><figure class="highlight http"><table><tr><td class="gutter"><pre><span class="line">1</span><br><span class="line">2</span><br></pre></td><td class="code"><pre><span class="line">PUT /projects/&#123;projectId&#125;</span><br><span class="line">&#123; &quot;name&quot;: &quot;...&quot;, &quot;taskIds&quot;: [&quot;t1&quot;,&quot;t2&quot;,&quot;t3&quot;] &#125;</span><br></pre></td></tr></table></figure><p>按<strong>垂直切片（Vertical Slicing）</strong>组织代码时，可按用例划分模块（维护项目 / 管理项目下的任务），避免一个 Controller 上的巨型 DTO 承担所有写场景。</p><pre><code class="mermaid">graph TD    classDef default rx:10,ry:10,font-size:13px    subgraph UpdateProject[&quot;UpdateProject 命令&quot;]        A(仅项目属性)    end    subgraph LinkTask[&quot;Link&#x2F;Unlink 命令&quot;]        B(仅关联变更)    end    subgraph AntiPattern[&quot;反模式：万能 Update&quot;]        C(项目属性 + 关联列表)    end    style UpdateProject fill:#e1f5e1,stroke:#2e7d2e,stroke-width:2px    style LinkTask fill:#e3f2fd,stroke:#1565c0,stroke-width:2px    style AntiPattern fill:#ffebee,stroke:#c62828,stroke-width:2px</code></pre><hr><h2 id="5-原则四：详情页当-Hub，编辑页管属性"><a href="#5-原则四：详情页当-Hub，编辑页管属性" class="headerlink" title="5. 原则四：详情页当 Hub，编辑页管属性"></a>5. 原则四：详情页当 Hub，编辑页管属性</h2><p>许多 B2B 产品的惯例是：</p><ul><li><strong>编辑表单</strong>：维护「文档型」主数据（名称、描述、日期、状态）；</li><li><strong>详情页（Hub）</strong>：展示读模型（Read Model），并在此完成<strong>关系型</strong>操作（成员、子任务、依赖、标签）。</li></ul><p>若将「管理项目下的任务」放在<strong>项目详情页</strong>：</p><ul><li>列表通过「按项目查询任务」类接口加载；</li><li>添加：选择器选中任务 → 调用 link（设置 <code>project_id</code>）；</li><li>移除：行内操作 → unlink（清空或迁移外键）；</li><li><strong>编辑项目</strong>接口不再携带全量 <code>taskIds</code>，只更新项目字段。</li></ul><p>这与 <strong>Master–Detail</strong>、<strong>任务型界面</strong>（完成单一动作）与<strong>文档型界面</strong>（整表保存）的区分一致，也有助于减少「只改了标题却丢了关联」类问题。</p><pre><code class="mermaid">graph TD    classDef default rx:10,ry:10    subgraph EditPage[&quot;编辑页（文档型界面）&quot;]        E1(项目名称)        E2(项目状态)        E3(负责人)    end    subgraph HubPage[&quot;详情页 Hub（任务型界面）&quot;]        H1(任务列表)        H2(成员管理)        H3(标签设置)    end    style EditPage fill:#e1f5e1,stroke:#2e7d2e,stroke-width:2px    style HubPage fill:#e3f2fd,stroke:#1565c0,stroke-width:2px</code></pre><hr><h2 id="6-两种实现路径：整单保存-vs-详情管关联"><a href="#6-两种实现路径：整单保存-vs-详情管关联" class="headerlink" title="6. 两种实现路径：整单保存 vs 详情管关联"></a>6. 两种实现路径：整单保存 vs 详情管关联</h2><p><strong>路径 A — 编辑页整单保存（常见 MVP）</strong></p><ul><li>编辑弹窗内嵌关联列表与选择器；</li><li>打开时加载当前关联并填入表单；</li><li>保存时提交全量 <code>taskIds</code>，服务端做 diff 同步。</li></ul><p><em>优点：</em> 一次提交、符合用户对「编辑 → 保存」的习惯，接口数量少。<br><em>代价：</em> 跨聚合写捆绑、半失败状态、全量列表与并发覆盖；空列表与未传字段的语义需严格约定（例如是否一律视为「清空关联」）。</p><p><strong>路径 B — 详情页管理关联（更清晰边界）</strong></p><ul><li>项目更新只改项目属性；</li><li>关联在详情页逐条或批量 link/unlink，每次操作对应更小范围的写与反馈。</li></ul><p><em>优点：</em> 命令与 UI 职责清晰，与 FK 所在侧一致。<br><em>代价：</em> 接口与交互步骤略多，需产品设计配合。</p><p>二者都是业界真实选择；当关联落在外键子表而非父聚合内集合时，<strong>路径 B 往往更易长期维护</strong>。</p><pre><code class="mermaid">graph TD    classDef default rx:10,ry:10    subgraph PathA[&quot;路径 A：整单保存&quot;]        A1(编辑弹窗) --&gt; A2(提交全量 taskIds)        A2 --&gt; A3(服务端 diff 同步)        A3 --&gt; A4(项目表 + 任务表)    end    subgraph PathB[&quot;路径 B：详情页管理&quot;]        B1(编辑页) --&gt; B2(仅更新项目属性)        B3(详情页 Hub) --&gt; B4(Link &#x2F; Unlink)        B4 --&gt; B5(仅更新任务表)    end    style PathA fill:#ffebee,stroke:#c62828,stroke-width:2px    style PathB fill:#e1f5e1,stroke:#2e7d2e,stroke-width:2px</code></pre><hr><h2 id="7-何时可以绑在一起，何时宜拆开"><a href="#7-何时可以绑在一起，何时宜拆开" class="headerlink" title="7. 何时可以绑在一起，何时宜拆开"></a>7. 何时可以绑在一起，何时宜拆开</h2><table><thead><tr><th>绑在一起（可接受）</th><th>拆开（更推荐）</th></tr></thead><tbody><tr><td>MVP、人力紧、关联变更很少</td><td>关联变更是高频、多人协作</td></tr><tr><td>业务强需求「父+子必须同一事务提交」</td><td>可接受分步保存、逐步生效</td></tr><tr><td>仅有表单、无详情 Hub</td><td>有稳定的详情页与独立管理流</td></tr><tr><td>关联真在父聚合内（值对象 Value Object / 集合）</td><td>关联在子表外键（跨聚合）</td></tr></tbody></table><p>父子通过<strong>子表外键</strong>建模时，多数属于右列。</p><hr><h2 id="8-总结：设计评审与文档里可用的三句话"><a href="#8-总结：设计评审与文档里可用的三句话" class="headerlink" title="8. 总结：设计评审与文档里可用的三句话"></a>8. 总结：设计评审与文档里可用的三句话</h2><ol><li><strong>更新父资源的命令，只应维护父聚合根上的字段</strong>；跨表关联用独立用例或子资源 API。</li><li><strong>详情页适合回答「谁和我有关」</strong>；编辑页适合回答「我是什么」。</li><li><strong>每个 Save 按钮问一句：有几个聚合（或几张表的写边界）在变？</strong> 若大于一，考虑拆命令、拆界面、拆测试。</li></ol><hr><h2 id="9-延伸阅读（原则与关键词）"><a href="#9-延伸阅读（原则与关键词）" class="headerlink" title="9. 延伸阅读（原则与关键词）"></a>9. 延伸阅读（原则与关键词）</h2><ul><li><strong>DDD</strong>：Aggregate、Consistency Boundary、Application Service</li><li><strong>CQS / CQRS</strong>：命令按用例拆分、读写分离</li><li><strong>REST</strong>：子资源、避免万能 PUT body</li><li><strong>SRP / Separation of Concerns</strong>：API 与 UI 块职责对齐</li><li><strong>信息架构</strong>：Hub page、Master–Detail、任务型 vs 文档型 UI</li></ul>]]>
    </content>
    <id>https://johnnyqian.net/blog/separating-properties-and-relationships-in-hierarchical-models.html</id>
    <link href="https://johnnyqian.net/blog/separating-properties-and-relationships-in-hierarchical-models.html"/>
    <published>2026-06-04T13:40:00.000Z</published>
    <summary>
      <![CDATA[<p>讨论一个常见却容易被忽略的设计问题：<strong>更新父资源时，是否应该在同一个请求里提交一整份子资源的关联 ID 列表？</strong></p>]]>
    </summary>
    <title>别在「保存父实体」里偷偷改子实体关联：层级模型里属性与关系为什么要分开</title>
    <updated>2026-11-04T15:17:54.170Z</updated>
  </entry>
  <entry>
    <author>
      <name>Johnny Qian</name>
    </author>
    <content>
      <![CDATA[<p>相信很多用户对百度网盘都有一种“又爱又恨”的复杂感情。它有丰富的云端资源，很多机构、第三方也用百度网盘给我们分享文件，但在下载体验上，却有一个让人极其头疼的痛点：<strong>为了下载文件，我们都必须忍受臃肿的 PC 客户端，忍受频繁的弹窗广告，甚至不得不让电脑保持长时间亮屏待机</strong>。这不仅消耗了电脑的性能，还浪费了大量的电能。</p><p>那么，有没有一种更优雅的解决方案呢？答案是肯定的。借助 Docker 技术，我们可以将百度网盘部署在 NAS、软路由甚至是闲置的 Windows 电脑上。通过网页端（Web）即可随时随地管理文件并实现 24 小时后台离线下载。本文将手把手教你如何在 Windows 环境下，利用 Docker Desktop 和 <code>johngong/baidunetdisk</code> 镜像轻松实现这一目标。<a id="more"></a></p><hr><h2 id="一、必须先拿到干净的-config"><a href="#一、必须先拿到干净的-config" class="headerlink" title="一、必须先拿到干净的 /config"></a>一、必须先拿到干净的 <code>/config</code></h2><p>该镜像依赖首次启动时生成的 VNC / noVNC 配置。<br><strong>只要 <code>/config</code> 卷不干净，容器就会“假启动、真无服务”</strong>。</p><figure class="highlight bash"><table><tr><td class="gutter"><pre><span class="line">1</span><br><span class="line">2</span><br><span class="line">3</span><br><span class="line">4</span><br><span class="line">5</span><br><span class="line">6</span><br><span class="line">7</span><br><span class="line">8</span><br><span class="line">9</span><br><span class="line">10</span><br><span class="line">11</span><br><span class="line">12</span><br></pre></td><td class="code"><pre><span class="line"><span class="comment"># 1️⃣ 不挂任何卷启动</span></span><br><span class="line">docker run -d \</span><br><span class="line">  --name baidunetdisk \</span><br><span class="line">  -p 5800:5800 \</span><br><span class="line">  -p 5900:5900 \</span><br><span class="line">  johngong/baidunetdisk:latest</span><br><span class="line"></span><br><span class="line"><span class="comment"># 2️⃣ 确认端口可访问</span></span><br><span class="line">curl -I http://127.0.0.1:5800</span><br><span class="line"></span><br><span class="line"><span class="comment"># 3️⃣ 拷贝干净配置</span></span><br><span class="line">docker <span class="built_in">cp</span> baidunetdisk:/config <span class="string">&quot;<span class="variable">$USERPROFILE</span>/baidudisk/config&quot;</span></span><br></pre></td></tr></table></figure><p>之后 <strong>永远用这个 <code>/config</code> 挂载</strong>。</p><hr><h2 id="二、Git-Bash-里不要用"><a href="#二、Git-Bash-里不要用" class="headerlink" title="二、Git Bash 里不要用 ~"></a>二、Git Bash 里不要用 <code>~</code></h2><figure class="highlight bash"><table><tr><td class="gutter"><pre><span class="line">1</span><br></pre></td><td class="code"><pre><span class="line"><span class="built_in">echo</span> ~</span><br></pre></td></tr></table></figure><p>通常不是你期望的 Windows 用户目录，Docker 也不认。</p><p>✅ <strong>正确做法：用 <code>$USERPROFILE</code></strong></p><hr><h2 id="三、路径斜杠混用是正常现象"><a href="#三、路径斜杠混用是正常现象" class="headerlink" title="三、路径斜杠混用是正常现象"></a>三、路径斜杠混用是正常现象</h2><figure class="highlight bash"><table><tr><td class="gutter"><pre><span class="line">1</span><br></pre></td><td class="code"><pre><span class="line"><span class="built_in">echo</span> <span class="string">&quot;<span class="variable">$USERPROFILE</span>/baidudisk/config&quot;</span></span><br></pre></td></tr></table></figure><p>输出类似：</p><figure class="highlight bash"><table><tr><td class="gutter"><pre><span class="line">1</span><br></pre></td><td class="code"><pre><span class="line">C:\Users\你的用户名/baidudisk/config</span><br></pre></td></tr></table></figure><p>✅ Docker Desktop 完全支持<br>✅ 不需要手动替换 <code>\</code> 或 <code>/</code><br>✅ <strong>必须加双引号</strong></p><hr><h2 id="四、最终推荐的一行命令"><a href="#四、最终推荐的一行命令" class="headerlink" title="四、最终推荐的一行命令"></a>四、最终推荐的一行命令</h2><figure class="highlight bash"><table><tr><td class="gutter"><pre><span class="line">1</span><br></pre></td><td class="code"><pre><span class="line">docker run -d --name baidunetdisk -p 5800:5800 -p 5900:5900 -v <span class="string">&quot;<span class="variable">$USERPROFILE</span>/baidudisk/config:/config&quot;</span> -v <span class="string">&quot;<span class="variable">$USERPROFILE</span>/baidudisk/downloads:/downloads&quot;</span> johngong/baidunetdisk:latest</span><br></pre></td></tr></table></figure><p><strong>服务访问端点</strong></p><table><thead><tr><th align="left">协议</th><th align="left">地址</th><th align="left">用途</th></tr></thead><tbody><tr><td align="left">HTTP</td><td align="left"><a href="http://127.0.0.1:5800/">http://127.0.0.1:5800</a></td><td align="left">noVNC Web 界面（推荐）</td></tr><tr><td align="left">VNC</td><td align="left"><code>127.0.0.1:5900</code></td><td align="left">原生 VNC 客户端接入</td></tr></tbody></table><p>在 Web 界面内，需将百度网盘的下载路径设置为 <code>/downloads</code>，该路径已映射到宿主机的 <code>$USERPROFILE/baidudisk/downloads</code>。</p><hr><h2 id="总结"><a href="#总结" class="headerlink" title="总结"></a>总结</h2><blockquote><p><strong>Git Bash + Docker Desktop：</strong></p><ul><li>不用 <code>~</code>，用 <code>$USERPROFILE</code></li><li><code>/config</code> 一定要干净</li><li>路径斜杠混用没问题</li><li>双引号必须有</li></ul></blockquote>]]>
    </content>
    <id>https://johnnyqian.net/blog/using-baidu-netdisk-with-docker.html</id>
    <link href="https://johnnyqian.net/blog/using-baidu-netdisk-with-docker.html"/>
    <published>2026-06-02T15:30:00.000Z</published>
    <summary>
      <![CDATA[<p>相信很多用户对百度网盘都有一种“又爱又恨”的复杂感情。它有丰富的云端资源，很多机构、第三方也用百度网盘给我们分享文件，但在下载体验上，却有一个让人极其头疼的痛点：<strong>为了下载文件，我们都必须忍受臃肿的 PC 客户端，忍受频繁的弹窗广告，甚至不得不让电脑保持长时间亮屏待机</strong>。这不仅消耗了电脑的性能，还浪费了大量的电能。</p>
<p>那么，有没有一种更优雅的解决方案呢？答案是肯定的。借助 Docker 技术，我们可以将百度网盘部署在 NAS、软路由甚至是闲置的 Windows 电脑上。通过网页端（Web）即可随时随地管理文件并实现 24 小时后台离线下载。本文将手把手教你如何在 Windows 环境下，利用 Docker Desktop 和 <code>johngong/baidunetdisk</code> 镜像轻松实现这一目标。]]>
    </summary>
    <title>Git Bash + Docker 运行百度网盘客户端VNC版</title>
    <updated>2026-11-04T15:17:54.171Z</updated>
  </entry>
  <entry>
    <author>
      <name>Johnny Qian</name>
    </author>
    <category term="API-Key" scheme="https://johnnyqian.net/tags/API-Key/"/>
    <category term="OAuth" scheme="https://johnnyqian.net/tags/OAuth/"/>
    <category term="AI 服务" scheme="https://johnnyqian.net/tags/AI-%E6%9C%8D%E5%8A%A1/"/>
    <category term="开发者体验" scheme="https://johnnyqian.net/tags/%E5%BC%80%E5%8F%91%E8%80%85%E4%BD%93%E9%AA%8C/"/>
    <content>
      <![CDATA[<p>传统的互联网巨头（如 Google, GitHub, Facebook）在开放平台时极力推崇 OAuth，而像 OpenAI, Anthropic, Google Gemini等 AI 巨头在面向开发者时，最显眼的接入方式却是 API-Key。那么，为什么 AI 服务提供商更倾向于使用 API-Key 而不是 OAuth 呢？本文将探讨其中的原因。<a id="more"></a></p><h2 id="核心逻辑的差异：谁在代表谁？"><a href="#核心逻辑的差异：谁在代表谁？" class="headerlink" title="核心逻辑的差异：谁在代表谁？"></a>核心逻辑的差异：谁在代表谁？</h2><p>理解这两个方案差异的关键在于：<strong>API 调用的主体是谁？</strong></p><ul><li><strong>OAuth 的核心是“代理授权”：</strong><br>OAuth 解决的问题是：<em>“用户（User）授权第三方应用（App）去访问用户在平台（Provider）上的私有数据。”</em> &gt; <strong>例子：</strong> 你授权一个修图软件访问你在 Google Photos 里的照片。这里涉及三方：你、修图软件、Google。OAuth 确保了修图软件拿不到你的密码。</li><li><strong>API-Key 的核心是“服务采购”：</strong><br>AI 服务的逻辑通常是：<em>“开发者（Developer）购买了 AI 能力，并将其集成到自己的产品中。”</em> &gt; <strong>例子：</strong> 你开发了一个翻译软件，你调用 GPT。这里本质上是两方：你（开发者）和 OpenAI。你不是在代表某个 OpenAI 的用户去访问他的数据，你是在使用你买来的“算力资源”。</li></ul><hr><h2 id="为什么-AI-厂商首选-API-Key？"><a href="#为什么-AI-厂商首选-API-Key？" class="headerlink" title="为什么 AI 厂商首选 API-Key？"></a>为什么 AI 厂商首选 API-Key？</h2><h3 id="极低的开发门槛（Developer-Experience）"><a href="#极低的开发门槛（Developer-Experience）" class="headerlink" title="极低的开发门槛（Developer Experience）"></a>极低的开发门槛（Developer Experience）</h3><p>AI 浪潮中，开发者追求的是 <strong>Time to First Hello World</strong>（从注册到跑通第一个 Demo 的时间）。</p><ul><li><strong>API-Key：</strong> 复制粘贴，一行代码即可调用。它不依赖前端环境，非常适合脚本、后台服务和 AI Agent。</li><li><strong>OAuth：</strong> 需要重定向回调地址、处理各种 Grant Type、维护 Access Token 和 Refresh Token 的生命周期。对于很多只想跑个模型的开发者来说，这太重了。</li></ul><h3 id="机器对机器（M2M）的通信模式"><a href="#机器对机器（M2M）的通信模式" class="headerlink" title="机器对机器（M2M）的通信模式"></a>机器对机器（M2M）的通信模式</h3><p>目前的 AI 应用绝大多数是<strong>服务器端调用</strong>。</p><ul><li>开发者在后台服务器里调用 AI 接口，处理完结果再返回给前端用户。这种场景下，服务器是一个受信任的环境，存储一个长效的 API-Key 是安全且高效的。</li><li>相比之下，OAuth 的优势在于处理不可信的客户端（如手机 App 或网页前端），这在目前的 AI 集成模式中并非主流。</li></ul><h3 id="计费模式的简洁性"><a href="#计费模式的简洁性" class="headerlink" title="计费模式的简洁性"></a>计费模式的简洁性</h3><p>AI 服务通常是<strong>按量计费（Token 计费）</strong>的。</p><ul><li><strong>API-Key</strong> 直接绑定的是开发者的<strong>账单账户</strong>。</li><li>如果使用 OAuth，逻辑会变得复杂：到底扣谁的 Token？是扣开发者的，还是扣最终授权用户的？在目前的商业模式下，AI 厂商更倾向于让开发者作为唯一的付费主体。</li></ul><hr><h2 id="未来的演进趋势"><a href="#未来的演进趋势" class="headerlink" title="未来的演进趋势"></a>未来的演进趋势</h2><p>值得注意的是，<strong>API Key主导的局面正在改变</strong>。随着AI服务深入企业核心业务流程，对安全性和细粒度控制的要求越来越高，OAuth 2.0正逐渐成为更受推崇的选择。</p><ul><li><strong>安全合规需求</strong>：API Key一旦泄露，就可能被滥用。而OAuth 2.0的短期访问令牌、可定义权限范围（scope）等特性，能提供更强大的安全保障。对于大型企业，为了审计和精细化权限控制，他们更倾向于使用 OAuth 2.0 的 <strong>Client Credentials Flow</strong> 来替代简单的 API-Key。</li><li><strong>场景复杂化</strong>：当AI服务需要访问企业内部的私有数据，或需要区分不同用户、不同部门的操作权限时，API Key就力不从心了。OAuth 2.0和其扩展协议OpenID Connect（OIDC）能更好地支持这些复杂场景。当 AI 服务需要代表最终用户访问其私有数据（如邮箱、日历、文件等）时，OAuth 成为必然选择。例如，OpenAI 的 GPT 插件商店允许用户授权 GPT 访问他们的第三方服务数据，这时 OAuth 就派上用场了。</li><li><strong>最佳实践融合</strong>：一些前沿的架构已经开始探索<strong>混合模式</strong>，即在网关层同时支持API Key和JWT（OAuth 2.0的常见令牌格式），根据场景灵活选用，兼顾易用性与安全性。</li></ul><h2 id="总结与对比"><a href="#总结与对比" class="headerlink" title="总结与对比"></a>总结与对比</h2><table><thead><tr><th>特性</th><th>API-Key (AI 厂商常用)</th><th>OAuth (传统社交/云平台常用)</th></tr></thead><tbody><tr><td><strong>交互对象</strong></td><td>机器 vs 机器 (M2M)</td><td>用户授权第三方应用</td></tr><tr><td><strong>复杂度</strong></td><td>极低，适合快速集成</td><td>较高，需要处理重定向和令牌刷新</td></tr><tr><td><strong>生命周期</strong></td><td>通常是长效的</td><td>短效 Token，安全性更高</td></tr><tr><td><strong>主要用途</strong></td><td>消耗资源、访问公共/算力服务</td><td>访问用户个人私有数据</td></tr><tr><td><strong>安全性</strong></td><td>密钥一旦泄露，权限较大</td><td>权限受限（Scope），风险可控</td></tr><tr><td><strong>计费对象</strong></td><td>开发者（购买算力）</td><td>最终用户（访问私有数据）</td></tr></tbody></table><p>总的来说，AI 服务提供商选择 API-Key 主要是为了简化开发者体验，适应机器对机器的通信模式，以及简化计费逻辑。随着 AI 应用的多样化，OAuth 也在特定场景下逐渐回归，但 API-Key 仍将是主流接入方式。</p>]]>
    </content>
    <id>https://johnnyqian.net/blog/why-use-api-key-for-ai-service.html</id>
    <link href="https://johnnyqian.net/blog/why-use-api-key-for-ai-service.html"/>
    <published>2026-01-19T06:13:23.000Z</published>
    <summary>
      <![CDATA[<p>传统的互联网巨头（如 Google, GitHub, Facebook）在开放平台时极力推崇 OAuth，而像 OpenAI, Anthropic, Google Gemini等 AI 巨头在面向开发者时，最显眼的接入方式却是 API-Key。那么，为什么 AI 服务提供商更倾向于使用 API-Key 而不是 OAuth 呢？本文将探讨其中的原因。]]>
    </summary>
    <title>AI 厂商为何偏爱 API-Key 而非 OAuth</title>
    <updated>2026-11-04T15:17:54.171Z</updated>
  </entry>
  <entry>
    <author>
      <name>Johnny Qian</name>
    </author>
    <content>
      <![CDATA[<p>在使用AI工具或寻求帮助时，当AI回复我的第一句话是 “这是一个好问题”、“这是一个非常敏锐的观察” 时，我总会感到欣慰。因为这意味着我提出的问题具有一定的价值和深度，能够引发有意义的讨论和回答。</p><p>多少好答案正在等待一个好问题。<a id="more"></a></p><p>我突然就想到了这句话。</p><p>我突然想到罗振宇老师在《时间的朋友》2022跨年演讲里提到的“好问题”这个概念。</p><p><img src="../images/202601/2026-01-18_200810.png" alt="good-question"></p><p>说实话，当时我并没有完全理解“好问题”的含义。直到今天，我才真正体会到，能提出一个好问题，需要具备一定的思考深度和洞察力、需要多学科、跨领域的知识积累。你才会在某个瞬间,灵光一现，提出一个好问题。就像AI大模型背后的人工神经网络一样，几千亿个神经元中的某几个神经元在某个瞬间被激活、连接，产生了一个“好问题”。在当今AI驱动的世界中，答案来的那么容易，提出好问题变得尤为重要。</p>]]>
    </content>
    <id>https://johnnyqian.net/blog/good-question.html</id>
    <link href="https://johnnyqian.net/blog/good-question.html"/>
    <published>2026-01-18T11:29:07.000Z</published>
    <summary>
      <![CDATA[<p>在使用AI工具或寻求帮助时，当AI回复我的第一句话是 “这是一个好问题”、“这是一个非常敏锐的观察” 时，我总会感到欣慰。因为这意味着我提出的问题具有一定的价值和深度，能够引发有意义的讨论和回答。</p>
<p>多少好答案正在等待一个好问题。]]>
    </summary>
    <title>多少好答案正在等待一个好问题</title>
    <updated>2026-11-04T15:17:54.169Z</updated>
  </entry>
  <entry>
    <author>
      <name>Johnny Qian</name>
    </author>
    <category term="微服务" scheme="https://johnnyqian.net/tags/%E5%BE%AE%E6%9C%8D%E5%8A%A1/"/>
    <category term="架构设计" scheme="https://johnnyqian.net/tags/%E6%9E%B6%E6%9E%84%E8%AE%BE%E8%AE%A1/"/>
    <category term="单体应用" scheme="https://johnnyqian.net/tags/%E5%8D%95%E4%BD%93%E5%BA%94%E7%94%A8/"/>
    <category term="迁移策略" scheme="https://johnnyqian.net/tags/%E8%BF%81%E7%A7%BB%E7%AD%96%E7%95%A5/"/>
    <category term="领域驱动设计" scheme="https://johnnyqian.net/tags/%E9%A2%86%E5%9F%9F%E9%A9%B1%E5%8A%A8%E8%AE%BE%E8%AE%A1/"/>
    <content>
      <![CDATA[<p>在软件开发的生命周期中，很多项目都是从单体应用 (Monolith) 开始的。它开发简单、部署方便。但随着业务规模的扩大，单体应用往往会变成一个臃肿的胖子：编译慢、部署难、牵一发而动全身。这时候，“微服务”就是一剂良药。但迁移并非简单的“拆分”，而是一场外科手术式的架构演进。<a id="more"></a></p><h2 id="为什么要迁移？"><a href="#为什么要迁移？" class="headerlink" title="为什么要迁移？"></a>为什么要迁移？</h2><p>在动手之前，我们需要明确目标。下表对比了两种架构的核心差异：</p><table><thead><tr><th>特性</th><th>单体架构 (Monolith)</th><th>微服务架构 (Microservices)</th></tr></thead><tbody><tr><td><strong>部署频率</strong></td><td>较低（需整体打包）</td><td>极高（独立部署）</td></tr><tr><td><strong>技术栈</strong></td><td>单一</td><td>灵活（各服务可选最适合的语言）</td></tr><tr><td><strong>扩展性</strong></td><td>只能整体垂直扩展</td><td>针对性水平扩展</td></tr><tr><td><strong>故障影响</strong></td><td>易引发级联崩溃</td><td>故障隔离，局部受损</td></tr><tr><td><strong>复杂度</strong></td><td>代码级复杂度低，运维简单</td><td>架构级复杂度高，运维挑战大</td></tr></tbody></table><h2 id="迁移策略"><a href="#迁移策略" class="headerlink" title="迁移策略"></a>迁移策略</h2><h3 id="1-止损策略"><a href="#1-止损策略" class="headerlink" title="1. 止损策略"></a>1. 止损策略</h3><p>当你的单体应用已经变得无法管理时，第一条法则便是停止让它继续变大。<strong>不要再往单体应用中添加新代码，而是在其外围构建新服务。</strong></p><p>这种策略下，系统架构包含三个主要部分：</p><ul><li><strong>新微服务</strong>：承载新开发的功能</li><li><strong>请求路由器</strong>：类似于API网关，将请求路由到新服务或单体应用</li><li><strong>胶水代码（防腐层）</strong>：连接微服务与单体应用，负责数据集成</li></ul><p>止损策略最大优点是防止单体应用进一步复杂化，但它<strong>不能解决单体应用现有的问题</strong>。</p><h3 id="2-核心策略：绞杀者模式-Strangler-Fig-Pattern"><a href="#2-核心策略：绞杀者模式-Strangler-Fig-Pattern" class="headerlink" title="2. 核心策略：绞杀者模式 (Strangler Fig Pattern)"></a>2. 核心策略：绞杀者模式 (Strangler Fig Pattern)</h3><p>直接推翻重写（即“大爆炸”式迁移）通常是灾难的开始。目前业界公认的最佳实践是<strong>绞杀者模式</strong>。</p><p>这种策略的核心思想是：<strong>从单体应用中逐步提取模块成为独立微服务。</strong> 随着时间的推移，新服务逐渐替代旧功能，单体应用最终“枯萎”并被移除。这种模式得名于热带雨林中的绞杀榕——它们缠绕着大树生长，最终大树死亡，只留下树形的藤蔓。</p><p><strong>如何选择优先提取的模块？</strong></p><ul><li><strong>变化频繁的模块</strong>：提取后可以加速开发进程。</li><li><strong>资源消耗大户</strong>：如内存数据库或计算密集型算法，提取后可以针对性优化资源分配。</li><li><strong>已有清晰边界的模块</strong>：如通过异步消息与其他部分交互的模块。</li></ul><hr><h2 id="迁移的关键步骤与动作"><a href="#迁移的关键步骤与动作" class="headerlink" title="迁移的关键步骤与动作"></a>迁移的关键步骤与动作</h2><h3 id="1-识别拆分边界-Bounded-Context"><a href="#1-识别拆分边界-Bounded-Context" class="headerlink" title="1. 识别拆分边界 (Bounded Context)"></a>1. 识别拆分边界 (Bounded Context)</h3><p>利用 <strong>领域驱动设计 (DDD)</strong> 的思想，找到业务的自然边界。例如，一个电商系统可以拆分为：</p><ul><li>用户服务 (User Service)</li><li>订单服务 (Order Service)</li><li>库存服务 (Inventory Service)</li><li>支付服务 (Payment Service)</li></ul><h3 id="2-逐步拆分单体应用"><a href="#2-逐步拆分单体应用" class="headerlink" title="2. 逐步拆分单体应用"></a>2. 逐步拆分单体应用</h3><p>采用<strong>增量方法</strong>，每次只拆分一个模块。拆分过程包括：</p><ol><li>在模块和单体应用间定义粗粒度接口</li><li>将模块转换为独立服务</li><li>通过IPC机制实现通信</li><li>验证新服务功能</li><li>逐步迁移流量到新服务</li></ol><h3 id="3-实现服务间通信"><a href="#3-实现服务间通信" class="headerlink" title="3. 实现服务间通信"></a>3. 实现服务间通信</h3><p>微服务之间需要通过轻量级机制进行通信。常用方式包括：</p><ul><li><strong>同步通信</strong>：REST API或gRPC</li><li><strong>异步通信</strong>：消息队列（如RabbitMQ、Kafka）</li></ul><h3 id="4-构建防腐层"><a href="#4-构建防腐层" class="headerlink" title="4. 构建防腐层"></a>4. 构建防腐层</h3><p>在新旧系统之间建立防腐层 (Anti-Corruption Layer)，确保新服务与单体应用之间的通信不会引入不必要的复杂性。防腐层可以包括：</p><ul><li>API 网关（如 Nginx, Kong 或 Spring Cloud Gateway）</li><li>消息队列</li><li>数据同步服务</li></ul><p><strong>初期：</strong> 网关将所有请求路由到单体。<br><strong>中期：</strong> 当你提取出一个新服务时，只需在网关层修改路由规则，将特定路径导向新服务。</p><h3 id="5-数据管理策略：最难的一环"><a href="#5-数据管理策略：最难的一环" class="headerlink" title="5. 数据管理策略：最难的一环"></a>5. 数据管理策略：最难的一环</h3><p>数据是迁移过程中最复杂的部分。常见的数据管理策略有：</p><ul><li><strong>数据库拆分</strong>：为每个微服务创建独立的数据库。</li><li><strong>数据复制</strong>：使用事件驱动架构同步数据。</li><li><strong>读写分离</strong>：新服务负责写操作，旧系统继续处理读操作。</li></ul><p>微服务的核心原则是<strong>数据库独立</strong>。</p><ul><li><strong>不要共享数据库：</strong> 如果两个服务读写同一张表，它们依然是耦合的。</li><li><strong>拆分步骤：</strong> 先在逻辑上拆分表，然后物理拆分数据库。对于跨服务的数据一致性，建议<strong>放弃追求传统的强一致性分布式事务</strong>（如 2PC/XA），转而采用 <strong>Saga 模式</strong> 或事件驱动架构来实现<strong>最终一致性</strong>。</li></ul><h3 id="6-基础设施自动化"><a href="#6-基础设施自动化" class="headerlink" title="6. 基础设施自动化"></a>6. 基础设施自动化</h3><p>微服务意味着你要管理几十甚至上百个进程。如果没有以下基础，请不要轻易迁移：</p><ul><li><strong>CI/CD：</strong> 自动化的测试与部署。</li><li><strong>容器化：</strong> Docker 和 Kubernetes 是微服务的标准配置。</li><li><strong>可观测性：</strong> 集中式日志 (ELK) 、指标监控（如Prometheus+Grafana）和链路追踪 (Jaeger/SkyWalking)。</li></ul><hr><h2 id="结语"><a href="#结语" class="headerlink" title="结语"></a>结语</h2><p>从单体到微服务的迁移是一项复杂且长期的任务，是一场<strong>马拉松而非短跑</strong>。它需要技术团队具备扎实的架构设计能力、良好的沟通协作能力以及持续改进的心态。<strong>微服务迁移本质上是组织架构的演进（康威定律），技术拆分只是第一步，团队的运维能力和自动化水平才是决定迁移能否成功的关键。</strong></p>]]>
    </content>
    <id>https://johnnyqian.net/blog/monolith-to-microservices-migration.html</id>
    <link href="https://johnnyqian.net/blog/monolith-to-microservices-migration.html"/>
    <published>2026-01-15T15:15:00.000Z</published>
    <summary>
      <![CDATA[<p>在软件开发的生命周期中，很多项目都是从单体应用 (Monolith) 开始的。它开发简单、部署方便。但随着业务规模的扩大，单体应用往往会变成一个臃肿的胖子：编译慢、部署难、牵一发而动全身。这时候，“微服务”就是一剂良药。但迁移并非简单的“拆分”，而是一场外科手术式的架构演进。]]>
    </summary>
    <title>从单体到微服务架构的演进</title>
    <updated>2026-11-04T15:17:54.170Z</updated>
  </entry>
  <entry>
    <author>
      <name>Johnny Qian</name>
    </author>
    <category term="分布式事务" scheme="https://johnnyqian.net/tags/%E5%88%86%E5%B8%83%E5%BC%8F%E4%BA%8B%E5%8A%A1/"/>
    <category term="微服务" scheme="https://johnnyqian.net/tags/%E5%BE%AE%E6%9C%8D%E5%8A%A1/"/>
    <category term="TCC" scheme="https://johnnyqian.net/tags/TCC/"/>
    <category term="Saga" scheme="https://johnnyqian.net/tags/Saga/"/>
    <category term="MQ" scheme="https://johnnyqian.net/tags/MQ/"/>
    <category term="Seata" scheme="https://johnnyqian.net/tags/Seata/"/>
    <content>
      <![CDATA[<p>在单体架构时代，我们依靠数据库的 <strong>ACID</strong> 特性就能高枕无忧。在微服务架构下，由于数据库被拆分（分库分表）或服务化，原本单机的 ACID 保证失效了。一个业务操作经常需要跨多个服务完成，例如一个简单的“下单”操作可能涉及订单、库存、支付等多个独立的服务和数据库。如何保证这些操作“要么都成功，要么都失败”？这就是<strong>分布式事务</strong>要解决的核心问题。<a id="more"></a></p><h2 id="分布式事务为什么这么难？"><a href="#分布式事务为什么这么难？" class="headerlink" title="分布式事务为什么这么难？"></a>分布式事务为什么这么难？</h2><p>在深入方案之前，我们必须掌握两个核心理论。</p><h3 id="1-CAP-定理"><a href="#1-CAP-定理" class="headerlink" title="1. CAP 定理"></a>1. CAP 定理</h3><p>在一个分布式系统中，以下三个要素最多只能同时实现两点：</p><ul><li><strong>Consistency（一致性）：</strong> 所有节点在同一时间的数据完全一致。</li><li><strong>Availability（可用性）：</strong> 服务一直可用，而且响应时间正常。</li><li><strong>Partition Tolerance（分区容错性）：</strong> 遇到网络分区（节点间通信故障）时，系统仍能继续服务。</li></ul><h4 id="分区容错性是什么"><a href="#分区容错性是什么" class="headerlink" title="分区容错性是什么"></a>分区容错性是什么</h4><p><strong>分区是常态，而非例外</strong>：分布式系统由多台通过网络连接的计算机构成，而网络是不可靠的。硬件故障、带宽拥塞、配置错误等都可能导致网络延迟或中断，使得系统中的部分节点无法正常通信，这就是<strong>网络分区</strong>。既然无法避免，系统就必须具备容忍分区错误的能力，这就是分区容错性的含义。分区容错性（P）是分布式系统必须保障的属性。你无法通过“不选择P”来换取CA。分布式事务为这么难，本质就是因为网络是不可靠的。</p><p><strong>P 是基础，决策在 C 和 A</strong>：正因为分区错误必然会发生，设计分布式系统时，<strong>分区容错性（P）是必须满足的前提</strong>。这引出了CAP定理的核心：当分区错误发生时，你无法同时保证强一致性和高可用性，必须在 <strong>C（一致性）</strong> 和 <strong>A（可用性）</strong> 之间做出选择。</p><h4 id="分区错误发生时的现实抉择"><a href="#分区错误发生时的现实抉择" class="headerlink" title="分区错误发生时的现实抉择"></a>分区错误发生时的现实抉择</h4><p>当网络出现分区错误，系统某些节点间无法通信时，你面临一个两难选择：</p><p><strong>选择 CP（一致性优先）</strong></p><ul><li><strong>做法</strong>：如果无法保证数据是最新的，系统将拒绝服务（例如返回一个错误或超时），直到数据同步完成。</li><li><strong>场景</strong>：适用于对数据准确性要求极高的场景。例如，<strong>银行转账系统</strong>或<strong>金融交易系统</strong>，宁可暂时停止服务，也绝不能出现数据不一致。</li></ul><p><strong>选择 AP（可用性优先）</strong></p><ul><li><strong>做法</strong>：系统始终响应请求，即使返回的数据可能是过时的。系统会接受暂时的数据不一致，并在网络恢复后通过同步机制逐步达到最终一致。</li><li><strong>场景</strong>：适用于对用户体验和系统可用性要求更高的场景。例如，<strong>电商网站的商品详情页</strong>或<strong>社交媒体的动态信息</strong>，让用户先看到可能略旧的信息，远比长时间等待或报错要好。</li></ul><h3 id="2-BASE-理论"><a href="#2-BASE-理论" class="headerlink" title="2. BASE 理论"></a>2. BASE 理论</h3><p>在实际应用中，纯粹的强一致性（CP）（往往会导致性能瓶颈）或高可用性（AP）可能过于绝对。因此，互联网大厂更多采用 <strong>BASE 理论</strong>作为AP系统的实践指南，它强调<strong>基本可用</strong>、<strong>软状态</strong>和<strong>最终一致性</strong>，在保证高可用的前提下，尽可能地接近数据一致。例如，你在电商平台下单时，库存可能不会立即锁定，而是通过异步方式处理，这背后就是BASE思想的体现。</p><ul><li><strong>Basically Available（基本可用）</strong></li><li><strong>Soft state（软状态）：</strong> 允许数据存在中间状态。</li><li><strong>Eventually consistent（最终一致性）：</strong> 不要求实时一致，但经过一段时间后，数据必须达成一致。</li></ul><hr><h2 id="分布式事务方案"><a href="#分布式事务方案" class="headerlink" title="分布式事务方案"></a>分布式事务方案</h2><h3 id="经典方案：强一致性模型-2PC-3PC"><a href="#经典方案：强一致性模型-2PC-3PC" class="headerlink" title="经典方案：强一致性模型 (2PC/3PC)"></a>经典方案：强一致性模型 (2PC/3PC)</h3><p>如果是传统企业级应用，追求数据的绝对准确（如金融转账），对强一致性有严格要求，且能接受其性能瓶颈的场景，那么会考虑这些方案。</p><p><strong>2PC (Two-Phase Commit) 两阶段提交</strong></p><p>这是最经典的分布式事务协议，它引入事务协调器（Transaction Coordinator），分准备和提交两个阶段，所有参与者都同意后才提交：</p><ol><li><strong>准备阶段 (Prepare)：</strong> 协调者询问所有参与者是否准备好提交。</li><li><strong>提交阶段 (Commit)：</strong> 如果大家都 OK，则下令提交；只要有一个不行，则下令回滚。</li></ol><p><strong>缺点</strong>是<strong>同步阻塞</strong>（性能差）、<strong>单点故障</strong>（协调者挂了就瘫痪）、<strong>数据不一致</strong>（第二阶段如果部分节点没收到 Commit 指令）。</p><p><strong>3PC (Three-Phase Commit)</strong></p><p>为了解决 2PC 的阻塞问题，引入了 <strong>CanCommit、PreCommit、DoCommit</strong> 三个阶段，并加入了<strong>超时机制</strong>。虽然缓解了阻塞，但依然无法完全解决网络分区导致的数据不一致。</p><h3 id="现代主流：最终一致性模型-TCC-Saga-MQ"><a href="#现代主流：最终一致性模型-TCC-Saga-MQ" class="headerlink" title="现代主流：最终一致性模型 (TCC/Saga/MQ)"></a>现代主流：最终一致性模型 (TCC/Saga/MQ)</h3><p>在高性能要求的互联网场景中，这些方案才是主角。</p><h3 id="1-TCC-Try-Confirm-Cancel"><a href="#1-TCC-Try-Confirm-Cancel" class="headerlink" title="1. TCC (Try-Confirm-Cancel)"></a>1. TCC (Try-Confirm-Cancel)</h3><p>TCC（Try-Confirm-Cancel）是一种基于业务补偿的分布式事务解决方案，它通过将业务操作拆分为三个核心阶段（尝试、确认、取消）来保证分布式系统下数据的最终一致性，属于应用层面的二阶段提交。</p><ul><li><strong>Try：</strong> 检测及预留业务资源（如：冻结余额）。</li><li><strong>Confirm：</strong> 确认执行业务操作（不进行任何业务检查，只使用 Try 预留的资源）。</li><li><strong>Cancel：</strong> 取消执行，释放预留资源（回滚）。</li></ul><p>实现一个健壮的 TCC 事务，必须处理好以下三个核心问题：</p><ul><li><strong>空回滚问题</strong>：当 Cancel 阶段执行时，可能会发现 Try 阶段根本没有成功执行（例如网络异常导致 Try 请求未到达）。此时，Cancel 阶段不应执行任何操作，以避免对业务数据造成错误影响。解决方案通常是在 Cancel 阶段检查 Try 是否成功执行，如果没有成功，则直接返回，不进行任何操作。</li><li><strong>幂等控制</strong>：由于网络问题，Confirm 或 Cancel 阶段可能会被多次调用。为了防止重复执行导致的数据错误，必须确保 Confirm 和 Cancel 操作是幂等的。常见的做法是使用唯一事务 ID 来标识每个事务，并在 Confirm 和 Cancel 阶段检查该 ID 是否已经处理过。</li><li><strong>悬挂问题</strong>：如果在 Try 阶段成功后，Confirm 阶段由于网络问题未能及时执行，可能会导致资源长时间被锁定，影响系统性能。为了解决这个问题，可以设置超时机制，在一定时间内未执行 Confirm，则自动触发 Cancel 操作，释放资源。</li></ul><h3 id="2-Saga-模式"><a href="#2-Saga-模式" class="headerlink" title="2. Saga 模式"></a>2. Saga 模式</h3><p>Saga（Sequentially Consistent Autonomous Global Transactions）将一个长事务（Long-running-transaction）拆分为多个本地短事务，按顺序执行。每个短事务都有一个对应的补偿事务。</p><ul><li><strong>流程：</strong> T<sub>1</sub> → T<sub>2</sub> → T<sub>3</sub>。</li><li><strong>异常处理：</strong> 如果 T<sub>2</sub> 失败，则执行 C<sub>2</sub> → C<sub>1</sub> 的补偿事务进行回滚。</li><li><strong>特点：</strong> 适用于业务流程长、参与者多的场景，如电商下单（创建订单→扣库存→支付）。</li></ul><h3 id="3-可靠消息最终一致性-MQ"><a href="#3-可靠消息最终一致性-MQ" class="headerlink" title="3. 可靠消息最终一致性 (MQ)"></a>3. 可靠消息最终一致性 (MQ)</h3><p>可靠消息最终一致性是分布式系统中保证数据最终一致性的重要方案，特别适用于<strong>跨服务的异步场景</strong>。其核心思想是将本地事务和消息发送绑定在一起，确保两者要么都成功，要么都失败。常见的实现方式有两种：</p><p>利用消息中间件（如 RocketMQ）的<strong>事务消息</strong>功能。</p><ol><li><strong>发送半消息 (Half Message)：</strong> 生产者先发一条“暂不可投递”的消息给 MQ。</li><li><strong>MQ 返回确认：</strong> MQ 收到并持久化消息，返回 ACK。此时消费者还看不见这条消息。</li><li><strong>执行本地事务：</strong> 生产者在收到确认后，才开始执行本地事务。</li><li><strong>提交/回滚：</strong> 如果本地事务成功，发送 <code>Commit</code> 给 MQ，消息对消费者可见。如果本地事务失败，发送 <code>Rollback</code> 给 MQ，消息被删除。</li><li><strong>回查机制（Transaction Status Check）（核心）：</strong> 如果第 4 步的确认信号因为网络原因丢了，MQ 会主动询问生产者：“你那个 ID 为 XXX 的本地事务到底成没成功？”</li><li><strong>下游消费消息并执行。</strong></li></ol><p>如果 MQ 不支持事务消息，通常会采用 <strong>本地消息表</strong> (Outbox Pattern)。</p><ol><li><strong>在一个本地事务里：</strong> 既保存订单，又在同一数据库的一张 <code>message_outbox</code> 表里插入一条消息记录。</li><li><strong>原子性保证：</strong> 利用关系型数据库的事务特性，保证了“订单”和“待发送消息”要么一起成功，要么一起失败。</li><li><strong>分布式投递：</strong> 启动一个后台线程不断扫描 <code>message_outbox</code> 表，把消息发给 MQ，直到发送成功再删除记录。</li></ol><p>在分布式事务的 <strong>可靠消息最终一致性</strong> 方案中，处理下游失败的核心思想是：<strong>“只许成功，不许失败；如果失败，重试到底；实在不行，人工接入。”</strong>因为在这一步，上游事务已经提交，无法回滚。</p><blockquote><p>MQ 模式之所以是分布式事务，是因为它面临着<strong>本地数据库更新与远程消息发送之间的原子性挑战</strong>。<br>仅仅在代码里写‘发消息’是不够的，因为网络或宕机可能导致‘数据库变了但消息没发’。我们必须通过 <strong>RocketMQ 的事务消息（半消息+回查）</strong> 或者 <strong>本地消息表（Outbox Pattern）</strong>，将这两个跨系统的操作‘绑定’在一起，从而实现上游和下游的最终一致性。</p></blockquote><hr><h2 id="工业级利器：Seata"><a href="#工业级利器：Seata" class="headerlink" title="工业级利器：Seata"></a>工业级利器：Seata</h2><p><a href="https://seata.io/">Seata</a> (Simple Extensible Autonomous Transaction Architecture)是阿里巴巴开源的分布式事务解决方案，支持多种分布式事务模型（如 TCC、AT、Saga、XA）。它通过引入全局事务管理器（TC）和资源管理器（RM），实现了对分布式事务的统一协调和管理。其中的<strong>AT 模式</strong>最常用，它基于无侵入的自动补偿机制。通过拦截 SQL，自动生成反向 SQL，并记录更新前后的快照（Undo Log），在回滚时自动还原，代码侵入极小。</p><h2 id="总结"><a href="#总结" class="headerlink" title="总结"></a>总结</h2><p>处理微服务分布式事务的核心思想是从传统的强一致性转向最终一致性，并通过补偿机制来实现回滚。选择时需要在一致性、性能、系统复杂度和开发成本之间做出权衡。</p>]]>
    </content>
    <id>https://johnnyqian.net/blog/distributed-transaction.html</id>
    <link href="https://johnnyqian.net/blog/distributed-transaction.html"/>
    <published>2026-01-15T06:57:46.000Z</published>
    <summary>
      <![CDATA[<p>在单体架构时代，我们依靠数据库的 <strong>ACID</strong> 特性就能高枕无忧。在微服务架构下，由于数据库被拆分（分库分表）或服务化，原本单机的 ACID 保证失效了。一个业务操作经常需要跨多个服务完成，例如一个简单的“下单”操作可能涉及订单、库存、支付等多个独立的服务和数据库。如何保证这些操作“要么都成功，要么都失败”？这就是<strong>分布式事务</strong>要解决的核心问题。]]>
    </summary>
    <title>分布式事务简述</title>
    <updated>2026-11-04T15:17:54.167Z</updated>
  </entry>
  <entry>
    <author>
      <name>Johnny Qian</name>
    </author>
    <category term="Web安全" scheme="https://johnnyqian.net/tags/Web%E5%AE%89%E5%85%A8/"/>
    <category term="CSRF" scheme="https://johnnyqian.net/tags/CSRF/"/>
    <category term="网络安全" scheme="https://johnnyqian.net/tags/%E7%BD%91%E7%BB%9C%E5%AE%89%E5%85%A8/"/>
    <content>
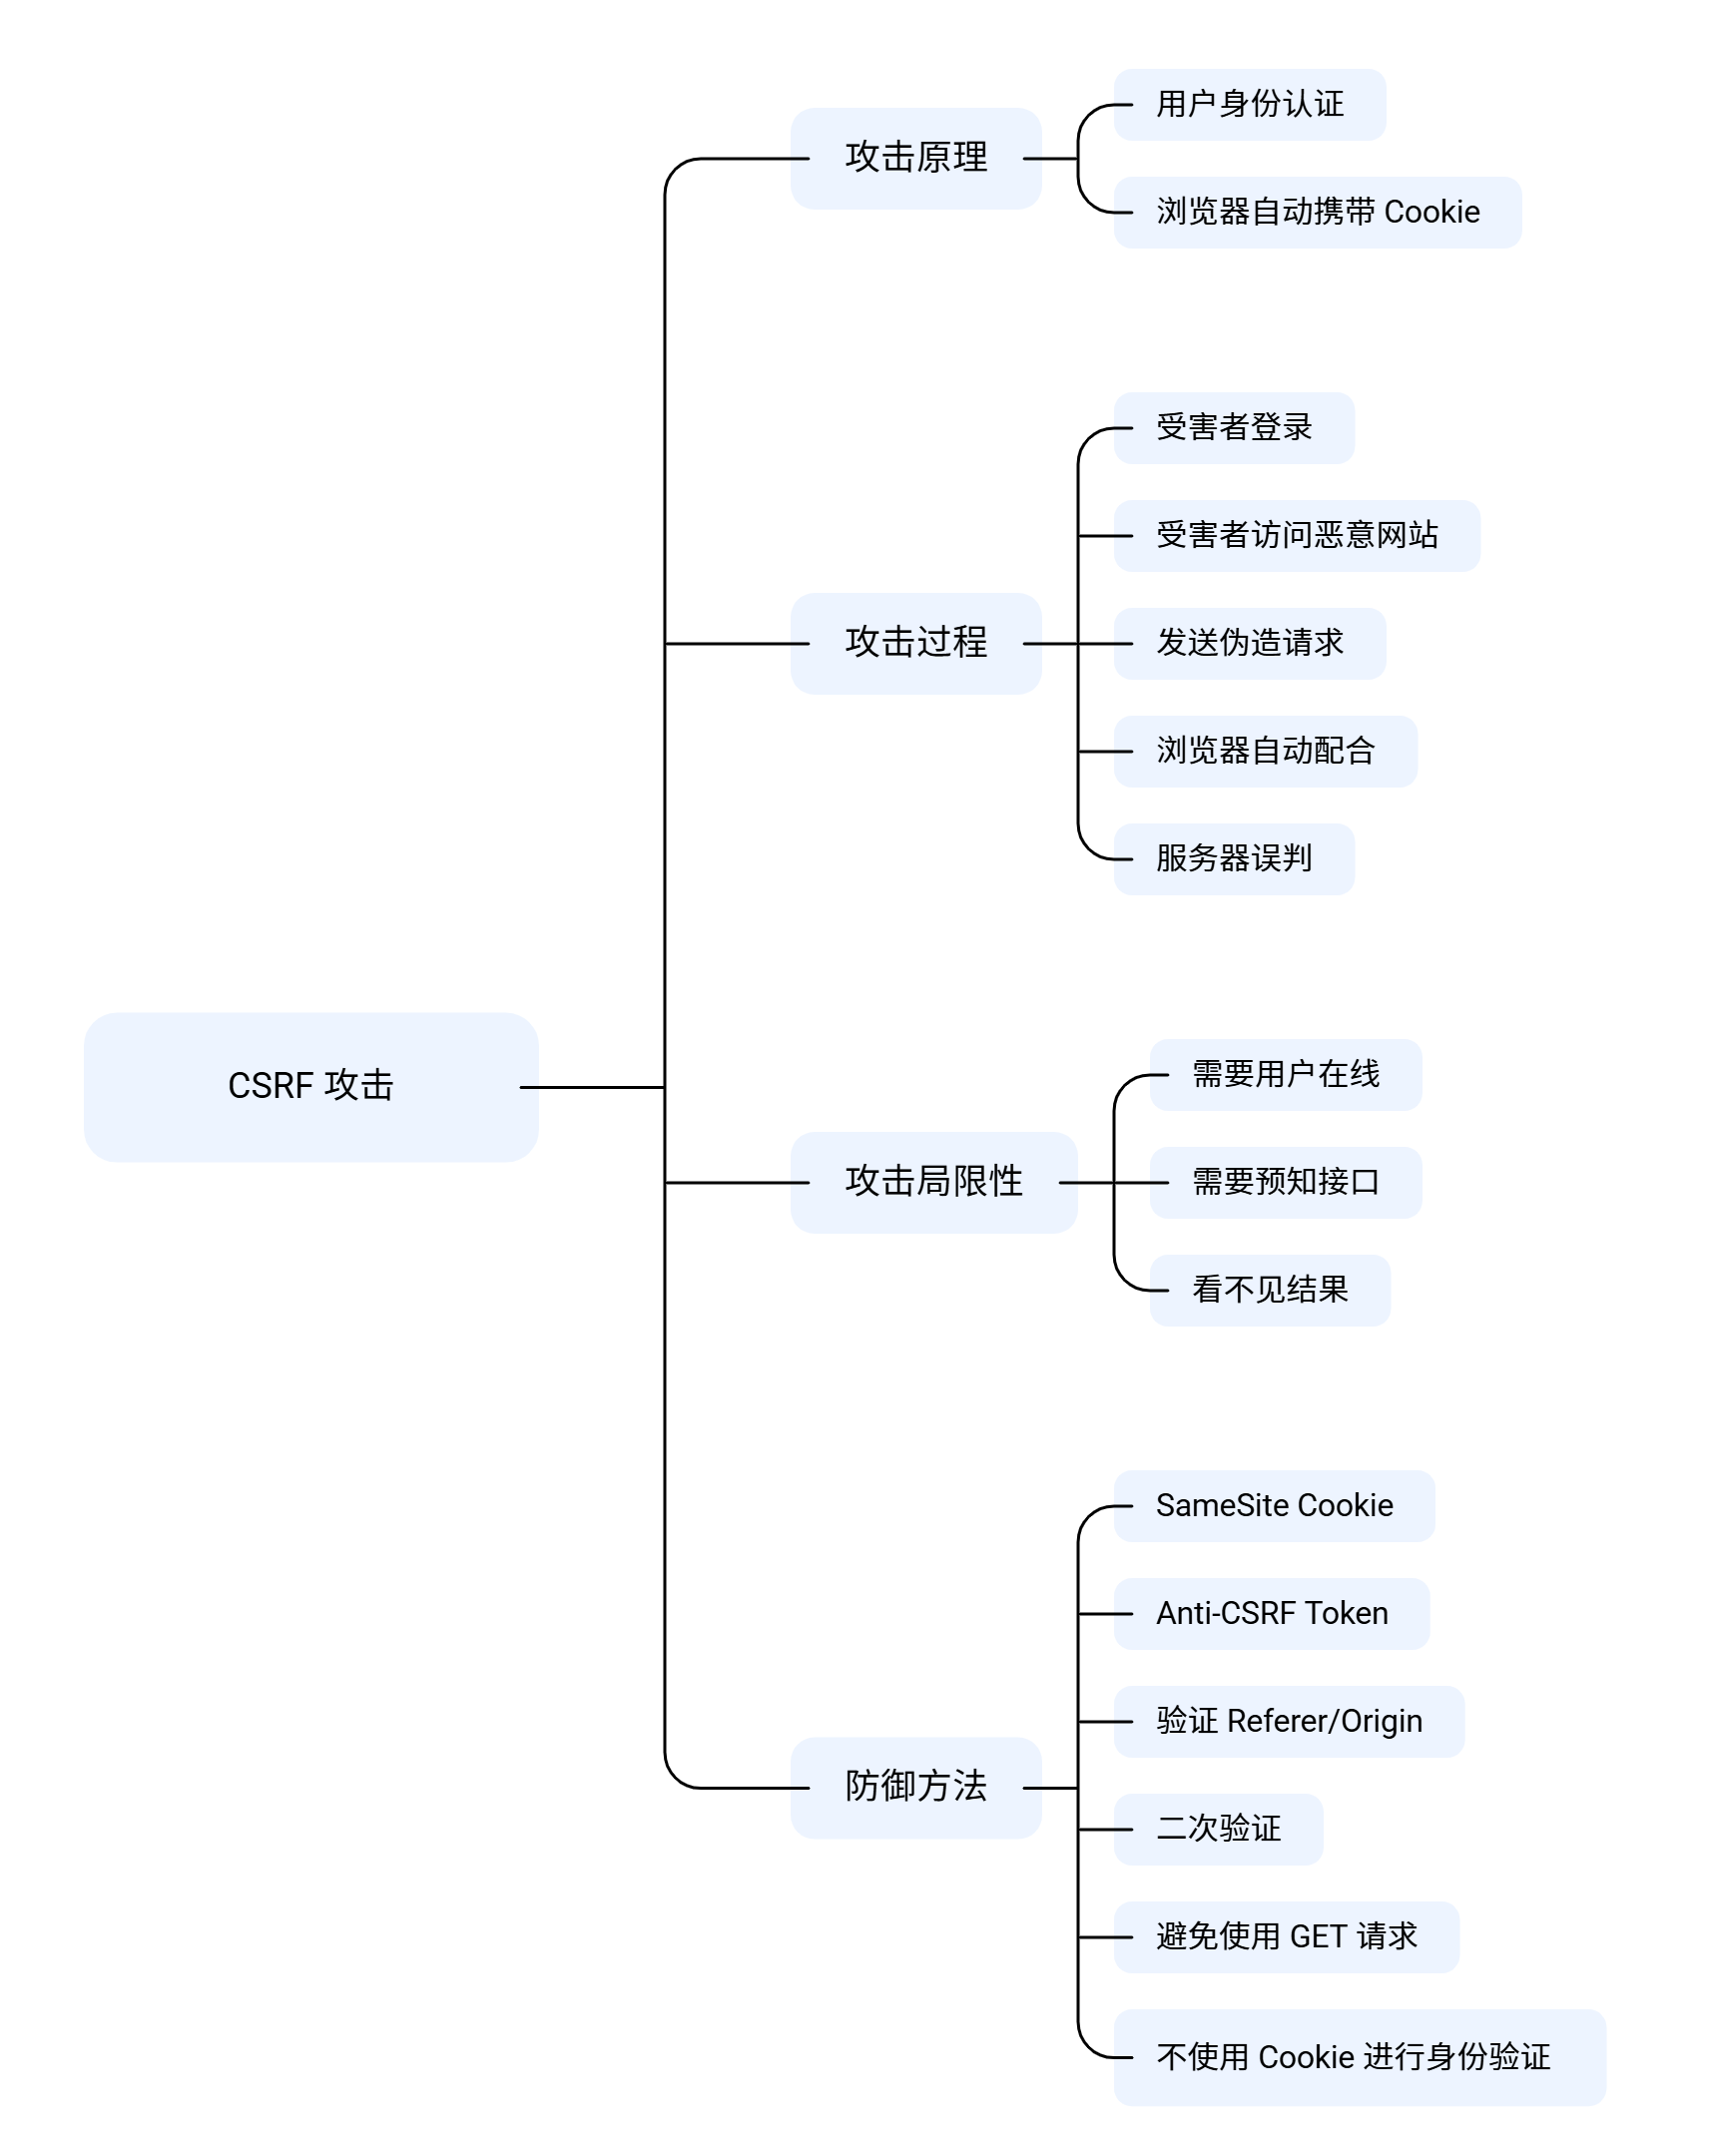
      <![CDATA[<p>CSRF（Cross-Site Request Forgery，跨站请求伪造）是一种经典的 Web 安全漏洞。CSRF 攻击利用了用户在已认证的站点上的身份，诱使用户在不知情的情况下执行恶意操作。攻击者通常通过构造恶意链接或表单，诱导用户点击或提交，从而在用户不知情的情况下发送请求到受信任的网站。<a id="more"></a></p><p><img src="/images/202601/csrf.png" alt="CSRF 攻击原理图解" style="margin:auto; width:70%" /><span></span></p><h2 id="CSRF-攻击原理"><a href="#CSRF-攻击原理" class="headerlink" title="CSRF 攻击原理"></a>CSRF 攻击原理</h2><p>CSRF 攻击的基本原理是利用用户在受信任网站上的身份认证状态。当用户登录某个网站并获得身份验证后，浏览器会存储相关的 Cookie 或会话信息。攻击者通过诱导用户访问恶意网站，利用浏览器自动携带的身份认证信息，向受信任的网站发送伪造的请求。这些请求看起来像是用户自己发起的，因此受信任的网站会执行相应的操作。我们可以把 CSRF 形象地理解为：<strong>“借你的手，办他的事。”</strong></p><hr><h3 id="CSRF-攻击的发生过程"><a href="#CSRF-攻击的发生过程" class="headerlink" title="CSRF 攻击的发生过程"></a>CSRF 攻击的发生过程</h3><p>CSRF 能够成功的核心前提是：<strong>浏览器在发送请求时，会自动带上目标网站的 Cookie。</strong></p><p>以下是一个典型的攻击流程：</p><ol><li><strong>受害者登录：</strong> 你登录了银行网站 <code>Bank.com</code>，并在本地浏览器留下了登录态（Session Cookie）。</li><li><strong>受害者访问恶意网站：</strong> 在没有退出登录的情况下，你被诱导点击了一个链接或进入了黑客控制的恶意网站 <code>Evil.com</code>。</li><li><strong>发送伪造请求：</strong> <code>Evil.com</code> 页面中隐藏了一段代码（可能是个自动提交的表单，或者一个隐藏的图片标签），它会指向 <code>Bank.com</code> 的转账接口：<code>http://Bank.com/transfer?to=hacker&amp;amount=10000</code>。</li><li><strong>浏览器自动配合：</strong> 当你的浏览器去请求 <code>Bank.com</code> 时，它会发现“哦，我有这个网站的 Cookie”，于是<strong>自动把你的登录凭证带上了</strong>。</li><li><strong>服务器误判：</strong> 银行服务器收到了请求，验证了 Cookie 发现确实是你，于是执行了转账操作。</li></ol><hr><h3 id="CSRF为什么能成功？"><a href="#CSRF为什么能成功？" class="headerlink" title="CSRF为什么能成功？"></a>CSRF为什么能成功？</h3><p>CSRF 的成功主要利用了两个弱点：</p><ul><li><strong>浏览器的自动机制：</strong> 只要域名匹配，浏览器发送请求时会自动携带该域名的 Cookie。它无法区分这个请求是你在 <code>Bank.com</code> 页面上点下的，还是在 <code>Evil.com</code> 页面里被代码触发的。</li><li><strong>缺乏请求来源验证：</strong> 许多网站没有对请求的来源进行严格验证，导致服务器无法区分合法请求和伪造请求。</li></ul><hr><h3 id="攻击的局限性"><a href="#攻击的局限性" class="headerlink" title="攻击的局限性"></a>攻击的局限性</h3><p>虽然 CSRF 很危险，但它也有明显的局限：</p><ul><li><strong>需要用户在线：</strong> 受害者必须处于登录状态，且 Cookie 尚未过期。</li><li><strong>需要预知接口：</strong> 攻击者必须事先知道目标网站的接口细节（例如 URL、参数名）。如果接口参数包含不可预测的随机值，攻击就很难奏效。</li><li><strong>看不见结果：</strong> 攻击者只能“发起”请求，也即是 “Fire and Forget”。由于浏览器的“同源策略”（Same-Origin Policy），攻击者无法跨域读取 <code>Bank.com</code> 返回的响应内容（他拿不到你的余额）。</li></ul><hr><h2 id="如何防御-CSRF？"><a href="#如何防御-CSRF？" class="headerlink" title="如何防御 CSRF？"></a>如何防御 CSRF？</h2><p>知道了 CSRF 的原理和局限性后，我们就可以针对性地采取多种措施来防御这种攻击。</p><ol><li><p><strong>SameSite Cookie</strong>：通过设置 Cookie 的 <code>SameSite</code> 属性为 <code>Strict</code> 或 <code>Lax</code>，可以限制浏览器在跨站请求时发送 Cookie，从而防止 CSRF 攻击。</p><blockquote><p>现代浏览器（如 Chrome、Firefox）默认将 Cookie 的 <code>SameSite</code> 属性设置为 <code>Lax</code>，大大降低了 CSRF 攻击的风险。</p><ul><li><code>Strict</code>：完全禁止跨站请求携带 Cookie。</li><li><code>Lax</code>：放宽限制，允许跨站GET请求携带 Cookie。</li></ul></blockquote></li><li><p><strong>Anti-CSRF Token</strong>：在传统的服务端渲染Web框架中，服务器在返回的页面表单中嵌入一个随机生成的Token（通常与用户会话关联）。当提交表单（如转账）时，必须携带这个Token供服务器验证。攻击者无法预知这个 Token，因此无法伪造有效请求。例如在ASP.NET MVC Razor中，可以使用<code>@Html.AntiForgeryToken()</code>生成Token，并在控制器中使用<code>[ValidateAntiForgeryToken]</code>属性进行验证。而在单页面应用（SPA）中，可以通过在请求头中添加 CSRF Token 来实现类似的防护。这个Token可以在用户登录后由服务器生成并通过API传递给前端，前端在每次发送修改状态的请求时，将该Token包含在请求头中（例如 <code>X-CSRF-Token</code>）。服务器在接收到请求时，验证该Token的有效性，从而防止CSRF攻击。</p><blockquote><p>Anti-CSRF Token在SPA中依然有效，需要调整为<code>令牌-头</code>模式，而非传统的<code>令牌-表单</code>模式。</p></blockquote></li><li><p><strong>验证 Referer/Origin</strong>：服务器检查请求的 <code>Referer</code> 或 <code>Origin</code> 头，确保请求来源于受信任的域名，否则拒绝请求。</p></li><li><p><strong>二次验证</strong>：对于敏感操作（如转账、修改密码），要求用户进行额外的验证步骤，如输入验证码或支付密码。</p></li><li><p><strong>避免使用 GET 请求进行状态更改</strong>：确保所有会修改服务器状态的操作（如转账、删除）都使用 POST、PUT 或 DELETE 请求，而不是 GET 请求。因为 GET 请求更容易被 CSRF 利用。</p></li><li><p><strong>不使用 Cookie 进行身份验证</strong>：采用基于 Token 的身份验证（如 JWT），并将 Token 存储在浏览器的 <code>localStorage</code> 或 <code>sessionStorage</code> 中，而不是 Cookie 中。这样，跨站请求时不会自动携带身份验证信息。这种做法对 CSRF 攻击有天然免疫力。但需要警惕另一个主要威胁：<strong>跨站脚本攻击（XSS）</strong>。</p></li></ol><p>通过以上多种防御措施的结合使用，可以有效降低 CSRF 攻击的风险，保护用户的账户安全和数据完整性。</p><hr><h2 id="总结"><a href="#总结" class="headerlink" title="总结"></a>总结</h2><p>CSRF 利用了服务器对浏览器（Cookie）的盲目信任以及浏览器会自动在发往目标网站的请求中附上用户的认证凭证。现在的浏览器默认行为（如 Chrome 的 SameSite 默认限制）已经让简单的 CSRF 攻击变得越来越难，但在开发接口时，依然必须保持警惕。</p>]]>
    </content>
    <id>https://johnnyqian.net/blog/csrf.html</id>
    <link href="https://johnnyqian.net/blog/csrf.html"/>
    <published>2026-01-14T16:00:00.000Z</published>
    <summary>
      <![CDATA[<p>CSRF（Cross-Site Request Forgery，跨站请求伪造）是一种经典的 Web 安全漏洞。CSRF 攻击利用了用户在已认证的站点上的身份，诱使用户在不知情的情况下执行恶意操作。攻击者通常通过构造恶意链接或表单，诱导用户点击或提交，从而在用户不知情的情况下发送请求到受信任的网站。]]>
    </summary>
    <title>一张图彻底搞懂CSRF</title>
    <updated>2026-11-04T15:17:54.171Z</updated>
  </entry>
  <entry>
    <author>
      <name>Johnny Qian</name>
    </author>
    <category term="ASP.NET Core" scheme="https://johnnyqian.net/tags/ASP-NET-Core/"/>
    <category term="EF Core" scheme="https://johnnyqian.net/tags/EF-Core/"/>
    <category term="多租户" scheme="https://johnnyqian.net/tags/%E5%A4%9A%E7%A7%9F%E6%88%B7/"/>
    <category term="Multi-tenancy" scheme="https://johnnyqian.net/tags/Multi-tenancy/"/>
    <content>
      <![CDATA[<p>目前大多数软件应用程序都是围绕<strong>多租户（Multi-tenancy）</strong>的概念构建的。一个应用程序为多个客户（租户）服务，同时保持他们的数据相互隔离。<a id="more"></a></p><p>实现多租户通常有两种主要方法：</p><ol><li><strong>单个数据库与租户的逻辑隔离</strong></li><li><strong>多个数据库与租户的物理隔离</strong></li></ol><p>选择哪种方案主要取决于你的业务需求。例如，医疗保健等行业对数据隔离有极高要求，因此通常必须为每个租户使用独立的数据库。那么，我们该如何使用 EF Core 来实现多租户支持呢？</p><hr><h2 id="基于单个数据库的多租户实现"><a href="#基于单个数据库的多租户实现" class="headerlink" title="基于单个数据库的多租户实现"></a>基于单个数据库的多租户实现</h2><p>要在单个数据库上实现多租户，你需要解决两件事：</p><ol><li><strong>识别当前租户</strong>：知道当前请求属于哪个租户。</li><li><strong>数据过滤</strong>：确保只查询到属于该租户的数据。</li></ol><p>典型的做法是在表中添加一个 <code>TenantId</code> 列，并在查询时通过该列进行过滤。我们可以在 <code>DbContext</code> 的 <code>OnModelCreating</code> 方法中配置全局查询过滤器：</p><figure class="highlight csharp"><table><tr><td class="gutter"><pre><span class="line">1</span><br><span class="line">2</span><br><span class="line">3</span><br><span class="line">4</span><br><span class="line">5</span><br><span class="line">6</span><br><span class="line">7</span><br><span class="line">8</span><br><span class="line">9</span><br><span class="line">10</span><br><span class="line">11</span><br><span class="line">12</span><br><span class="line">13</span><br><span class="line">14</span><br><span class="line">15</span><br><span class="line">16</span><br><span class="line">17</span><br><span class="line">18</span><br><span class="line">19</span><br><span class="line">20</span><br></pre></td><td class="code"><pre><span class="line"><span class="keyword">public</span> <span class="keyword">class</span> <span class="title">OrdersDbContext</span> : <span class="title">DbContext</span></span><br><span class="line">&#123;</span><br><span class="line">    <span class="keyword">private</span> <span class="keyword">readonly</span> <span class="built_in">string</span> _tenantId;</span><br><span class="line"></span><br><span class="line">    <span class="function"><span class="keyword">public</span> <span class="title">OrdersDbContext</span>(<span class="params"></span></span></span><br><span class="line"><span class="params"><span class="function">        DbContextOptions&lt;OrdersDbContext&gt; options,</span></span></span><br><span class="line"><span class="params"><span class="function">        TenantProvider tenantProvider</span>) : <span class="title">base</span>(<span class="params">options</span>)</span></span><br><span class="line">    &#123;</span><br><span class="line">        <span class="comment">// 从提供程序中获取当前租户 ID</span></span><br><span class="line">        _tenantId = tenantProvider.TenantId;</span><br><span class="line">    &#125;</span><br><span class="line"></span><br><span class="line">    <span class="function"><span class="keyword">protected</span> <span class="keyword">override</span> <span class="keyword">void</span> <span class="title">OnModelCreating</span>(<span class="params">ModelBuilder modelBuilder</span>)</span></span><br><span class="line">    &#123;</span><br><span class="line">        modelBuilder</span><br><span class="line">            .Entity&lt;Order&gt;()</span><br><span class="line">            .HasQueryFilter(o =&gt; o.TenantId == _tenantId);</span><br><span class="line">    &#125;</span><br><span class="line">&#125;</span><br><span class="line"></span><br></pre></td></tr></table></figure><blockquote><p>查询过滤器是 EF Core 提供的一项强大功能，允许你为实体类型定义全局过滤条件。这样，每次查询该实体时，EF Core 都会自动应用这些过滤条件。</p><ul><li>通过在实体上调用 <code>HasQueryFilter</code> 来配置查询过滤器。</li><li>EF Core 会将该过滤器应用于该实体的所有查询。</li><li>你可以使用 <code>IgnoreQueryFilters</code> 手动关闭它。</li><li>每个实体仅允许定义一个查询过滤器。</li></ul></blockquote><p>在上面的代码中，我们通过 <code>TenantProvider</code> 获取当前租户的 ID，并在查询过滤器中使用它来确保只返回属于该租户的订单。其实现如下：</p><figure class="highlight csharp"><table><tr><td class="gutter"><pre><span class="line">1</span><br><span class="line">2</span><br><span class="line">3</span><br><span class="line">4</span><br><span class="line">5</span><br><span class="line">6</span><br><span class="line">7</span><br><span class="line">8</span><br><span class="line">9</span><br><span class="line">10</span><br><span class="line">11</span><br><span class="line">12</span><br><span class="line">13</span><br><span class="line">14</span><br><span class="line">15</span><br><span class="line">16</span><br></pre></td><td class="code"><pre><span class="line"><span class="keyword">public</span> <span class="keyword">sealed</span> <span class="keyword">class</span> <span class="title">TenantProvider</span></span><br><span class="line">&#123;</span><br><span class="line">    <span class="keyword">private</span> <span class="keyword">const</span> <span class="built_in">string</span> TenantIdHeaderName = <span class="string">&quot;X-TenantId&quot;</span>;</span><br><span class="line">    <span class="keyword">private</span> <span class="keyword">readonly</span> IHttpContextAccessor _httpContextAccessor;</span><br><span class="line"></span><br><span class="line">    <span class="function"><span class="keyword">public</span> <span class="title">TenantProvider</span>(<span class="params">IHttpContextAccessor httpContextAccessor</span>)</span></span><br><span class="line">    &#123;</span><br><span class="line">        _httpContextAccessor = httpContextAccessor;</span><br><span class="line">    &#125;</span><br><span class="line"></span><br><span class="line">    <span class="keyword">public</span> <span class="built_in">string</span> TenantId =&gt; _httpContextAccessor</span><br><span class="line">        .HttpContext</span><br><span class="line">        .Request</span><br><span class="line">        .Headers[TenantIdHeaderName];</span><br><span class="line">&#125;</span><br><span class="line"></span><br></pre></td></tr></table></figure><p>在此示例中，<code>TenantId</code> 是从 HTTP 请求头中获取的。其他常见的获取方式包括：</p><ul><li><strong>查询字符串</strong>：<code>api/orders?tenantId=xxx</code></li><li><strong>JWT 声明（Claim）</strong></li><li><strong>API 密钥</strong></li></ul><p>为了安全性，建议优先使用 <strong>JWT 声明</strong> 或 <strong>API 密钥</strong>。</p><p>使用JWT声明的示例：</p><figure class="highlight csharp"><table><tr><td class="gutter"><pre><span class="line">1</span><br><span class="line">2</span><br><span class="line">3</span><br><span class="line">4</span><br><span class="line">5</span><br><span class="line">6</span><br><span class="line">7</span><br><span class="line">8</span><br><span class="line">9</span><br><span class="line">10</span><br><span class="line">11</span><br><span class="line">12</span><br><span class="line">13</span><br><span class="line">14</span><br><span class="line">15</span><br><span class="line">16</span><br></pre></td><td class="code"><pre><span class="line"><span class="keyword">public</span> <span class="keyword">sealed</span> <span class="keyword">class</span> <span class="title">TenantProvider</span></span><br><span class="line">&#123;</span><br><span class="line">    <span class="keyword">private</span> <span class="keyword">const</span> <span class="built_in">string</span> TenantIdClaimName = <span class="string">&quot;tenant_id&quot;</span>;</span><br><span class="line">    <span class="keyword">private</span> <span class="keyword">readonly</span> IHttpContextAccessor _httpContextAccessor;</span><br><span class="line"></span><br><span class="line">    <span class="function"><span class="keyword">public</span> <span class="title">TenantProvider</span>(<span class="params">IHttpContextAccessor httpContextAccessor</span>)</span></span><br><span class="line">    &#123;</span><br><span class="line">        _httpContextAccessor = httpContextAccessor;</span><br><span class="line">    &#125;</span><br><span class="line"></span><br><span class="line">    <span class="keyword">public</span> <span class="built_in">string</span> TenantId =&gt; _httpContextAccessor</span><br><span class="line">        .HttpContext</span><br><span class="line">        .User</span><br><span class="line">        .FindFirst(TenantIdClaimName)</span><br><span class="line">        ?.Value;</span><br><span class="line">&#125;</span><br></pre></td></tr></table></figure><hr><h2 id="基于独立数据库的多租户实现"><a href="#基于独立数据库的多租户实现" class="headerlink" title="基于独立数据库的多租户实现"></a>基于独立数据库的多租户实现</h2><p>如果我们希望将每个租户隔离在不同的数据库中，该怎么办？</p><p>这种情况下，我们需要做出以下调整：</p><ul><li>为每个租户应用不同的连接字符串。</li><li>实现解析特定租户连接字符串的机制。</li></ul><p>在这种模式下不能使用查询过滤器，因为数据分布在不同的物理数据库中。你需要将租户信息及其连接字符串存储在某个地方。</p><p>一个简单的实现方案是将其存储在应用配置中：</p><figure class="highlight json"><table><tr><td class="gutter"><pre><span class="line">1</span><br><span class="line">2</span><br><span class="line">3</span><br><span class="line">4</span><br><span class="line">5</span><br><span class="line">6</span><br><span class="line">7</span><br><span class="line">8</span><br><span class="line">9</span><br><span class="line">10</span><br><span class="line">11</span><br></pre></td><td class="code"><pre><span class="line"><span class="attr">&quot;Tenants&quot;</span><span class="punctuation">:</span> <span class="punctuation">[</span></span><br><span class="line">    <span class="punctuation">&#123;</span></span><br><span class="line">        <span class="attr">&quot;Id&quot;</span><span class="punctuation">:</span> <span class="string">&quot;tenant-1&quot;</span><span class="punctuation">,</span></span><br><span class="line">        <span class="attr">&quot;ConnectionString&quot;</span><span class="punctuation">:</span> <span class="string">&quot;Host=tenant1.db;Database=tenant1&quot;</span></span><br><span class="line">    <span class="punctuation">&#125;</span><span class="punctuation">,</span></span><br><span class="line">    <span class="punctuation">&#123;</span></span><br><span class="line">        <span class="attr">&quot;Id&quot;</span><span class="punctuation">:</span> <span class="string">&quot;tenant-2&quot;</span><span class="punctuation">,</span></span><br><span class="line">        <span class="attr">&quot;ConnectionString&quot;</span><span class="punctuation">:</span> <span class="string">&quot;Host=tenant2.db;Database=tenant2&quot;</span></span><br><span class="line">    <span class="punctuation">&#125;</span></span><br><span class="line"><span class="punctuation">]</span></span><br><span class="line"></span><br></pre></td></tr></table></figure><p>然后，我们可以修改 <code>TenantProvider</code> 以返回当前租户的连接字符串：</p><figure class="highlight csharp"><table><tr><td class="gutter"><pre><span class="line">1</span><br><span class="line">2</span><br><span class="line">3</span><br><span class="line">4</span><br><span class="line">5</span><br><span class="line">6</span><br><span class="line">7</span><br><span class="line">8</span><br><span class="line">9</span><br><span class="line">10</span><br><span class="line">11</span><br><span class="line">12</span><br><span class="line">13</span><br><span class="line">14</span><br><span class="line">15</span><br><span class="line">16</span><br><span class="line">17</span><br><span class="line">18</span><br><span class="line">19</span><br><span class="line">20</span><br><span class="line">21</span><br><span class="line">22</span><br><span class="line">23</span><br><span class="line">24</span><br><span class="line">25</span><br></pre></td><td class="code"><pre><span class="line"><span class="keyword">public</span> <span class="keyword">sealed</span> <span class="keyword">class</span> <span class="title">TenantProvider</span></span><br><span class="line">&#123;</span><br><span class="line">    <span class="keyword">private</span> <span class="keyword">const</span> <span class="built_in">string</span> TenantIdHeaderName = <span class="string">&quot;X-TenantId&quot;</span>;</span><br><span class="line">    <span class="keyword">private</span> <span class="keyword">readonly</span> IHttpContextAccessor _httpContextAccessor;</span><br><span class="line">    <span class="keyword">private</span> <span class="keyword">readonly</span> TenantSettings _tenantSettings;</span><br><span class="line"></span><br><span class="line">    <span class="function"><span class="keyword">public</span> <span class="title">TenantProvider</span>(<span class="params"></span></span></span><br><span class="line"><span class="params"><span class="function">        IHttpContextAccessor httpContextAccessor,</span></span></span><br><span class="line"><span class="params"><span class="function">        IOptions&lt;TenantSettings&gt; tenantsOptions</span>)</span></span><br><span class="line">    &#123;</span><br><span class="line">        _httpContextAccessor = httpContextAccessor;</span><br><span class="line">        _tenantSettings = tenantsOptions.Value;</span><br><span class="line">    &#125;</span><br><span class="line"></span><br><span class="line">    <span class="keyword">public</span> <span class="built_in">string</span> TenantId =&gt; _httpContextAccessor</span><br><span class="line">        .HttpContext</span><br><span class="line">        .Request</span><br><span class="line">        .Headers[TenantIdHeaderName];</span><br><span class="line"></span><br><span class="line">    <span class="function"><span class="keyword">public</span> <span class="built_in">string</span> <span class="title">GetConnectionString</span>()</span></span><br><span class="line">    &#123;</span><br><span class="line">        <span class="keyword">return</span> _tenantSettings.Tenants.Single(t =&gt; t.Id == TenantId).ConnectionString;</span><br><span class="line">    &#125;</span><br><span class="line">&#125;</span><br><span class="line"></span><br></pre></td></tr></table></figure><p>最后一步是在注册 <code>DbContext</code> 时，动态解析连接字符串：</p><figure class="highlight csharp"><table><tr><td class="gutter"><pre><span class="line">1</span><br><span class="line">2</span><br><span class="line">3</span><br><span class="line">4</span><br><span class="line">5</span><br><span class="line">6</span><br><span class="line">7</span><br><span class="line">8</span><br></pre></td><td class="code"><pre><span class="line">builder.Services.AddDbContext&lt;OrdersDbContext&gt;((sp, o) =&gt;</span><br><span class="line">&#123;</span><br><span class="line">    <span class="keyword">var</span> tenantProvider = sp.GetRequiredService&lt;TenantProvider&gt;();</span><br><span class="line">    <span class="keyword">var</span> connectionString = tenantProvider.GetConnectionString();</span><br><span class="line">    </span><br><span class="line">    o.UseSqlServer(connectionString);</span><br><span class="line">&#125;);</span><br><span class="line"></span><br></pre></td></tr></table></figure><p>这样，在每次请求时，系统都会创建一个新的 <code>OrdersDbContext</code> 并连接到该租户对应的数据库。</p><p><em>注：在生产环境中，应考虑将租户连接字符串存储在安全的地方，如 Azure Key Vault。</em></p><hr><h2 id="总结"><a href="#总结" class="headerlink" title="总结"></a>总结</h2><p>希望本文能帮助你更好地理解如何使用 EF Core 构建多租户系统。无论是选择单一数据库还是多个数据库的方案，都需要根据具体的业务需求和数据隔离要求来决定。EF Core 提供了强大的功能来支持这两种多租户实现方式。</p><h2 id="参考资料"><a href="#参考资料" class="headerlink" title="参考资料"></a>参考资料</h2><ul><li><a href="https://learn.microsoft.com/en-us/ef/core/querying/filters">EF Core Global Query Filters</a></li><li><a href="https://www.milanjovanovic.tech/blog/multi-tenant-applications-with-ef-core">Multi-Tenant Applications With EF Core</a></li></ul>]]>
    </content>
    <id>https://johnnyqian.net/blog/multi-tenant-applications-with-ef-core.html</id>
    <link href="https://johnnyqian.net/blog/multi-tenant-applications-with-ef-core.html"/>
    <published>2026-01-11T13:29:35.000Z</published>
    <summary>
      <![CDATA[<p>目前大多数软件应用程序都是围绕<strong>多租户（Multi-tenancy）</strong>的概念构建的。一个应用程序为多个客户（租户）服务，同时保持他们的数据相互隔离。]]>
    </summary>
    <title>使用 EF Core 开发多租户应用程序</title>
    <updated>2026-11-04T15:17:54.166Z</updated>
  </entry>
  <entry>
    <author>
      <name>Johnny Qian</name>
    </author>
    <category term="ASP.NET Core" scheme="https://johnnyqian.net/tags/ASP-NET-Core/"/>
    <category term="Minimal APIs" scheme="https://johnnyqian.net/tags/Minimal-APIs/"/>
    <category term="Carter" scheme="https://johnnyqian.net/tags/Carter/"/>
    <content>
      <![CDATA[<p>Carter 是一个用于 ASP.NET Core 的轻量级框架，旨在简化构建 Minimal API 的过程。如果你觉得 Minimal API 虽然简洁，但在组织大量端点时显得有些杂乱，或者希望更方便地集成验证、文件处理等功能，Carter 是一个非常值得尝试的优雅解决方案。它提供了一种简洁的方式来定义路由、处理请求和响应，同时保持代码的可读性和可维护性。<a id="more"></a></p><p>以下是使用 Carter 创建最小化 API 的基本步骤：</p><ol><li><p><strong>安装 Carter 包</strong><br>首先，您需要在您的 ASP.NET Core 项目中安装 Carter NuGet 包。您可以使用以下命令：</p><figure class="highlight bash"><table><tr><td class="gutter"><pre><span class="line">1</span><br></pre></td><td class="code"><pre><span class="line">dotnet add package Carter</span><br></pre></td></tr></table></figure></li><li><p><strong>创建 Carter 模块</strong><br>创建一个新的类，继承自 <code>CarterModule</code>，并在构造函数中定义路由和处理程序。例如：</p><figure class="highlight csharp"><table><tr><td class="gutter"><pre><span class="line">1</span><br><span class="line">2</span><br><span class="line">3</span><br><span class="line">4</span><br><span class="line">5</span><br><span class="line">6</span><br><span class="line">7</span><br><span class="line">8</span><br><span class="line">9</span><br><span class="line">10</span><br><span class="line">11</span><br><span class="line">12</span><br><span class="line">13</span><br><span class="line">14</span><br><span class="line">15</span><br><span class="line">16</span><br></pre></td><td class="code"><pre><span class="line"><span class="keyword">using</span> Carter;</span><br><span class="line"></span><br><span class="line"><span class="keyword">public</span> <span class="keyword">class</span> <span class="title">HomeModule</span> : <span class="title">CarterModule</span></span><br><span class="line">&#123;</span><br><span class="line">    <span class="function"><span class="keyword">public</span> <span class="keyword">override</span> <span class="keyword">void</span> <span class="title">AddRoutes</span>(<span class="params">IEndpointRouteBuilder app</span>)</span></span><br><span class="line">    &#123;</span><br><span class="line">        app.MapGet(<span class="string">&quot;/hello&quot;</span>, () =&gt; <span class="string">&quot;Hello, World!&quot;</span>);</span><br><span class="line"></span><br><span class="line">        app.MapPost(<span class="string">&quot;/echo&quot;</span>, <span class="keyword">async</span> (HttpRequest request) =&gt;</span><br><span class="line">        &#123;</span><br><span class="line">            <span class="keyword">using</span> <span class="keyword">var</span> reader = <span class="keyword">new</span> StreamReader(request.Body);</span><br><span class="line">            <span class="keyword">var</span> body = <span class="keyword">await</span> reader.ReadToEndAsync();</span><br><span class="line">            <span class="keyword">return</span> Results.Ok(body);</span><br><span class="line">        &#125;);</span><br><span class="line">    &#125;</span><br><span class="line">&#125;</span><br></pre></td></tr></table></figure></li><li><p><strong>配置 Carter 中间件</strong><br>在 <code>Startup.cs</code> 或 <code>Program.cs</code> 文件中，添加 Carter 中间件：</p><figure class="highlight csharp"><table><tr><td class="gutter"><pre><span class="line">1</span><br><span class="line">2</span><br><span class="line">3</span><br><span class="line">4</span><br><span class="line">5</span><br><span class="line">6</span><br><span class="line">7</span><br><span class="line">8</span><br><span class="line">9</span><br><span class="line">10</span><br></pre></td><td class="code"><pre><span class="line"><span class="keyword">using</span> Carter;</span><br><span class="line"><span class="keyword">using</span> Microsoft.AspNetCore.Builder;</span><br><span class="line"><span class="keyword">using</span> Microsoft.Extensions.DependencyInjection;</span><br><span class="line"></span><br><span class="line"><span class="keyword">var</span> builder = WebApplication.CreateBuilder(<span class="keyword">args</span>);</span><br><span class="line">builder.Services.AddCarter();</span><br><span class="line"></span><br><span class="line"><span class="keyword">var</span> app = builder.Build();</span><br><span class="line">app.MapCarter();</span><br><span class="line">app.Run();</span><br></pre></td></tr></table></figure><blockquote><p>完整的 Demo 项目可以参考这里 <a href="https://github.com/johnnyqian/OddsAndEnds/tree/master/CarterWebApi">OddsAndEnds/CarterWebApi</a></p></blockquote></li></ol><h3 id="Carter-vs-传统Controller"><a href="#Carter-vs-传统Controller" class="headerlink" title="Carter vs. 传统Controller"></a>Carter vs. 传统Controller</h3><p>使用 Carter 构建 Minimal API 相较于传统的 Controller 方法有几个优势：</p><ul><li><strong>简洁性</strong>：Carter 允许您直接在模块中定义路由和处理程序，减少了样板代码。</li><li><strong>模块化</strong>：通过将相关端点组织在同一个模块中，代码更易于维护和理解。</li><li><strong>内置功能</strong>：Carter 提供了许多内置功能，如验证、文件处理等，简化了常见任务的实现。</li></ul><h4 id="📊-性能对比"><a href="#📊-性能对比" class="headerlink" title="📊 性能对比"></a>📊 性能对比</h4><table><thead><tr><th>维度</th><th>Carter (Minimal API风格)</th><th>传统 Controller</th></tr></thead><tbody><tr><td><strong>启动性能</strong></td><td>✅ <strong>更优</strong>：无MVC框架开销，更少中间件</td><td>有MVC框架初始化开销</td></tr><tr><td><strong>内存占用</strong></td><td>✅ <strong>更低</strong>：更少中间件和内置对象</td><td>包含ViewResult、ActionContext等额外对象</td></tr><tr><td><strong>请求处理开销</strong></td><td>✅ <strong>更低</strong>：直接处理请求，无MVC管道</td><td>需经过模型绑定、过滤器、ActionInvoker等步骤</td></tr><tr><td><strong>反射使用</strong></td><td>✅ <strong>更少</strong>：依赖方法组和委托</td><td>大量使用反射（方法选择、参数绑定）</td></tr><tr><td><strong>基准测试结果</strong></td><td>吞吐量通常高10-20%</td><td>略低于Minimal API风格</td></tr></tbody></table><h4 id="📈-实际性能数据参考"><a href="#📈-实际性能数据参考" class="headerlink" title="📈 实际性能数据参考"></a>📈 实际性能数据参考</h4><p>根据ASP.NET团队基准测试：</p><ul><li><strong>简单API端点</strong>：Carter/Minimal API吞吐量高15-25%</li><li><strong>JSON序列化</strong>：基本相同（都使用System.Text.Json）</li><li><strong>内存分配</strong>：Carter减少20-30%的分配</li><li><strong>启动时间</strong>：Carter应用启动快10-15%</li></ul><h3 id="总结"><a href="#总结" class="headerlink" title="总结"></a>总结</h3><p>通过使用 Carter，您可以轻松地创建和管理最小化 API，同时保持代码的简洁和可维护性。Carter 还支持中间件、依赖注入和其他 ASP.NET Core 功能，使其成为构建现代 Web 应用程序的强大工具。Carter在性能和代码组织结构上有明显优势，特别适合API优先的微服务架构。传统Controller在功能完整性和生态系统上仍有优势，适合全栈Web应用。选择时需权衡项目需求、团队技能和长期维护成本。</p><h3 id="参考资料"><a href="#参考资料" class="headerlink" title="参考资料"></a>参考资料</h3><ul><li><a href="https://github.com/CarterCommunity/Carter">Carter</a></li><li><a href="https://learn.microsoft.com/en-us/aspnet/core/fundamentals/minimal-apis">ASP.NET Core Minimal APIs</a></li><li><a href="https://learn.microsoft.com/en-us/aspnet/core/performance/overview">ASP.NET Core 性能最佳实践</a></li><li><a href="https://www.hanselman.com/blog/carter-community-for-aspnet-core-means-enjoyable-web-apis-on-the-cutting-edge">Carter Community for ASP.NET Core means enjoyable Web APIs on the cutting edge</a></li></ul>]]>
    </content>
    <id>https://johnnyqian.net/blog/minimal-apis-with-carter.html</id>
    <link href="https://johnnyqian.net/blog/minimal-apis-with-carter.html"/>
    <published>2026-01-07T16:00:00.000Z</published>
    <summary>
      <![CDATA[<p>Carter 是一个用于 ASP.NET Core 的轻量级框架，旨在简化构建 Minimal API 的过程。如果你觉得 Minimal API 虽然简洁，但在组织大量端点时显得有些杂乱，或者希望更方便地集成验证、文件处理等功能，Carter 是一个非常值得尝试的优雅解决方案。它提供了一种简洁的方式来定义路由、处理请求和响应，同时保持代码的可读性和可维护性。]]>
    </summary>
    <title>Minimal APIs with Carter</title>
    <updated>2026-11-04T15:17:54.166Z</updated>
  </entry>
  <entry>
    <author>
      <name>Johnny Qian</name>
    </author>
    <content>
      <![CDATA[<p>今天我们来介绍一下C#中的动态代理（Dynamic Proxy）技术。动态代理是一种在运行时创建代理类的技术，它允许我们在不修改原始类代码的情况下，拦截和增强方法调用。这在AOP（面向切面编程）中非常有用，可以用于日志记录、事务管理、权限验证等场景。<a id="more"></a>动态代理的实现通常依赖于反射和IL生成技术。C#中有几个流行的库可以帮助我们实现动态代理，最常用的包括Castle DynamicProxy和DispatchProxy。</p><h3 id="Castle-DynamicProxy"><a href="#Castle-DynamicProxy" class="headerlink" title="Castle DynamicProxy"></a>Castle DynamicProxy</h3><p><a href="https://www.nuget.org/packages/Castle.Core/">Castle DynamicProxy</a>是一个功能强大的动态代理库。它允许我们创建接口代理和类代理。下面是一个使用Castle DynamicProxy创建动态代理的简单示例：</p><figure class="highlight csharp"><table><tr><td class="gutter"><pre><span class="line">1</span><br><span class="line">2</span><br><span class="line">3</span><br><span class="line">4</span><br><span class="line">5</span><br><span class="line">6</span><br><span class="line">7</span><br><span class="line">8</span><br><span class="line">9</span><br><span class="line">10</span><br><span class="line">11</span><br><span class="line">12</span><br><span class="line">13</span><br><span class="line">14</span><br><span class="line">15</span><br><span class="line">16</span><br><span class="line">17</span><br><span class="line">18</span><br><span class="line">19</span><br><span class="line">20</span><br><span class="line">21</span><br><span class="line">22</span><br><span class="line">23</span><br><span class="line">24</span><br><span class="line">25</span><br><span class="line">26</span><br><span class="line">27</span><br><span class="line">28</span><br><span class="line">29</span><br><span class="line">30</span><br><span class="line">31</span><br><span class="line">32</span><br><span class="line">33</span><br><span class="line">34</span><br><span class="line">35</span><br><span class="line">36</span><br></pre></td><td class="code"><pre><span class="line"><span class="keyword">using</span> System;</span><br><span class="line"><span class="keyword">using</span> Castle.DynamicProxy;</span><br><span class="line"></span><br><span class="line"><span class="keyword">public</span> <span class="keyword">class</span> <span class="title">LoggingInterceptor</span> : <span class="title">IInterceptor</span></span><br><span class="line">&#123;</span><br><span class="line">    <span class="function"><span class="keyword">public</span> <span class="keyword">void</span> <span class="title">Intercept</span>(<span class="params">IInvocation invocation</span>)</span></span><br><span class="line">    &#123;</span><br><span class="line">        Console.WriteLine(<span class="string">$&quot;Calling method <span class="subst">&#123;invocation.Method.Name&#125;</span> with arguments <span class="subst">&#123;<span class="built_in">string</span>.Join(<span class="string">&quot;, &quot;</span>, invocation.Arguments)&#125;</span>&quot;</span>);</span><br><span class="line">        invocation.Proceed();</span><br><span class="line">        Console.WriteLine(<span class="string">$&quot;Method <span class="subst">&#123;invocation.Method.Name&#125;</span> returned <span class="subst">&#123;invocation.ReturnValue&#125;</span>&quot;</span>);</span><br><span class="line">    &#125;</span><br><span class="line">&#125;</span><br><span class="line"></span><br><span class="line"><span class="keyword">public</span> <span class="keyword">interface</span> <span class="title">ICalculator</span></span><br><span class="line">&#123;</span><br><span class="line">    <span class="function"><span class="built_in">int</span> <span class="title">Add</span>(<span class="params"><span class="built_in">int</span> a, <span class="built_in">int</span> b</span>)</span>;</span><br><span class="line">&#125;</span><br><span class="line"></span><br><span class="line"><span class="keyword">public</span> <span class="keyword">class</span> <span class="title">Calculator</span> : <span class="title">ICalculator</span></span><br><span class="line">&#123;</span><br><span class="line">    <span class="function"><span class="keyword">public</span> <span class="built_in">int</span> <span class="title">Add</span>(<span class="params"><span class="built_in">int</span> a, <span class="built_in">int</span> b</span>)</span> =&gt; a + b;</span><br><span class="line">&#125;</span><br><span class="line"></span><br><span class="line"><span class="keyword">class</span> <span class="title">Program</span></span><br><span class="line">&#123;</span><br><span class="line">    <span class="function"><span class="keyword">static</span> <span class="keyword">void</span> <span class="title">Main</span>()</span></span><br><span class="line">    &#123;</span><br><span class="line">        ProxyGenerator generator = <span class="keyword">new</span> ProxyGenerator();</span><br><span class="line">        ICalculator calculatorProxy = generator.CreateInterfaceProxyWithTarget&lt;ICalculator&gt;(</span><br><span class="line">            <span class="keyword">new</span> Calculator(),</span><br><span class="line">            <span class="keyword">new</span> LoggingInterceptor());</span><br><span class="line"></span><br><span class="line">        <span class="built_in">int</span> result = calculatorProxy.Add(<span class="number">2</span>, <span class="number">3</span>);</span><br><span class="line">        Console.WriteLine(<span class="string">$&quot;Result: <span class="subst">&#123;result&#125;</span>&quot;</span>);</span><br><span class="line">    &#125;</span><br><span class="line">&#125;</span><br></pre></td></tr></table></figure><blockquote><p>输出为：<br>Calling method Add with arguments 2, 3<br>Method Add returned 5<br>Result: 5</p></blockquote><h3 id="DispatchProxy"><a href="#DispatchProxy" class="headerlink" title="DispatchProxy"></a>DispatchProxy</h3><p><a href="https://learn.microsoft.com/en-us/dotnet/api/system.reflection.dispatchproxy">DispatchProxy</a>是.NET Framework 4.6及更高版本中引入的一个内置动态代理机制。它允许我们创建接口的代理类，并通过重写<code>Invoke</code>方法来拦截方法调用。下面是一个使用DispatchProxy创建动态代理的示例：</p><figure class="highlight csharp"><table><tr><td class="gutter"><pre><span class="line">1</span><br><span class="line">2</span><br><span class="line">3</span><br><span class="line">4</span><br><span class="line">5</span><br><span class="line">6</span><br><span class="line">7</span><br><span class="line">8</span><br><span class="line">9</span><br><span class="line">10</span><br><span class="line">11</span><br><span class="line">12</span><br><span class="line">13</span><br><span class="line">14</span><br><span class="line">15</span><br><span class="line">16</span><br><span class="line">17</span><br><span class="line">18</span><br><span class="line">19</span><br><span class="line">20</span><br><span class="line">21</span><br><span class="line">22</span><br><span class="line">23</span><br><span class="line">24</span><br><span class="line">25</span><br><span class="line">26</span><br><span class="line">27</span><br><span class="line">28</span><br><span class="line">29</span><br><span class="line">30</span><br><span class="line">31</span><br><span class="line">32</span><br><span class="line">33</span><br><span class="line">34</span><br><span class="line">35</span><br><span class="line">36</span><br><span class="line">37</span><br><span class="line">38</span><br><span class="line">39</span><br><span class="line">40</span><br><span class="line">41</span><br><span class="line">42</span><br><span class="line">43</span><br><span class="line">44</span><br></pre></td><td class="code"><pre><span class="line"><span class="keyword">using</span> System;</span><br><span class="line"><span class="keyword">using</span> System.Reflection;</span><br><span class="line"></span><br><span class="line"><span class="keyword">public</span> <span class="keyword">class</span> <span class="title">LoggingProxy</span>&lt;<span class="title">T</span>&gt; : <span class="title">DispatchProxy</span></span><br><span class="line">&#123;</span><br><span class="line">    <span class="keyword">private</span> T _decorated;</span><br><span class="line"></span><br><span class="line">    <span class="function"><span class="keyword">protected</span> <span class="keyword">override</span> <span class="built_in">object</span> <span class="title">Invoke</span>(<span class="params">MethodInfo targetMethod, <span class="built_in">object</span>[] <span class="keyword">args</span></span>)</span></span><br><span class="line">    &#123;</span><br><span class="line">        Console.WriteLine(<span class="string">$&quot;Calling method <span class="subst">&#123;targetMethod.Name&#125;</span> with arguments <span class="subst">&#123;<span class="built_in">string</span>.Join(<span class="string">&quot;, &quot;</span>, <span class="keyword">args</span>)&#125;</span>&quot;</span>);</span><br><span class="line">        <span class="keyword">var</span> result = targetMethod.Invoke(_decorated, <span class="keyword">args</span>);</span><br><span class="line">        Console.WriteLine(<span class="string">$&quot;Method <span class="subst">&#123;targetMethod.Name&#125;</span> returned <span class="subst">&#123;result&#125;</span>&quot;</span>);</span><br><span class="line">        <span class="keyword">return</span> result;</span><br><span class="line">    &#125;</span><br><span class="line"></span><br><span class="line">    <span class="function"><span class="keyword">public</span> <span class="keyword">static</span> T <span class="title">Create</span>(<span class="params">T decorated</span>)</span></span><br><span class="line">    &#123;</span><br><span class="line">        <span class="built_in">object</span> proxy = Create&lt;T, LoggingProxy&lt;T&gt;&gt;();</span><br><span class="line">        ((LoggingProxy&lt;T&gt;)proxy)._decorated = decorated;</span><br><span class="line">        <span class="keyword">return</span> (T)proxy;</span><br><span class="line">    &#125;</span><br><span class="line">&#125;</span><br><span class="line"></span><br><span class="line"><span class="keyword">public</span> <span class="keyword">interface</span> <span class="title">ICalculator</span></span><br><span class="line">&#123;</span><br><span class="line">    <span class="function"><span class="built_in">int</span> <span class="title">Add</span>(<span class="params"><span class="built_in">int</span> a, <span class="built_in">int</span> b</span>)</span>;</span><br><span class="line">&#125;</span><br><span class="line"></span><br><span class="line"><span class="keyword">public</span> <span class="keyword">class</span> <span class="title">Calculator</span> : <span class="title">ICalculator</span></span><br><span class="line">&#123;</span><br><span class="line">    <span class="function"><span class="keyword">public</span> <span class="built_in">int</span> <span class="title">Add</span>(<span class="params"><span class="built_in">int</span> a, <span class="built_in">int</span> b</span>)</span> =&gt; a + b;</span><br><span class="line">&#125;</span><br><span class="line"></span><br><span class="line"><span class="keyword">class</span> <span class="title">Program</span></span><br><span class="line">&#123;</span><br><span class="line">    <span class="function"><span class="keyword">static</span> <span class="keyword">void</span> <span class="title">Main</span>()</span></span><br><span class="line">    &#123;</span><br><span class="line">        ICalculator calculator = <span class="keyword">new</span> Calculator();</span><br><span class="line">        ICalculator proxy = LoggingProxy&lt;ICalculator&gt;.Create(calculator);</span><br><span class="line"></span><br><span class="line">        <span class="built_in">int</span> result = proxy.Add(<span class="number">2</span>, <span class="number">3</span>);</span><br><span class="line">        Console.WriteLine(<span class="string">$&quot;Result: <span class="subst">&#123;result&#125;</span>&quot;</span>);</span><br><span class="line">    &#125;</span><br><span class="line">&#125;</span><br></pre></td></tr></table></figure><blockquote><p>输出为：<br>Calling method Add with arguments 2, 3<br>Method Add returned 5<br>Result: 5</p></blockquote><p>通过以上两个示例，我们可以看到动态代理在C#中的强大功能。无论是使用Castle DynamicProxy还是DispatchProxy，我们都可以轻松地拦截方法调用并添加自定义逻辑，从而实现AOP的各种需求。在实际应用中，选择哪种动态代理技术取决于具体的需求和项目环境。</p><blockquote><p>只有被标记为<code>virtual</code>的方法才能被动态代理拦截。接口的方法默认就是<code>virtual</code>的。具体实现类中的<code>virtual</code>方法也可以被拦截。</p></blockquote><h3 id="动态代理的应用场景"><a href="#动态代理的应用场景" class="headerlink" title="动态代理的应用场景"></a>动态代理的应用场景</h3><p>动态代理在许多场景中都非常有用，以下是一些常见框架及其对应的动态代理应用场景：</p><h4 id="Moq"><a href="#Moq" class="headerlink" title="Moq"></a>Moq</h4><p>Moq是一个流行的.NET模拟库，广泛用于单元测试。它利用动态代理技术创建接口和类的模拟对象，使得测试代码更加简洁和易于维护。通过Moq，我们可以轻松地设置期望值、验证方法调用以及模拟复杂的行为。</p><figure class="highlight csharp"><table><tr><td class="gutter"><pre><span class="line">1</span><br><span class="line">2</span><br><span class="line">3</span><br><span class="line">4</span><br><span class="line">5</span><br><span class="line">6</span><br><span class="line">7</span><br><span class="line">8</span><br><span class="line">9</span><br><span class="line">10</span><br><span class="line">11</span><br><span class="line">12</span><br><span class="line">13</span><br><span class="line">14</span><br><span class="line">15</span><br><span class="line">16</span><br><span class="line">17</span><br><span class="line">18</span><br><span class="line">19</span><br><span class="line">20</span><br><span class="line">21</span><br></pre></td><td class="code"><pre><span class="line"><span class="keyword">using</span> Moq;</span><br><span class="line"><span class="keyword">using</span> System.Diagnostics;</span><br><span class="line"></span><br><span class="line"><span class="keyword">public</span> <span class="keyword">class</span> <span class="title">Customer</span></span><br><span class="line">&#123;</span><br><span class="line">    <span class="keyword">public</span> <span class="built_in">int</span> Id &#123; <span class="keyword">get</span>; <span class="keyword">set</span>; &#125;</span><br><span class="line">&#125;</span><br><span class="line"></span><br><span class="line"><span class="keyword">public</span> <span class="keyword">interface</span> <span class="title">IDataService</span></span><br><span class="line">&#123;</span><br><span class="line">    <span class="function">Customer <span class="title">GetCustomer</span>(<span class="params"><span class="built_in">int</span> id</span>)</span>;</span><br><span class="line">&#125;</span><br><span class="line"></span><br><span class="line"><span class="keyword">var</span> mock = <span class="keyword">new</span> Mock&lt;IDataService&gt;();</span><br><span class="line">mock.Setup(x =&gt; x.GetCustomer(It.IsAny&lt;<span class="built_in">int</span>&gt;()))</span><br><span class="line">    .Returns((<span class="built_in">int</span> id) =&gt; <span class="keyword">new</span> Customer &#123; Id = id &#125;)</span><br><span class="line">    .Callback((<span class="built_in">int</span> id) =&gt; Console.WriteLine(<span class="string">$&quot;Called with id: <span class="subst">&#123;id&#125;</span>&quot;</span>));</span><br><span class="line"></span><br><span class="line"><span class="keyword">var</span> result = mock.Object.GetCustomer(<span class="number">1</span>);</span><br><span class="line">mock.Verify(s =&gt; s.GetCustomer(<span class="number">1</span>), Times.Once);</span><br><span class="line">Debug.Assert(result.Id == <span class="number">1</span>);</span><br></pre></td></tr></table></figure><ol><li><strong>Moq的核心是表达式树解析</strong>，将 <code>x =&gt; x.Method(It.IsAny&lt;int&gt;())</code> 转换为匹配规则</li><li><strong>动态代理处理所有方法调用</strong>，不需要手动实现每个接口方法</li><li><strong>调用链是惰性计算的</strong>，只有在实际调用时才计算结果</li><li><strong>默认值提供机制</strong>让 Mock.Of<T>() 等特性成为可能</li></ol><p>这就是为什么 Moq 能”自动”实现所有接口方法 - 它实际上没有实现任何方法，而是用一个动态代理拦截所有调用，然后根据 Setup 规则决定如何响应。</p><h4 id="Entity-Framework-Core"><a href="#Entity-Framework-Core" class="headerlink" title="Entity Framework Core"></a>Entity Framework Core</h4><p>Entity Framework Core使用动态代理来实现延迟加载（Lazy Loading）功能。当我们访问导航属性时，EF Core会动态创建一个代理类来拦截对该属性的访问，并在需要时从数据库加载相关数据。这种方式提高了性能，避免了不必要的数据加载。</p><figure class="highlight csharp"><table><tr><td class="gutter"><pre><span class="line">1</span><br><span class="line">2</span><br><span class="line">3</span><br><span class="line">4</span><br><span class="line">5</span><br><span class="line">6</span><br><span class="line">7</span><br><span class="line">8</span><br><span class="line">9</span><br><span class="line">10</span><br><span class="line">11</span><br><span class="line">12</span><br><span class="line">13</span><br><span class="line">14</span><br><span class="line">15</span><br><span class="line">16</span><br></pre></td><td class="code"><pre><span class="line"><span class="keyword">using</span> Microsoft.EntityFrameworkCore;</span><br><span class="line"></span><br><span class="line"><span class="keyword">public</span> <span class="keyword">class</span> <span class="title">Blog</span></span><br><span class="line">&#123;</span><br><span class="line">    <span class="keyword">public</span> <span class="built_in">int</span> BlogId &#123; <span class="keyword">get</span>; <span class="keyword">set</span>; &#125;</span><br><span class="line">    <span class="keyword">public</span> <span class="built_in">string</span> Url &#123; <span class="keyword">get</span>; <span class="keyword">set</span>; &#125;</span><br><span class="line">    <span class="keyword">public</span> <span class="keyword">virtual</span> ICollection&lt;Post&gt; Posts &#123; <span class="keyword">get</span>; <span class="keyword">set</span>; &#125; <span class="comment">// 声明导航属性为 virtual 以支持延迟加载</span></span><br><span class="line">&#125;</span><br><span class="line"></span><br><span class="line"><span class="keyword">public</span> <span class="keyword">class</span> <span class="title">Post</span></span><br><span class="line">&#123;</span><br><span class="line">    <span class="keyword">public</span> <span class="built_in">int</span> PostId &#123; <span class="keyword">get</span>; <span class="keyword">set</span>; &#125;</span><br><span class="line">    <span class="keyword">public</span> <span class="built_in">string</span> Title &#123; <span class="keyword">get</span>; <span class="keyword">set</span>; &#125;</span><br><span class="line">    <span class="keyword">public</span> <span class="built_in">int</span> BlogId &#123; <span class="keyword">get</span>; <span class="keyword">set</span>; &#125;</span><br><span class="line">    <span class="keyword">public</span> <span class="keyword">virtual</span> Blog Blog &#123; <span class="keyword">get</span>; <span class="keyword">set</span>; &#125; <span class="comment">// 声明导航属性为 virtual 以支持延迟加载</span></span><br><span class="line">&#125;</span><br></pre></td></tr></table></figure><h4 id="AOP框架"><a href="#AOP框架" class="headerlink" title="AOP框架"></a>AOP框架</h4><p>许多AOP框架（如PostSharp、AspectCore等）都使用动态代理来实现方法拦截和增强功能。通过动态代理，这些框架可以在不修改原始代码的情况下，添加日志记录、事务管理、缓存等功能，从而提高代码的可维护性和复用性。</p><figure class="highlight csharp"><table><tr><td class="gutter"><pre><span class="line">1</span><br><span class="line">2</span><br><span class="line">3</span><br><span class="line">4</span><br><span class="line">5</span><br></pre></td><td class="code"><pre><span class="line">[<span class="meta">Log</span>] <span class="comment">// 使用AOP框架的日志特性</span></span><br><span class="line"><span class="function"><span class="keyword">public</span> <span class="keyword">void</span> <span class="title">ProcessData</span>()</span></span><br><span class="line">&#123;</span><br><span class="line">    <span class="comment">// 业务逻辑</span></span><br><span class="line">&#125;</span><br></pre></td></tr></table></figure><h4 id="远程调用"><a href="#远程调用" class="headerlink" title="远程调用"></a>远程调用</h4><p>动态代理也常用于远程调用场景，如WCF和gRPC等框架。通过动态代理，客户端可以透明地调用远程服务，就像调用本地方法一样。动态代理负责处理网络通信、序列化和反序列化等复杂操作，使得开发者可以专注于业务逻辑的实现。</p><figure class="highlight csharp"><table><tr><td class="gutter"><pre><span class="line">1</span><br><span class="line">2</span><br><span class="line">3</span><br><span class="line">4</span><br><span class="line">5</span><br></pre></td><td class="code"><pre><span class="line"><span class="comment">// gRPC客户端示例</span></span><br><span class="line"><span class="keyword">var</span> channel = GrpcChannel.ForAddress(<span class="string">&quot;https://localhost:5001&quot;</span>);</span><br><span class="line"><span class="keyword">var</span> client = <span class="keyword">new</span> Greeter.GreeterClient(channel);</span><br><span class="line"><span class="keyword">var</span> reply = <span class="keyword">await</span> client.SayHelloAsync(<span class="keyword">new</span> HelloRequest &#123; Name = <span class="string">&quot;World&quot;</span> &#125;);</span><br><span class="line">Console.WriteLine(<span class="string">&quot;Greeting: &quot;</span> + reply.Message);</span><br></pre></td></tr></table></figure><h4 id="装饰器模式"><a href="#装饰器模式" class="headerlink" title="装饰器模式"></a>装饰器模式</h4><p>动态代理也可以用于实现装饰器模式，通过动态创建代理类来增强原始对象的功能。例如，我们可以创建一个缓存代理，当调用某个方法时，先检查缓存中是否有结果，如果有则直接返回，否则调用原始方法并将结果存入缓存。</p><figure class="highlight csharp"><table><tr><td class="gutter"><pre><span class="line">1</span><br><span class="line">2</span><br><span class="line">3</span><br><span class="line">4</span><br><span class="line">5</span><br><span class="line">6</span><br><span class="line">7</span><br><span class="line">8</span><br><span class="line">9</span><br><span class="line">10</span><br><span class="line">11</span><br><span class="line">12</span><br><span class="line">13</span><br><span class="line">14</span><br><span class="line">15</span><br><span class="line">16</span><br><span class="line">17</span><br><span class="line">18</span><br><span class="line">19</span><br><span class="line">20</span><br><span class="line">21</span><br><span class="line">22</span><br><span class="line">23</span><br><span class="line">24</span><br><span class="line">25</span><br><span class="line">26</span><br><span class="line">27</span><br><span class="line">28</span><br><span class="line">29</span><br><span class="line">30</span><br></pre></td><td class="code"><pre><span class="line"><span class="keyword">public</span> <span class="keyword">class</span> <span class="title">CachingProxy</span>&lt;<span class="title">T</span>&gt; : <span class="title">DispatchProxy</span></span><br><span class="line">&#123;</span><br><span class="line">    <span class="keyword">private</span> T _decorated;</span><br><span class="line">    <span class="keyword">private</span> Dictionary&lt;<span class="built_in">string</span>, <span class="built_in">object</span>&gt; _cache = <span class="keyword">new</span> Dictionary&lt;<span class="built_in">string</span>, <span class="built_in">object</span>&gt;();</span><br><span class="line"></span><br><span class="line">    <span class="function"><span class="keyword">protected</span> <span class="keyword">override</span> <span class="built_in">object</span> <span class="title">Invoke</span>(<span class="params">MethodInfo targetMethod, <span class="built_in">object</span>[] <span class="keyword">args</span></span>)</span></span><br><span class="line">    &#123;</span><br><span class="line">        <span class="built_in">string</span> cacheKey = <span class="string">$&quot;<span class="subst">&#123;targetMethod.Name&#125;</span>:<span class="subst">&#123;<span class="built_in">string</span>.Join(<span class="string">&quot;,&quot;</span>, <span class="keyword">args</span>)&#125;</span>&quot;</span>;</span><br><span class="line">        <span class="keyword">if</span> (_cache.TryGetValue(cacheKey, <span class="keyword">out</span> <span class="keyword">var</span> cachedResult))</span><br><span class="line">        &#123;</span><br><span class="line">            <span class="keyword">return</span> cachedResult;</span><br><span class="line">        &#125;</span><br><span class="line"></span><br><span class="line">        <span class="keyword">var</span> result = targetMethod.Invoke(_decorated, <span class="keyword">args</span>);</span><br><span class="line">        _cache[cacheKey] = result;</span><br><span class="line">        <span class="keyword">return</span> result;</span><br><span class="line">    &#125;</span><br><span class="line"></span><br><span class="line">    <span class="function"><span class="keyword">public</span> <span class="keyword">static</span> T <span class="title">Create</span>(<span class="params">T decorated</span>)</span></span><br><span class="line">    &#123;</span><br><span class="line">        <span class="built_in">object</span> proxy = Create&lt;T, CachingProxy&lt;T&gt;&gt;();</span><br><span class="line">        ((CachingProxy&lt;T&gt;)proxy)._decorated = decorated;</span><br><span class="line">        <span class="keyword">return</span> (T)proxy;</span><br><span class="line">    &#125;</span><br><span class="line">&#125;</span><br><span class="line"></span><br><span class="line"><span class="comment">// 调用示例</span></span><br><span class="line">ICalculator calculator = <span class="keyword">new</span> Calculator();</span><br><span class="line">ICalculator proxy = CachingProxy&lt;ICalculator&gt;.Create(calculator);</span><br><span class="line"><span class="built_in">int</span> result1 = proxy.Add(<span class="number">2</span>, <span class="number">3</span>); <span class="comment">// 计算并缓存结果</span></span><br></pre></td></tr></table></figure><h3 id="总结"><a href="#总结" class="headerlink" title="总结"></a>总结</h3><p>动态代理是C#中一种强大的技术，广泛应用于AOP、单元测试和远程调用等场景。通过使用动态代理，我们可以在不修改原始代码的情况下，拦截和增强方法调用，从而提高代码的灵活性和可维护性。无论是使用Castle DynamicProxy还是DispatchProxy，动态代理都为C#开发者提供了强大的工具，帮助他们更好地实现复杂的功能需求。</p><h3 id="参考资料"><a href="#参考资料" class="headerlink" title="参考资料"></a>参考资料</h3><ul><li><a href="https://www.castleproject.org/projects/dynamicproxy/">Castle DynamicProxy 官方文档</a></li><li><a href="https://learn.microsoft.com/en-us/dotnet/api/system.reflection.dispatchproxy">DispatchProxy 官方文档</a></li><li><a href="https://github.com/devlooped/moq">Moq 官方文档</a></li></ul>]]>
    </content>
    <id>https://johnnyqian.net/blog/dynamic-proxy-in-csharp.html</id>
    <link href="https://johnnyqian.net/blog/dynamic-proxy-in-csharp.html"/>
    <published>2026-01-06T02:00:00.000Z</published>
    <summary>
      <![CDATA[<p>今天我们来介绍一下C#中的动态代理（Dynamic Proxy）技术。动态代理是一种在运行时创建代理类的技术，它允许我们在不修改原始类代码的情况下，拦截和增强方法调用。这在AOP（面向切面编程）中非常有用，可以用于日志记录、事务管理、权限验证等场景。]]>
    </summary>
    <title>C# 动态代理简介</title>
    <updated>2026-11-04T15:17:54.167Z</updated>
  </entry>
  <entry>
    <author>
      <name>Johnny Qian</name>
    </author>
    <content>
      <![CDATA[<p>英语单词 “caret” 源自拉丁语，意思是 “缺失”。在传统的手稿校对和印刷业中，当作者或编辑发现文中漏掉了一个单词、字母或标点时，他们会在漏掉位置的下方插入这个<code>^</code>符号，然后在行间的上方空白处写上需要插入（insert）​ 的内容。<a id="more"></a></p><p><img src="/images/202512/caret-example.png" alt="插入符号 Caret 示例"></p><blockquote><p>也有的将需要插入的内容直接写在插入符号的下方。<br><img src="/images/202512/caret-example-new.png" alt="插入符号 Caret 示例"></p></blockquote><p>所以，^的核心原始含义是 “此处有缺失，需插入以下内容”。它是一个插入标记。</p><h3 id="中文翻译：“脱字符号”"><a href="#中文翻译：“脱字符号”" class="headerlink" title="中文翻译：“脱字符号”"></a>中文翻译：“脱字符号”</h3><p>中文翻译为“脱字符号”非常形象和准确，可以从两个层面理解：</p><ul><li><strong>“脱字”</strong>：指“脱漏的字”，即<strong>文本中缺失、遗漏的文字</strong>。这完美对应了 “caret” 拉丁语词源“缺失”的意思，以及它用于标记漏字的原始功能。</li><li><strong>“符号”</strong>：指其作为标记的形状。</li></ul><p>所以，“脱字符号” = <strong>用来标记“脱漏的字”的符号</strong>。这个翻译是<strong>意译</strong>，紧紧抓住了该符号的核心功能和历史渊源，而不是单纯按照形状（如“帽子符号”）或读音（如“卡瑞特”）来翻译。但一般情况下，我们更习惯直接称其为“插入符号”。</p><h3 id="编程语言中的插入符号（-）的含义"><a href="#编程语言中的插入符号（-）的含义" class="headerlink" title="编程语言中的插入符号（^）的含义"></a>编程语言中的插入符号（^）的含义</h3><p>在编程和计算机科学中，插入符号（^）有多种用途，具体取决于上下文。以下是一些常见的用法：</p><ol><li><p><strong>按位异或运算符</strong>：在一般通用编程语言（如C、C++、Java和Python）中，插入符号用于表示按位异或运算符。它对两个整数的每一位执行异或操作，结果位为1当且仅当对应位不同。</p><figure class="highlight python"><table><tr><td class="gutter"><pre><span class="line">1</span><br><span class="line">2</span><br><span class="line">3</span><br></pre></td><td class="code"><pre><span class="line">a = <span class="number">5</span>      <span class="comment"># 二进制表示为 0101</span></span><br><span class="line">b = <span class="number">3</span>      <span class="comment"># 二进制表示为 0011</span></span><br><span class="line">result = a ^ b  <span class="comment"># 结果为 6，二进制表示为 0110</span></span><br></pre></td></tr></table></figure></li><li><p><strong>幂运算符</strong>：在某些科学计算或数学编程语言（如MATLAB、R）中，插入符号用于表示幂运算。例如，在R语言中，<code>2 ^ 3</code> 表示 2 的 3 次方。</p><figure class="highlight r"><table><tr><td class="gutter"><pre><span class="line">1</span><br></pre></td><td class="code"><pre><span class="line">result <span class="operator">&lt;-</span> 2 <span class="operator">^</span> <span class="number">3</span>  <span class="comment"># 结果为 8</span></span><br></pre></td></tr></table></figure></li><li><p><strong>语义化版本控制</strong>：在前端Web开发中，插入符号（^）常用于表示语义化版本控制。<br>例如，在<code>package.json</code>文件中定义<code>&quot;antd&quot;: &quot;^5.21.3&quot;</code></p><ul><li><strong>含义</strong>：安装时，包管理器会寻找 <code>5.x.x</code> 系列中大于等于 <code>5.21.3</code> 的最新版本。</li><li><strong>允许的自动升级示例</strong>：<code>5.21.4</code>, <code>5.22.0</code>, <code>5.30.0</code>。</li><li><strong>不允许的自动升级</strong>：<code>6.0.0</code>（因为大版本从 5 变到了 6）。</li></ul><!-- break the list --><p>在语义化版本（如 <code>^5.21.3</code>）中，<code>^</code> 的“插入”含义被巧妙地引申了：</p><ul><li>它不再表示“此处插入文字”，而是表示<strong>“请在此版本号所定义的‘主版本’范围内，插入（即允许安装）所有兼容的、更新的版本”</strong>。</li><li>你可以把它想象成一个<strong>指向允许升级范围的指针</strong>，这个用法与其作为“插入标记”的历史一脉相承。</li></ul></li><li><p><strong>正则表达式中的锚点</strong>：在正则表达式中，插入符号用于表示字符串的开头。例如，正则表达式<code>^abc</code>匹配以”abc”开头的字符串。例如：</p><figure class="highlight python"><table><tr><td class="gutter"><pre><span class="line">1</span><br><span class="line">2</span><br><span class="line">3</span><br><span class="line">4</span><br><span class="line">5</span><br><span class="line">6</span><br></pre></td><td class="code"><pre><span class="line"><span class="keyword">import</span> re</span><br><span class="line">pattern = <span class="string">r&quot;^abc&quot;</span></span><br><span class="line">string = <span class="string">&quot;abcdef&quot;</span></span><br><span class="line"><span class="keyword">match</span> = re.<span class="keyword">match</span>(pattern, string)</span><br><span class="line"><span class="keyword">if</span> <span class="keyword">match</span>:</span><br><span class="line">    <span class="built_in">print</span>(<span class="string">&quot;匹配成功&quot;</span>)</span><br></pre></td></tr></table></figure></li><li><p><strong>命令行中的特殊字符</strong>：在某些命令行界面（如Windows命令提示符）中，插入符号用于转义特殊字符或表示换行符。例如：</p><figure class="highlight cmd"><table><tr><td class="gutter"><pre><span class="line">1</span><br></pre></td><td class="code"><pre><span class="line"><span class="built_in">echo</span> Hello ^&amp; World</span><br></pre></td></tr></table></figure></li><li><p><strong>编程语言中的错误指示符</strong>：在某些编程语言中，插入符号用于指示代码中的错误位置。例如：</p> <figure class="highlight text"><table><tr><td class="gutter"><pre><span class="line">1</span><br><span class="line">2</span><br></pre></td><td class="code"><pre><span class="line">Syntax Error: unexpected token</span><br><span class="line">       ^</span><br></pre></td></tr></table></figure></li><li><p><strong>版本控制系统中的分支标记</strong>：在某些版本控制系统中，插入符号用于表示分支或标签的起点。例如，在Git中，<code>^</code>用于表示父提交。</p> <figure class="highlight bash"><table><tr><td class="gutter"><pre><span class="line">1</span><br></pre></td><td class="code"><pre><span class="line">git checkout HEAD^  <span class="comment"># 切换到当前提交的父提交</span></span><br></pre></td></tr></table></figure></li></ol><p>总的来说，插入符号（^）在不同的编程语言和上下文中有多种用途，理解其具体含义需要根据使用环境来确定。</p><h3 id="插入符号（-）的快捷输入"><a href="#插入符号（-）的快捷输入" class="headerlink" title="插入符号（^）的快捷输入"></a>插入符号（^）的快捷输入</h3><ul><li>在大多数键盘布局中，插入符号（^）通常位于数字键盘的 <code>6</code> 键上方。要输入插入符号，按住 <code>Shift</code> 键，然后按 <code>6</code> 键。</li><li>插入符号（^）的ASCII码是 <code>94</code>，因此使用<a href="/blog/encoding-and-charset-ime.html#ALT%E7%A0%81%E8%BE%93%E5%85%A5%E6%B3%95">ALT码输入法</a> <code>Alt + 94</code>，即可输出字符 <code>^</code>。</li></ul><h3 id="参考资料"><a href="#参考资料" class="headerlink" title="参考资料"></a>参考资料</h3><ul><li><a href="https://en.wikipedia.org/wiki/Caret">Caret - Wikipedia</a></li><li><a href="https://semver.org/">Semantic Versioning</a></li><li><a href="https://www.geeksforgeeks.org/javascript/difference-between-tilde-and-caret-in-package-json/">Difference between tilde ( ~ ) and caret ( ^ ) in package.json</a></li><li><a href="https://www.regular-expressions.info/anchors.html">Regular Expressions - Caret (^) Symbol</a></li><li><a href="https://www.ascii-code.com/94">ASCII Table - Caret (^)</a></li></ul>]]>
    </content>
    <id>https://johnnyqian.net/blog/the-caret-symbol.html</id>
    <link href="https://johnnyqian.net/blog/the-caret-symbol.html"/>
    <published>2025-12-17T02:01:42.000Z</published>
    <summary>
      <![CDATA[<p>英语单词 “caret” 源自拉丁语，意思是 “缺失”。在传统的手稿校对和印刷业中，当作者或编辑发现文中漏掉了一个单词、字母或标点时，他们会在漏掉位置的下方插入这个<code>^</code>符号，然后在行间的上方空白处写上需要插入（insert）​ 的内容。]]>
    </summary>
    <title>插入符号 Caret（^）</title>
    <updated>2026-11-04T15:17:54.167Z</updated>
  </entry>
  <entry>
    <author>
      <name>Johnny Qian</name>
    </author>
    <category term="ASP.NET Core" scheme="https://johnnyqian.net/tags/ASP-NET-Core/"/>
    <category term="IOptions" scheme="https://johnnyqian.net/tags/IOptions/"/>
    <category term="IOptionsSnapshot" scheme="https://johnnyqian.net/tags/IOptionsSnapshot/"/>
    <category term="IOptionsMonitor" scheme="https://johnnyqian.net/tags/IOptionsMonitor/"/>
    <category term="配置管理" scheme="https://johnnyqian.net/tags/%E9%85%8D%E7%BD%AE%E7%AE%A1%E7%90%86/"/>
    <content>
      <![CDATA[<style>.table-container {    font-size: 0.8em;}.table-container table {    width: 100%;    border-collapse: collapse;}</style><p>在 ASP.NET Core 的选项模式中，<code>IOptions</code>、<code>IOptionsSnapshot</code> 和 <code>IOptionsMonitor</code> 是三个核心接口，它们的主要区别在于<strong>生命周期</strong>和<strong>对配置变更的响应能力</strong>。<a id="more"></a>下面的表格展示了它们之间的核心差异。</p><table><thead><tr><th align="left">特性</th><th align="left">IOptions&lt;&gt;</th><th align="left">IOptionsSnapshot&lt;&gt;</th><th align="left">IOptionsMonitor&lt;&gt;</th></tr></thead><tbody><tr><td align="left"><strong>生命周期</strong></td><td align="left">单例 (Singleton)</td><td align="left">作用域 (Scoped)</td><td align="left">单例 (Singleton)</td></tr><tr><td align="left"><strong>继承关系</strong></td><td align="left">基接口</td><td align="left"><strong>继承自</strong> <code>IOptions&lt;TOptions&gt;</code></td><td align="left">独立的接口，<strong>不继承</strong>自上述两者</td></tr><tr><td align="left"><strong>关键成员</strong></td><td align="left"><code>Value</code> 属性</td><td align="left"><code>Value</code> 属性, <code>Get(string name)</code> 方法</td><td align="left"><code>CurrentValue</code> 属性, <code>Get(string name)</code> 方法, <code>OnChange</code> 事件</td></tr><tr><td align="left"><strong>主要用途</strong></td><td align="left">提供对选项值的简单访问</td><td align="left">在<strong>作用域（Scoped）</strong> 内提供选项的快照，并支持<strong>命名选项</strong></td><td align="left">作为<strong>单例</strong>监听选项变更，支持命名选项和变更通知</td></tr><tr><td align="left"><strong>配置热更新</strong></td><td align="left">❌ 不支持</td><td align="left">✅ 支持 (每次请求内)</td><td align="left">✅ 支持 (实时)</td></tr><tr><td align="left"><strong>变更通知</strong></td><td align="left">❌ 不支持</td><td align="left">❌ 不支持</td><td align="left">✅ 支持 (通过 <code>OnChange</code> 事件)</td></tr><tr><td align="left"><strong>命名选项</strong></td><td align="left">仅默认名称</td><td align="left">支持</td><td align="left">支持</td></tr><tr><td align="left"><strong>应用场景</strong></td><td align="left">配置数据在应用运行期间恒定不变</td><td align="left">Web 环境中，每个请求可能需要最新的配置值</td><td align="left">后台服务/单例服务中需要实时响应配置变更</td></tr></tbody></table><h3 id="详解三种接口"><a href="#详解三种接口" class="headerlink" title="详解三种接口"></a>详解三种接口</h3><h4 id="IOptions-lt-TOptions-gt"><a href="#IOptions-lt-TOptions-gt" class="headerlink" title="IOptions&lt;TOptions&gt;"></a>IOptions&lt;TOptions&gt;</h4><ul><li><p><strong>工作方式</strong>：由于注册为单例，其配置值在应用程序启动时就被加载并缓存。在整个应用生命周期内，无论底层配置文件如何修改，通过 <code>IOptions.Value</code> 获取的值都保持不变 。</p></li><li><p><strong>适用场景</strong>：适用于那些<strong>一旦启动就无需改变</strong>的配置，例如数据库连接字符串、第三方API的Base URL等。</p></li><li><p><strong>代码示例</strong>：</p><figure class="highlight csharp"><table><tr><td class="gutter"><pre><span class="line">1</span><br><span class="line">2</span><br><span class="line">3</span><br><span class="line">4</span><br><span class="line">5</span><br><span class="line">6</span><br><span class="line">7</span><br><span class="line">8</span><br><span class="line">9</span><br><span class="line">10</span><br></pre></td><td class="code"><pre><span class="line"><span class="keyword">public</span> <span class="keyword">class</span> <span class="title">MyService</span></span><br><span class="line">&#123;</span><br><span class="line">    <span class="keyword">private</span> <span class="keyword">readonly</span> MySettings _settings;</span><br><span class="line">    <span class="comment">// 在构造函数中注入 IOptions</span></span><br><span class="line">    <span class="function"><span class="keyword">public</span> <span class="title">MyService</span>(<span class="params">IOptions&lt;MySettings&gt; options</span>)</span></span><br><span class="line">    &#123;</span><br><span class="line">        <span class="comment">// 通过 .Value 获取配置实例</span></span><br><span class="line">        _settings = options.Value;</span><br><span class="line">    &#125;</span><br><span class="line">&#125;</span><br></pre></td></tr></table></figure><!-- break the list --></li></ul><h4 id="IOptionsSnapshot-lt-TOptions-gt"><a href="#IOptionsSnapshot-lt-TOptions-gt" class="headerlink" title="IOptionsSnapshot&lt;TOptions&gt;"></a>IOptionsSnapshot&lt;TOptions&gt;</h4><ul><li><p><strong>工作方式</strong>：注册为作用域服务。在每次接收到 HTTP 请求时，它会创建一个新的配置快照。这意味着在同一个请求内部，配置是一致的；在不同请求之间，如果配置文件被修改，新请求会获取到最新的值 。</p></li><li><p><strong>适用场景</strong>：主要用于 <strong>Web 应用</strong>，当需要确保在一次请求处理过程中使用同一份配置，同时又希望不同的请求能享受到配置热更新带来的灵活性。</p></li><li><p><strong>代码示例</strong>：</p>  <figure class="highlight csharp"><table><tr><td class="gutter"><pre><span class="line">1</span><br><span class="line">2</span><br><span class="line">3</span><br><span class="line">4</span><br><span class="line">5</span><br><span class="line">6</span><br><span class="line">7</span><br><span class="line">8</span><br><span class="line">9</span><br><span class="line">10</span><br></pre></td><td class="code"><pre><span class="line"><span class="keyword">public</span> <span class="keyword">class</span> <span class="title">MyController</span> : <span class="title">Controller</span></span><br><span class="line">&#123;</span><br><span class="line">    <span class="keyword">private</span> <span class="keyword">readonly</span> MySettings _settings;</span><br><span class="line">    <span class="comment">// 在构造函数中注入 IOptionsSnapshot</span></span><br><span class="line">    <span class="function"><span class="keyword">public</span> <span class="title">MyController</span>(<span class="params">IOptionsSnapshot&lt;MySettings&gt; optionsSnapshot</span>)</span></span><br><span class="line">    &#123;</span><br><span class="line">        <span class="comment">// 通过 .Value 获取当前请求的最新配置实例</span></span><br><span class="line">        _settings = optionsSnapshot.Value;</span><br><span class="line">    &#125;</span><br><span class="line">&#125;</span><br></pre></td></tr></table></figure><!-- break the list --></li></ul><h4 id="IOptionsMonitor-lt-TOptions-gt"><a href="#IOptionsMonitor-lt-TOptions-gt" class="headerlink" title="IOptionsMonitor&lt;TOptions&gt;"></a>IOptionsMonitor&lt;TOptions&gt;</h4><ul><li><p><strong>工作方式</strong>：虽然也是单例，但它通过监听底层配置源的变更通知（如文件修改）来实时更新内部缓存。它通过 <code>CurrentValue</code> 属性提供当前最新的配置值。最大的特点是提供了 <code>OnChange</code> 方法，允许注册一个回调方法，在配置发生改变时立即执行 。</p></li><li><p><strong>适用场景</strong>：</p><ol><li>在<strong>单例服务</strong>（如 <code>BackgroundService</code>）中需要访问最新配置。</li><li>需要在其<strong>他组件中捕获配置变更事件</strong>并执行特定逻辑（例如，重新建立连接、刷新内部状态）。</li></ol></li><li><p><strong>代码示例</strong>：</p>  <figure class="highlight csharp"><table><tr><td class="gutter"><pre><span class="line">1</span><br><span class="line">2</span><br><span class="line">3</span><br><span class="line">4</span><br><span class="line">5</span><br><span class="line">6</span><br><span class="line">7</span><br><span class="line">8</span><br><span class="line">9</span><br><span class="line">10</span><br><span class="line">11</span><br><span class="line">12</span><br><span class="line">13</span><br><span class="line">14</span><br><span class="line">15</span><br><span class="line">16</span><br><span class="line">17</span><br></pre></td><td class="code"><pre><span class="line"><span class="keyword">public</span> <span class="keyword">class</span> <span class="title">MyBackgroundService</span> : <span class="title">BackgroundService</span></span><br><span class="line">&#123;</span><br><span class="line">    <span class="keyword">private</span> <span class="keyword">readonly</span> IOptionsMonitor&lt;MySettings&gt; _optionsMonitor;</span><br><span class="line">    <span class="keyword">private</span> MySettings _currentSettings;</span><br><span class="line"></span><br><span class="line">    <span class="function"><span class="keyword">public</span> <span class="title">MyBackgroundService</span>(<span class="params">IOptionsMonitor&lt;MySettings&gt; optionsMonitor</span>)</span></span><br><span class="line">    &#123;</span><br><span class="line">        _optionsMonitor = optionsMonitor;</span><br><span class="line">        <span class="comment">// 获取当前值</span></span><br><span class="line">        _currentSettings = _optionsMonitor.CurrentValue;</span><br><span class="line">        <span class="comment">// 注册变更回调</span></span><br><span class="line">        _optionsMonitor.OnChange(newSettings =&gt; &#123;</span><br><span class="line">            _currentSettings = newSettings;</span><br><span class="line">            <span class="comment">// 可以在这里添加重新初始化等逻辑</span></span><br><span class="line">        &#125;);</span><br><span class="line">    &#125;</span><br><span class="line">&#125;</span><br></pre></td></tr></table></figure><!-- break the list --></li></ul><h4 id="如何选择？"><a href="#如何选择？" class="headerlink" title="如何选择？"></a>如何选择？</h4><ul><li>追求<strong>极致性能</strong>且配置<strong>确定不变</strong>：选择 <code>IOptions&lt;&gt;</code>。</li><li><strong>Web 应用</strong>中需要<strong>请求级别</strong>的配置更新：选择 <code>IOptionsSnapshot&lt;&gt;</code>。</li><li>在<strong>单例服务</strong>中需要最新配置，或需要<strong>响应配置变更事件</strong>：选择 <code>IOptionsMonitor&lt;&gt;</code>。</li></ul><blockquote><p>重要陷阱：生命周期不匹配⚠️<br>  务必注意服务间的生命周期依赖关系。<strong>严禁将生命周期比当前服务“短”的服务注入进来</strong>。例如：<br>  <strong>在 Singleton 服务中注入 Scoped 服务</strong>：这是最常见的错误。因为 Singleton 只会创建一次，而它依赖的 Scoped 服务试图“每次请求”都创建一个新实例，这会导致该 Scoped 服务实际上也以 Singleton 模式运行，从而引发数据混乱等难以调试的问题。</p></blockquote><h3 id="IOptionsMonitor的热更新正确使用方式"><a href="#IOptionsMonitor的热更新正确使用方式" class="headerlink" title="IOptionsMonitor的热更新正确使用方式"></a>IOptionsMonitor的热更新正确使用方式</h3><p>如果业务需求是让Singleton服务也能感知并应用最新的配置，通常有以下两种实践方案：</p><ol><li><p><strong>使用 <code>OnChange</code> 回调主动更新字段</strong><br> 这是最推荐和常见的做法。在Singleton服务的构造函数中注册 <code>IOptionsMonitor</code> 的 <code>OnChange</code> 事件。当配置发生变化时，在该事件的回调方法中更新内部保存配置的字段。</p> <figure class="highlight csharp"><table><tr><td class="gutter"><pre><span class="line">1</span><br><span class="line">2</span><br><span class="line">3</span><br><span class="line">4</span><br><span class="line">5</span><br><span class="line">6</span><br><span class="line">7</span><br><span class="line">8</span><br><span class="line">9</span><br><span class="line">10</span><br><span class="line">11</span><br><span class="line">12</span><br><span class="line">13</span><br><span class="line">14</span><br><span class="line">15</span><br><span class="line">16</span><br><span class="line">17</span><br><span class="line">18</span><br><span class="line">19</span><br><span class="line">20</span><br><span class="line">21</span><br><span class="line">22</span><br></pre></td><td class="code"><pre><span class="line"><span class="keyword">public</span> <span class="keyword">class</span> <span class="title">MySingletonService</span></span><br><span class="line">&#123;</span><br><span class="line">    <span class="keyword">private</span> MyOptions _myOptions; <span class="comment">// 用于保存当前配置的字段</span></span><br><span class="line"></span><br><span class="line">    <span class="function"><span class="keyword">public</span> <span class="title">MySingletonService</span>(<span class="params">IOptionsMonitor&lt;MyOptions&gt; optionsMonitor</span>)</span></span><br><span class="line">    &#123;</span><br><span class="line">        _myOptions = optionsMonitor.CurrentValue; <span class="comment">// 初始化</span></span><br><span class="line"></span><br><span class="line">        <span class="comment">// 注册监听：当配置改变时，自动更新 _myOptions</span></span><br><span class="line">        optionsMonitor.OnChange(newOptions =&gt;</span><br><span class="line">        &#123;</span><br><span class="line">            _myOptions = newOptions;</span><br><span class="line">            <span class="comment">// 通常这里还会执行一些配置变更后的逻辑，如重置连接池、刷新缓存等。</span></span><br><span class="line">        &#125;);</span><br><span class="line">    &#125;</span><br><span class="line"></span><br><span class="line">    <span class="function"><span class="keyword">public</span> <span class="keyword">void</span> <span class="title">DoWork</span>()</span></span><br><span class="line">    &#123;</span><br><span class="line">        <span class="comment">// 此时使用的 _myOptions 永远是最新配置</span></span><br><span class="line">        Console.WriteLine(_myOptions.SomeSetting);</span><br><span class="line">    &#125;</span><br><span class="line">&#125;</span><br></pre></td></tr></table></figure></li><li><p><strong>惰性读取：每次实时获取</strong><br> 另一种方法是放弃保存字段，在每次需要配置的时候都通过 <code>IOptionsMonitor</code> 实例实时获取。这种方法代码更简洁，但会带来轻微的性能开销，因为每次都要检查配置源。</p> <figure class="highlight csharp"><table><tr><td class="gutter"><pre><span class="line">1</span><br><span class="line">2</span><br><span class="line">3</span><br><span class="line">4</span><br><span class="line">5</span><br><span class="line">6</span><br><span class="line">7</span><br><span class="line">8</span><br><span class="line">9</span><br><span class="line">10</span><br><span class="line">11</span><br><span class="line">12</span><br><span class="line">13</span><br><span class="line">14</span><br><span class="line">15</span><br><span class="line">16</span><br></pre></td><td class="code"><pre><span class="line"><span class="keyword">public</span> <span class="keyword">class</span> <span class="title">MySingletonService</span></span><br><span class="line">&#123;</span><br><span class="line">    <span class="keyword">private</span> <span class="keyword">readonly</span> IOptionsMonitor&lt;MyOptions&gt; _optionsMonitor;</span><br><span class="line"></span><br><span class="line">    <span class="function"><span class="keyword">public</span> <span class="title">MySingletonService</span>(<span class="params">IOptionsMonitor&lt;MyOptions&gt; optionsMonitor</span>)</span></span><br><span class="line">    &#123;</span><br><span class="line">        _optionsMonitor = optionsMonitor;</span><br><span class="line">    &#125;</span><br><span class="line"></span><br><span class="line">    <span class="function"><span class="keyword">public</span> <span class="keyword">void</span> <span class="title">DoWork</span>()</span></span><br><span class="line">    &#123;</span><br><span class="line">        <span class="comment">// 每次都会获取当前最新的配置值</span></span><br><span class="line">        <span class="keyword">var</span> currentSettings = _optionsMonitor.CurrentValue;</span><br><span class="line">        Console.WriteLine(currentSettings.SomeSetting);</span><br><span class="line">    &#125;</span><br><span class="line">&#125;</span><br></pre></td></tr></table></figure><blockquote><p>在Singleton服务中，如果只是简单地在构造函数中获取一次IOptionsMonitor提供的值并保存，那么这个值在服务生命周期内将保持不变，确实无法实现热更新。IOptionsMonitor的实时性体现在每次访问CurrentValue或Get方法时总是能返回当前的最新配置，OnChange事件则提供了一个让你能响应变化并执行后续逻辑的钩子（Hook）。简单总结下，要实现热更新，您需要利用 OnChange回调在服务内部主动更新配置字段，或者选择在每次使用时实时获取。</p></blockquote></li></ol><h3 id="IOptionsMonitor与分布式配置中心"><a href="#IOptionsMonitor与分布式配置中心" class="headerlink" title="IOptionsMonitor与分布式配置中心"></a>IOptionsMonitor与分布式配置中心</h3><p>在微服务架构中，将分布式配置中心与 <code>IOptionsMonitor</code> 结合，是实现配置集中化管理、动态刷新的优雅方案。它能确保配置变更时，所有微服务实例都能近乎实时地感知并应用新配置，无需重启应用。</p><p>下面是一个对比表格，帮你快速了解分布式配置中心的核心优势与传统本地配置的区别：</p><table><thead><tr><th align="left">特性</th><th align="left">传统本地配置</th><th align="left">分布式配置中心</th></tr></thead><tbody><tr><td align="left"><strong>管理方式</strong></td><td align="left">分散在各个微服务实例的本地文件中</td><td align="left"><strong>集中管理</strong>，所有配置存储在中心服务器</td></tr><tr><td align="left"><strong>动态更新</strong></td><td align="left">通常需要重启服务才能生效</td><td align="left"><strong>实时动态更新</strong>，服务无需重启</td></tr><tr><td align="left"><strong>环境隔离</strong></td><td align="left">依赖部署脚本或环境变量，容易出错</td><td align="left">通过<strong>命名空间（Namespace）和分组（Group）</strong> 实现天然隔离</td></tr><tr><td align="left"><strong>一致性保障</strong></td><td align="left">难以保证所有实例配置一致</td><td align="left">通过版本控制和推送机制保障最终一致性</td></tr><tr><td align="left"><strong>运维效率</strong></td><td align="left">实例越多，配置管理越繁琐</td><td align="left"><strong>高效便捷</strong>，尤其适合大规模微服务集群</td></tr></tbody></table><h4 id="如何实现集成"><a href="#如何实现集成" class="headerlink" title="如何实现集成"></a>如何实现集成</h4><p>将配置中心与 <code>IOptionsMonitor</code> 结合，核心是让 <code>IOptionsMonitor</code> 的数据源不再是本地的 <code>appsettings.json</code>，而是远程的配置中心。以下是实现这一目标的关键步骤和代码思路：</p><ol><li><p><strong>选择并搭建配置中心</strong>：首先需要选择一个配置中心（如Nacos 、Apollo、Azure App Configuration等），并完成服务端的搭建与配置。</p></li><li><p><strong>在项目中引入客户端库</strong>：为你的ASP.NET Core项目安装对应的配置中心客户端NuGet包（例如，对于Nacos，可以使用 <code>nacos-sdk-csharp-extensions</code>）。</p></li><li><p><strong>将配置中心添加为配置源</strong>：在 <code>Program.cs</code> 中，使用客户端库提供的方法，将配置中心添加为一个新的配置源，替换或补充默认的本地配置。</p> <figure class="highlight csharp"><table><tr><td class="gutter"><pre><span class="line">1</span><br><span class="line">2</span><br><span class="line">3</span><br><span class="line">4</span><br><span class="line">5</span><br><span class="line">6</span><br><span class="line">7</span><br><span class="line">8</span><br><span class="line">9</span><br><span class="line">10</span><br><span class="line">11</span><br><span class="line">12</span><br><span class="line">13</span><br></pre></td><td class="code"><pre><span class="line"><span class="keyword">var</span> builder = WebApplication.CreateBuilder(<span class="keyword">args</span>);</span><br><span class="line"></span><br><span class="line"><span class="comment">// 添加Nacos作为配置源，并指定要监听的数据ID和分组</span></span><br><span class="line">builder.Configuration.AddNacosConfiguration(</span><br><span class="line">    options =&gt;</span><br><span class="line">    &#123;</span><br><span class="line">        options.ServerAddresses = <span class="keyword">new</span> List&lt;<span class="built_in">string</span>&gt; &#123; <span class="string">&quot;http://your-nacos-server:8848&quot;</span> &#125;;</span><br><span class="line">        options.Namespace = <span class="string">&quot;your-namespace-id&quot;</span>; <span class="comment">// 用于环境隔离 </span></span><br><span class="line">        options.Group = <span class="string">&quot;DEFAULT_GROUP&quot;</span>;</span><br><span class="line">        options.DataId = <span class="string">&quot;your-app-dev.json&quot;</span>; <span class="comment">// 你的配置文件名</span></span><br><span class="line">    &#125;,</span><br><span class="line">    logAction: (log) =&gt; &#123; <span class="comment">/* 配置日志 */</span> &#125;</span><br><span class="line">);</span><br></pre></td></tr></table></figure></li><li><p><strong>正常使用IOptionsMonitor</strong>：此后，在控制器或服务中注入和使用 <code>IOptionsMonitor</code> 的方式与使用本地配置源时<strong>完全一致</strong>。<code>IOptionsMonitor</code> 会自动监听配置中心的变更。</p> <figure class="highlight csharp"><table><tr><td class="gutter"><pre><span class="line">1</span><br><span class="line">2</span><br><span class="line">3</span><br><span class="line">4</span><br><span class="line">5</span><br><span class="line">6</span><br><span class="line">7</span><br><span class="line">8</span><br><span class="line">9</span><br><span class="line">10</span><br><span class="line">11</span><br><span class="line">12</span><br><span class="line">13</span><br><span class="line">14</span><br></pre></td><td class="code"><pre><span class="line"><span class="keyword">public</span> <span class="keyword">class</span> <span class="title">SomeService</span></span><br><span class="line">&#123;</span><br><span class="line">    <span class="keyword">private</span> <span class="keyword">readonly</span> MyOptions _options;</span><br><span class="line">    </span><br><span class="line">    <span class="function"><span class="keyword">public</span> <span class="title">SomeService</span>(<span class="params">IOptionsMonitor&lt;MyOptions&gt; optionsMonitor</span>)</span></span><br><span class="line">    &#123;</span><br><span class="line">        _options = optionsMonitor.CurrentValue;</span><br><span class="line">        <span class="comment">// 注册变更回调（可选）</span></span><br><span class="line">        optionsMonitor.OnChange(newOptions =&gt; </span><br><span class="line">        &#123;</span><br><span class="line">            _options = newOptions; <span class="comment">// 当配置中心的值改变时，此回调会被触发</span></span><br><span class="line">        &#125;);</span><br><span class="line">    &#125;</span><br><span class="line">&#125;</span><br></pre></td></tr></table></figure><!-- break the list --></li></ol><h4 id="关键技术机制"><a href="#关键技术机制" class="headerlink" title="关键技术机制"></a>关键技术机制</h4><p>上述流程的背后依赖几个关键的技术机制：</p><ul><li><strong>配置监听与推送</strong>：配置中心客户端会通过<strong>长轮询（Long Polling）</strong> 或WebSocket等方式与服务器保持长连接。当配置发生变更时，服务端会主动推送更新消息给配置中心客户端 。</li><li><strong>客户端自动刷新</strong>：客户端收到变更通知后，会重新拉取最新配置，并更新到内存中。此时，<code>IOptionsMonitor</code> 会触发 <code>OnChange</code> 事件，通知所有监听的组件 。</li><li><strong>本地缓存与容灾</strong>：为了提高读取速度和应对配置中心临时不可用的情况，客户端通常会在本地缓存一份配置 。在应用启动时，会先加载本地缓存配置，然后再去尝试获取最新配置，这保证了即使配置中心宕机，应用也能正常启动 。</li></ul><h4 id="进阶实践与建议"><a href="#进阶实践与建议" class="headerlink" title="进阶实践与建议"></a>进阶实践与建议</h4><p>在实际生产环境中，你还可以考虑以下最佳实践：</p><ul><li><strong>灰度发布</strong>：重要的配置变更可以分批次推送给部分服务实例，验证无误后再全量发布，降低风险 。</li><li><strong>配置加密</strong>：对于数据库密码等敏感信息，配置中心通常提供加密存储功能，客户端在获取后进行解密，确保数据安全 。</li><li><strong>权限与审计</strong>：为配置中心设置访问权限，并记录所有配置的修改日志，便于追踪和审计 。</li></ul><blockquote><p>通过将 <code>IOptionsMonitor</code> 与分布式配置中心结合，ASP.NET Core 应用能够实现配置的集中化管理和动态刷新，极大提升了微服务架构下的配置管理效率和应用的灵活性。利用配置中心的推送机制和 <code>IOptionsMonitor</code> 的监听能力，应用可以实时响应配置变更，无需重启服务，确保系统始终运行在最新的配置状态下。这种集成方式不仅简化了运维工作，还增强了应用的稳定性和可维护性，是现代云原生应用开发中的重要实践之一。</p></blockquote>]]>
    </content>
    <id>https://johnnyqian.net/blog/aspnet-core-options.html</id>
    <link href="https://johnnyqian.net/blog/aspnet-core-options.html"/>
    <published>2025-12-12T02:57:05.000Z</published>
    <summary>
      <![CDATA[<style>
.table-container {
    font-size: 0.8em;
}
.table-container table {
    width: 100%;
    border-collapse: collapse;
}
</style>

<p>在 ASP.NET Core 的选项模式中，<code>IOptions</code>、<code>IOptionsSnapshot</code> 和 <code>IOptionsMonitor</code> 是三个核心接口，它们的主要区别在于<strong>生命周期</strong>和<strong>对配置变更的响应能力</strong>。]]>
    </summary>
    <title>ASP.NET Core 中的选项接口 - IOptions、IOptionsSnapshot 与 IOptionsMonitor</title>
    <updated>2026-11-04T15:17:54.166Z</updated>
  </entry>
  <entry>
    <author>
      <name>Johnny Qian</name>
    </author>
    <content>
      <![CDATA[<p>在使用iPhone拍摄视频后，我们可能会对视频的长度、亮度、对比度等信息进行修改，这时保存后的视频的创建时间就会变成我们修改时的时间，很显然这个时间是不对的，我们希望视频的创建时间保持不变。</p><a id="more"></a><p>在Windows上，我们可以通过一些工具来修改视频<strong>文件</strong>的创建时间，但Windows上的文件创建时间和视频的创建时间是不同的，我们修改的是文件的创建时间，而不是视频的创建时间。此时，我们可以通过ExifTool这个工具来修改视频的元数据进而来修改视频的创建时间。更重要的是Windows中的资源管理器默认会以视频的创建时间来排序，而不是文件的创建时间。其他的一些设备，例如iPhone、iPad、NAS存储等，也会以视频的创建时间来排序。</p><img src="/images/202401/2024-01-04_211020.png" width="400px" alt="Windows File Property" style="border: 1px solid #C3C3C3" /><blockquote><p>在Windows Explorer中，如果发现Date列显示的时间与Date Created列显示的时间不一致，那么就说明视频被后期编辑过，可以继续阅读本文了解如何将这个时间调整为视频的创建时间。<br><img src="/images/202401/2024-09-08_173048.png" width="800px" alt="Windows Explorer" /></p></blockquote><h2 id="1-安装ExifTool"><a href="#1-安装ExifTool" class="headerlink" title="1. 安装ExifTool"></a>1. 安装ExifTool</h2><p>ExifTool是一个用于读取、写入和编辑图像、音频和视频文件中的元数据的工具，它是一个跨平台的工具，可以在Windows、Linux、MacOS等系统上使用。</p><blockquote><p>Exif是Exchangeable Image File的缩写，它是一种标准，可以在图像、音频、视频文件中存储如拍摄时间、拍摄设备、拍摄地点等信息。如果你习惯使用图形界面，那么你可以使用<a href="https://exiftool.org/gui/">ExifToolGUI</a>来修改元数据。</p></blockquote><p>ExifTool的官方网站是：<a href="https://exiftool.org/">https://exiftool.org/</a>，我们可以在官网上下载到ExifTool的安装包，也可以在Github上下载到ExifTool的源码。在Windows上，我们可以直接下载ExifTool的安装包，然后安装即可。</p><h2 id="2-修改视频的创建时间"><a href="#2-修改视频的创建时间" class="headerlink" title="2. 修改视频的创建时间"></a>2. 修改视频的创建时间</h2><p>在安装好ExifTool后，我们就可以使用ExifTool来修改视频的创建时间了。</p><p>在Windows上，我们可以通过以下命令来修改视频的创建时间：</p><figure class="highlight bash"><table><tr><td class="gutter"><pre><span class="line">1</span><br></pre></td><td class="code"><pre><span class="line">exiftool <span class="string">&quot;-CreateDate=2024:01:01 20:00:00&quot;</span> video.mp4</span><br></pre></td></tr></table></figure><p>上面的命令中，我们通过<code>-CreateDate</code>参数来指定视频的创建时间，<code>video.mp4</code>是我们要修改的视频文件。但是手动输入视频的创建时间很麻烦，对于使用iPhone拍摄的视频，我们可以通过下面的命令将视频的创建时间修改为相机拍摄时的时间：</p><figure class="highlight bash"><table><tr><td class="gutter"><pre><span class="line">1</span><br></pre></td><td class="code"><pre><span class="line">exiftool -api QuickTimeUTC <span class="string">&quot;-CreateDate&lt;QuickTime:CreationDate&quot;</span> IMG_7368.MOV</span><br></pre></td></tr></table></figure><blockquote><p><code>-api QuickTimeUTC</code> 指示 exiftool 使用 QuickTime UTC 时间戳格式，<code>-CreateDate&lt;QuickTime:CreationDate</code> 指示将 QuickTime:CreationDate 值复制到 CreateDate 标签。</p></blockquote><h2 id="参考文章"><a href="#参考文章" class="headerlink" title="参考文章"></a>参考文章</h2><ol><li><a href="https://exiftool.org/">ExifTool</a></li><li><a href="https://devblogs.microsoft.com/oldnewthing/20230921-00/?p=108808">How does Explorer calculate the “Date” of a file?</a></li><li><a href="https://superuser.com/questions/147525/what-is-the-date-column-in-windows-7-explorer-it-matches-no-date-column-from">What is the “Date” column in Windows 7 explorer?</a></li><li><a href="https://stackoverflow.com/questions/53926085/how-to-change-media-created-date-in-exiftool">How to change Media Created Date in Exiftool?</a></li><li><a href="https://superuser.com/questions/1721508/how-to-change-mp4-windows-file-creation-date-to-create-date-from-quicktime">How to change mp4 windows file creation date to create date from QuickTime?</a></li></ol>]]>
    </content>
    <id>https://johnnyqian.net/blog/how-to-change-media-created-time.html</id>
    <link href="https://johnnyqian.net/blog/how-to-change-media-created-time.html"/>
    <published>2024-01-01T12:00:00.000Z</published>
    <summary>
      <![CDATA[<p>在使用iPhone拍摄视频后，我们可能会对视频的长度、亮度、对比度等信息进行修改，这时保存后的视频的创建时间就会变成我们修改时的时间，很显然这个时间是不对的，我们希望视频的创建时间保持不变。</p>]]>
    </summary>
    <title>如何修改视频文件的创建时间</title>
    <updated>2026-11-04T15:17:54.170Z</updated>
  </entry>
  <entry>
    <author>
      <name>Johnny Qian</name>
    </author>
    <content>
      <![CDATA[<h4 id="删除本地有但在远程库中已经不存在的跟踪分支-Remove-tracking-branches-that-are-no-longer-exist-on-remote"><a href="#删除本地有但在远程库中已经不存在的跟踪分支-Remove-tracking-branches-that-are-no-longer-exist-on-remote" class="headerlink" title="删除本地有但在远程库中已经不存在的跟踪分支(Remove tracking branches that are no longer exist on remote)"></a>删除本地有但在远程库中已经不存在的跟踪分支(Remove tracking branches that are no longer exist on remote)</h4><p>在使用基于 Pull Request 模式的开发流程中，一般我们都会设置为PR通过后自动删除对应的Branch。长此以往，本地的Repo中就会残留很多老旧（Stale）无用的Tracking Branch。<a id="more"></a></p><figure class="highlight bash"><table><tr><td class="gutter"><pre><span class="line">1</span><br></pre></td><td class="code"><pre><span class="line">git remote prune origin</span><br></pre></td></tr></table></figure><blockquote><p><code>prune</code> 这个词的本意是修剪树枝、修剪羽毛，Git Repo的多分支特性可以看成是一个复杂的多叉树，因此这个命令很形象的表达了这个意思。</p></blockquote><h4 id="忽略跟踪本地Repo的某些文件-Ignore-watching-tracking-a-particular-directory-file"><a href="#忽略跟踪本地Repo的某些文件-Ignore-watching-tracking-a-particular-directory-file" class="headerlink" title="忽略跟踪本地Repo的某些文件(Ignore watching/tracking a particular directory/file)"></a>忽略跟踪本地Repo的某些文件(Ignore watching/tracking a particular directory/file)</h4><p>有时候我们想在本地Repo中做一些特定的修改（例如配置文件、数据库连接信息等），但又不能、不想提交到代码库中，我们可以告诉Git暂时忽略某些文件。</p><figure class="highlight bash"><table><tr><td class="gutter"><pre><span class="line">1</span><br></pre></td><td class="code"><pre><span class="line">git update-index --assume-unchanged path-to-file</span><br></pre></td></tr></table></figure><p>这样Git就会忽略对该文件的修改。如果想恢复对该文件的修改跟踪，执行下面的命令即可。</p><figure class="highlight bash"><table><tr><td class="gutter"><pre><span class="line">1</span><br></pre></td><td class="code"><pre><span class="line">git update-index --no-assume-unchanged path-to-file</span><br></pre></td></tr></table></figure><p>如果要显示当前Repo中所有被忽略的文件，可以执行下面的命令：</p><figure class="highlight bash"><table><tr><td class="gutter"><pre><span class="line">1</span><br></pre></td><td class="code"><pre><span class="line">! git ls-files -v | grep ^h | <span class="built_in">cut</span> -c3-</span><br></pre></td></tr></table></figure><p>如果需要经常使用这三个命令，可以给它们创建别名：</p><figure class="highlight bash"><table><tr><td class="gutter"><pre><span class="line">1</span><br><span class="line">2</span><br><span class="line">3</span><br></pre></td><td class="code"><pre><span class="line">git config --global alias.hide <span class="string">&#x27;update-index --assume-unchanged&#x27;</span></span><br><span class="line">git config --global alias.unhide <span class="string">&#x27;update-index --no-assume-unchanged&#x27;</span></span><br><span class="line">git config --global alias.hidden <span class="string">&#x27;! git ls-files -v | grep ^h | cut -c3-&#x27;</span></span><br></pre></td></tr></table></figure><p>下次使用的时候：</p><figure class="highlight bash"><table><tr><td class="gutter"><pre><span class="line">1</span><br><span class="line">2</span><br><span class="line">3</span><br><span class="line">4</span><br><span class="line">5</span><br></pre></td><td class="code"><pre><span class="line">git hide path-to-file</span><br><span class="line">or</span><br><span class="line">git unhide path-to-file</span><br><span class="line">or</span><br><span class="line">git hidden</span><br></pre></td></tr></table></figure><blockquote><p>这个命令和<code>.gitignore</code>文件的作用是不一样的。<code>.gitignore</code>文件用于指示Git将指定的文件或文件夹完全排除在Git的管理之外，所有其它用户的Repo都将遵循<code>.gitignore</code>文件中定义的规则。上述两个命令只对当前本地的Repo产生作用，不影响其它用户的Repo。</p></blockquote><h4 id="修改最后一个commit的author-Change-the-author-of-the-latest-commit"><a href="#修改最后一个commit的author-Change-the-author-of-the-latest-commit" class="headerlink" title="修改最后一个commit的author(Change the author of the latest commit)"></a>修改最后一个commit的author(Change the author of the latest commit)</h4><p>Git有全局的配置可以设置Git Repo的用户名及邮箱。但是某些Git Repo你可能想使用一个不同的用户名及邮箱，例如工作邮箱或者个人邮箱。很多在线的Git Repo还提供基于邮箱地址的<a href="https://gravatar.com/">Gravatar</a>头像服务。因此你可能发现在提交某个Commit之后，用户名及邮箱弄错了。</p><figure class="highlight bash"><table><tr><td class="gutter"><pre><span class="line">1</span><br><span class="line">2</span><br><span class="line">3</span><br></pre></td><td class="code"><pre><span class="line">git config --<span class="built_in">local</span> user.name <span class="string">&quot;FirstName LastName&quot;</span></span><br><span class="line">git config --<span class="built_in">local</span> user.email <span class="string">&quot;first.last@example.com&quot;</span></span><br><span class="line">git commit --amend --reset-author --no-edit</span><br></pre></td></tr></table></figure><p>或者</p><figure class="highlight bash"><table><tr><td class="gutter"><pre><span class="line">1</span><br></pre></td><td class="code"><pre><span class="line">git commit --amend --author=<span class="string">&quot;Author Name &lt;email@address.com&gt;&quot;</span> --no-edit</span><br></pre></td></tr></table></figure><h4 id="修改最后一个commit的datetime-Change-the-commit-datetime-of-the-latest-commit"><a href="#修改最后一个commit的datetime-Change-the-commit-datetime-of-the-latest-commit" class="headerlink" title="修改最后一个commit的datetime(Change the commit datetime of the latest commit)"></a>修改最后一个commit的datetime(Change the commit datetime of the latest commit)</h4><figure class="highlight bash"><table><tr><td class="gutter"><pre><span class="line">1</span><br></pre></td><td class="code"><pre><span class="line">git commit --amend --<span class="built_in">date</span> <span class="string">&quot;2025-01-08T8:00:00&quot;</span> --no-edit</span><br></pre></td></tr></table></figure><blockquote><p>如果不指定 <code>--date</code> 选项，<code>git commit --amend --no-edit</code> 则默认使用当前时间。</p></blockquote><h4 id="修改最后一个commit的message-Change-the-commit-message-of-the-latest-commit"><a href="#修改最后一个commit的message-Change-the-commit-message-of-the-latest-commit" class="headerlink" title="修改最后一个commit的message(Change the commit message of the latest commit)"></a>修改最后一个commit的message(Change the commit message of the latest commit)</h4><figure class="highlight bash"><table><tr><td class="gutter"><pre><span class="line">1</span><br></pre></td><td class="code"><pre><span class="line">git commit --amend -m <span class="string">&quot;New commit message&quot;</span></span><br></pre></td></tr></table></figure><h4 id="修改远程Repo的地址-Change-a-remote’s-URL"><a href="#修改远程Repo的地址-Change-a-remote’s-URL" class="headerlink" title="修改远程Repo的地址(Change a remote’s URL)"></a>修改远程Repo的地址(Change a remote’s URL)</h4><figure class="highlight bash"><table><tr><td class="gutter"><pre><span class="line">1</span><br></pre></td><td class="code"><pre><span class="line">git remote set-url origin https://github.com/USERNAME/REPOSITORY.git</span><br></pre></td></tr></table></figure><h4 id="在自己的分支上不切换到-master-分支，拿到-master-分支的最新改动"><a href="#在自己的分支上不切换到-master-分支，拿到-master-分支的最新改动" class="headerlink" title="在自己的分支上不切换到 master 分支，拿到 master 分支的最新改动"></a>在自己的分支上<strong>不切换到 master 分支</strong>，拿到 master 分支的最新改动</h4><figure class="highlight bash"><table><tr><td class="gutter"><pre><span class="line">1</span><br><span class="line">2</span><br><span class="line">3</span><br><span class="line">4</span><br></pre></td><td class="code"><pre><span class="line">git fetch  origin master</span><br><span class="line"></span><br><span class="line">git merge  origin/master or</span><br><span class="line">git rebase origin/master</span><br></pre></td></tr></table></figure><blockquote><p>这里的 <code>origin</code> 是远程仓库的默认名称，<code>master</code> 是分支的名称。<br><code>origin master</code> 用于需要分别指定远程和分支的命令，表示“origin 仓库的 master 分支”。<br><code>origin/master</code> 是本地对远程 master 分支的跟踪分支，直接作为分支引用来用。</p></blockquote><h3 id="参考资料"><a href="#参考资料" class="headerlink" title="参考资料"></a>参考资料</h3><ul><li><a href="https://git-scm.com/cheat-sheet">Git Cheat Sheet</a></li></ul>]]>
    </content>
    <id>https://johnnyqian.net/blog/git-commands-that-are-not-commonly-used.html</id>
    <link href="https://johnnyqian.net/blog/git-commands-that-are-not-commonly-used.html"/>
    <published>2023-03-05T02:42:30.000Z</published>
    <summary>
      <![CDATA[<h4 id="删除本地有但在远程库中已经不存在的跟踪分支-Remove-tracking-branches-that-are-no-longer-exist-on-remote"><a href="#删除本地有但在远程库中已经不存在的跟踪分支-Remove-tracking-branches-that-are-no-longer-exist-on-remote" class="headerlink" title="删除本地有但在远程库中已经不存在的跟踪分支(Remove tracking branches that are no longer exist on remote)"></a>删除本地有但在远程库中已经不存在的跟踪分支(Remove tracking branches that are no longer exist on remote)</h4><p>在使用基于 Pull Request 模式的开发流程中，一般我们都会设置为PR通过后自动删除对应的Branch。长此以往，本地的Repo中就会残留很多老旧（Stale）无用的Tracking Branch。]]>
    </summary>
    <title>不常用的一些Git命令</title>
    <updated>2026-11-04T15:17:54.169Z</updated>
  </entry>
  <entry>
    <author>
      <name>Johnny Qian</name>
    </author>
    <content>
      <![CDATA[<p>这个问题困惑我很久了。本地的Git Repo, 使用Sourcetree打开后，Remote图标上总有一个红色感叹号。鼠标移动上去，也没有任何错误提示。<a id="more"></a></p><p><img src="/images/202203/2022-03-12_111016.png" alt="Sourcetree"></p><p>最近花了点时间终于解决了。</p><p><strong>问题的原因在于Git Repo没有指定Remote Account。</strong></p><p><img src="/images/202203/2022-03-12_111613.png" alt="Sourcetree"></p><h2 id="解决步骤"><a href="#解决步骤" class="headerlink" title="解决步骤"></a>解决步骤</h2><ol><li><p>首先确定你的远程Git Repo是由以下的Hosting Provider来提供，如果不是，那么本文的解决方案则不适用。<br><img src="/images/202203/2022-03-12_115428.png" alt="Sourcetree"></p></li><li><p>打开Sourcetree的Options对话框，点击 Authentication -&gt; Add。<br><img src="/images/202203/2022-03-12_115024.png" alt="Sourcetree"></p></li><li><p>选择你的Hosting Service，输入相关的身份验证信息。我使用的是Azure DevOps，需要提供PAT来验证身份信息。<br><img src="/images/202203/2022-03-12_111536.png" alt="Sourcetree"></p></li><li><p>打开Git Repo的Settings对话框，编辑默认的远程Repo（一般是origin）。将Remote Account设置为刚才创建的Azure DevOps账号。<br><img src="/images/202203/2022-03-12_121325.png" alt="Sourcetree"></p></li><li><p>关闭Sourcetree重新打开，Remote图标上的红色感叹号就消失了。</p></li></ol>]]>
    </content>
    <id>https://johnnyqian.net/blog/red-exclamation-mark-on-remote-icon-in-sourcetree.html</id>
    <link href="https://johnnyqian.net/blog/red-exclamation-mark-on-remote-icon-in-sourcetree.html"/>
    <published>2022-03-12T03:20:48.000Z</published>
    <summary>
      <![CDATA[<p>这个问题困惑我很久了。本地的Git Repo, 使用Sourcetree打开后，Remote图标上总有一个红色感叹号。鼠标移动上去，也没有任何错误提示。]]>
    </summary>
    <title>Red Exclamation Mark on Remote Icon In Sourcetree</title>
    <updated>2026-11-04T15:17:54.169Z</updated>
  </entry>
  <entry>
    <author>
      <name>Johnny Qian</name>
    </author>
    <content>
      <![CDATA[<style>.table-container {    font-size: 0.66em;}.table-container .gutter, .table-container .code{    font-size: 1.5em;}</style><p>在.NET Core中，Host负责应用程序的启动和生命周期管理。除此之外，在Host中还可以设置日志(Logging)、配置(Configuration)和依赖关系注入(Dependency Injection)等。Host将一个常规的控制台应用程序(Console Application)变成了一个可以长时间运行的服务(Long-running Service)。</p><a id="more"></a><h2 id="Hosting-History"><a href="#Hosting-History" class="headerlink" title="Hosting History"></a>Hosting History</h2><p>在.NET Core中，有以下2个Host:</p><ul><li>.NET Generic Host(简称 Generic Host)</li><li>ASP.NET Core Web Host(简称 Web Host)</li></ul><p>要了解它们之间的区别与联系，我们需要从.NET Core的发展历程中寻找答案。</p><p>微软在2016年6月发布了<code>.NET Core 1.0</code>。.NET Core是一个开放的、支持跨平台的框架，它与.NET Framework有着显著的不同。在这之后微软又陆续发布了<code>.NET Core 1.1</code>、<code>.NET Core 2.0</code>、<code>.NET Core 2.1</code>、<code>.NET Core 2.2</code>、<code>.NET Core 3.0</code>和<code>.NET Core 3.1</code>。</p><p>Web Host在<code>.NET Core 1.0</code>中被引入，它被用于配置并启动<code>Kestrel</code>Web服务器，在指定的端口上监听HTTP请求。Web Host正如它的名称所言，只用于Host ASP.NET Core Web Application。</p><p>Generic Host在<code>.NET Core 2.1</code>中被引入，但它只被用于non-HTTP的场景，例如<a href="https://docs.microsoft.com/en-us/aspnet/core/fundamentals/host/hosted-services?view=aspnetcore-2.1">hosted services/worker services</a>。此时你仍需要使用Web Host来Host ASP.NET Core Web Application。这带来了一定的混淆和麻烦，很多相近的类被引入。</p><h3 id="IWebHost-与-IHost，IWebHostBuilder与IHostBuilder"><a href="#IWebHost-与-IHost，IWebHostBuilder与IHostBuilder" class="headerlink" title="IWebHost 与 IHost，IWebHostBuilder与IHostBuilder"></a>IWebHost 与 IHost，IWebHostBuilder与IHostBuilder</h3><table><thead><tr><th>Interface</th><th>Namespace</th><th>Default Implementation</th><th>Git Repo</th><th>Source Code</th></tr></thead><tbody><tr><td>IWebHost</td><td>Microsoft.AspNetCore.Hosting</td><td>WebHost</td><td><a href="https://github.com/dotnet/aspnetcore">https://github.com/dotnet/aspnetcore</a></td><td><a href="https://github.com/dotnet/aspnetcore/blob/main/src/Hosting/Hosting/src/Internal/WebHost.cs">src/Hosting/Hosting/src/Internal/WebHost.cs</a></td></tr><tr><td>IHost</td><td>Microsoft.Extensions.Hosting</td><td>Host</td><td><a href="https://github.com/dotnet/runtime">https://github.com/dotnet/runtime</a></td><td><a href="https://github.com/dotnet/runtime/blob/main/src/libraries/Microsoft.Extensions.Hosting/src/Internal/Host.cs">src/libraries/Microsoft.Extensions.Hosting/src/Internal/Host.cs</a></td></tr><tr><td>IWebHostBuilder</td><td>Microsoft.AspNetCore.Hosting</td><td>WebHostBuilder</td><td><a href="https://github.com/dotnet/aspnetcore">https://github.com/dotnet/aspnetcore</a></td><td><a href="https://github.com/dotnet/aspnetcore/blob/main/src/Hosting/Hosting/src/WebHostBuilder.cs">src/Hosting/Hosting/src/WebHostBuilder.cs</a></td></tr><tr><td>IHostBuilder</td><td>Microsoft.Extensions.Hosting</td><td>HostBuilder</td><td><a href="https://github.com/dotnet/runtime">https://github.com/dotnet/runtime</a></td><td><a href="https://github.com/dotnet/runtime/blob/main/src/libraries/Microsoft.Extensions.Hosting/src/HostBuilder.cs">src/libraries/Microsoft.Extensions.Hosting/src/HostBuilder.cs</a></td></tr></tbody></table><p>还有与这些接口相关的静态辅助类：</p><table><thead><tr><th>Class</th><th>Namespace</th><th>Git Repo</th><th>Source Code</th></tr></thead><tbody><tr><td>WebHost</td><td>Microsoft.AspNetCore</td><td><a href="https://github.com/dotnet/aspnetcore">https://github.com/dotnet/aspnetcore</a></td><td><a href="https://github.com/dotnet/aspnetcore/blob/main/src/DefaultBuilder/src/WebHost.cs">src/DefaultBuilder/src/WebHost.cs</a></td></tr><tr><td>Host</td><td>Microsoft.Extensions.Hosting</td><td><a href="https://github.com/dotnet/runtime">https://github.com/dotnet/runtime</a></td><td><a href="https://github.com/dotnet/runtime/blob/main/src/libraries/Microsoft.Extensions.Hosting/src/Host.cs">src/libraries/Microsoft.Extensions.Hosting/src/Host.cs</a></td></tr></tbody></table><p>我们在<code>Program.cs</code>文件中一般都是用这两个静态辅助类来创建IWebHost或IHost的具体实例，进而启动应用程序。</p><h3 id="IHostingEnvironment-vs-IHostEnvironment-vs-IWebHostEnvironment"><a href="#IHostingEnvironment-vs-IHostEnvironment-vs-IWebHostEnvironment" class="headerlink" title="IHostingEnvironment vs IHostEnvironment vs IWebHostEnvironment"></a>IHostingEnvironment vs IHostEnvironment vs IWebHostEnvironment</h3><p>这几个接口是不是傻傻分不清？这其实充分说明了微软在主导.NET Core的开发过程中存在着管理和命名的混乱。这也难免，毕竟这么大的项目，而且代码库也是各管各的。</p><p>首先IHostingEnvironment存在于2个不同的命名空间中，虽然接口内容大致相同，但却是互不兼容的——它们之间没有继承关系。</p><table><thead><tr><th>Interface</th><th>Namespace</th><th>Git Repo</th><th>Source Code</th></tr></thead><tbody><tr><td>IHostingEnvironment</td><td>Microsoft.AspNetCore.Hosting</td><td><a href="https://github.com/dotnet/aspnetcore">https://github.com/dotnet/aspnetcore</a></td><td><a href="https://github.com/dotnet/aspnetcore/blob/main/src/Hosting/Abstractions/src/IHostingEnvironment.cs">src/Hosting/Abstractions/src/IHostingEnvironment.cs</a></td></tr><tr><td>IHostingEnvironment</td><td>Microsoft.Extensions.Hosting</td><td><a href="https://github.com/dotnet/runtime">https://github.com/dotnet/runtime</a></td><td><a href="https://github.com/dotnet/runtime/blob/main/src/libraries/Microsoft.Extensions.Hosting.Abstractions/src/IHostingEnvironment.cs">src/libraries/Microsoft.Extensions.Hosting.Abstractions/src/IHostingEnvironment.cs</a></td></tr></tbody></table><p>从.NET Core 3.0起，这两个接口都被标记为<code>obsolete</code>，取而代之的分别是IWebHostEnvironment 与 IHostEnvironment。它们依然存在于不同的命名空间中，但它们之间有了继承关系。</p><table><thead><tr><th>Interface</th><th>Namespace</th><th>Git Repo</th><th>Source Code</th></tr></thead><tbody><tr><td>IWebHostEnvironment</td><td>Microsoft.AspNetCore.Hosting</td><td><a href="https://github.com/dotnet/aspnetcore">https://github.com/dotnet/aspnetcore</a></td><td><a href="https://github.com/dotnet/aspnetcore/blob/main/src/Hosting/Abstractions/src/IWebHostEnvironment.cs">src/Hosting/Abstractions/src/IWebHostEnvironment.cs</a></td></tr><tr><td>IHostEnvironment</td><td>Microsoft.Extensions.Hosting</td><td><a href="https://github.com/dotnet/runtime">https://github.com/dotnet/runtime</a></td><td><a href="https://github.com/dotnet/runtime/blob/main/src/libraries/Microsoft.Extensions.Hosting.Abstractions/src/IHostEnvironment.cs">src/libraries/Microsoft.Extensions.Hosting.Abstractions/src/IHostEnvironment.cs</a></td></tr></tbody></table><figure class="highlight csharp"><table><tr><td class="gutter"><pre><span class="line">1</span><br><span class="line">2</span><br><span class="line">3</span><br><span class="line">4</span><br><span class="line">5</span><br><span class="line">6</span><br><span class="line">7</span><br><span class="line">8</span><br><span class="line">9</span><br><span class="line">10</span><br><span class="line">11</span><br><span class="line">12</span><br><span class="line">13</span><br><span class="line">14</span><br><span class="line">15</span><br><span class="line">16</span><br><span class="line">17</span><br><span class="line">18</span><br><span class="line">19</span><br></pre></td><td class="code"><pre><span class="line"><span class="keyword">namespace</span> <span class="title">Microsoft.AspNetCore.Hosting</span></span><br><span class="line">&#123;</span><br><span class="line">    <span class="keyword">public</span> <span class="keyword">interface</span> <span class="title">IWebHostEnvironment</span> : <span class="title">IHostEnvironment</span></span><br><span class="line">    &#123;</span><br><span class="line">        <span class="built_in">string</span> WebRootPath &#123; <span class="keyword">get</span>; <span class="keyword">set</span>; &#125;</span><br><span class="line">        IFileProvider WebRootFileProvider &#123; <span class="keyword">get</span>; <span class="keyword">set</span>; &#125;</span><br><span class="line">    &#125;</span><br><span class="line">&#125;</span><br><span class="line"></span><br><span class="line"><span class="keyword">namespace</span> <span class="title">Microsoft.Extensions.Hosting</span></span><br><span class="line">&#123;</span><br><span class="line">    <span class="keyword">public</span> <span class="keyword">interface</span> <span class="title">IHostEnvironment</span></span><br><span class="line">    &#123;</span><br><span class="line">        <span class="built_in">string</span> EnvironmentName &#123; <span class="keyword">get</span>; <span class="keyword">set</span>; &#125;</span><br><span class="line">        <span class="built_in">string</span> ApplicationName &#123; <span class="keyword">get</span>; <span class="keyword">set</span>; &#125;</span><br><span class="line">        <span class="built_in">string</span> ContentRootPath &#123; <span class="keyword">get</span>; <span class="keyword">set</span>; &#125;</span><br><span class="line">        IFileProvider ContentRootFileProvider &#123; <span class="keyword">get</span>; <span class="keyword">set</span>; &#125;</span><br><span class="line">    &#125;</span><br><span class="line">&#125;</span><br></pre></td></tr></table></figure><p>这样的设计就很合理，也减少了重复。它们各自的默认实现也基本相同。</p><table><thead><tr><th>Default Implementation</th><th>Namespace</th><th>Git Repo</th><th>Source Code</th></tr></thead><tbody><tr><td>HostingEnvironment</td><td>Microsoft.AspNetCore.Hosting</td><td><a href="https://github.com/dotnet/aspnetcore">https://github.com/dotnet/aspnetcore</a></td><td><a href="https://github.com/dotnet/aspnetcore/blob/main/src/Hosting/Hosting/src/Internal/HostingEnvironment.cs">src/Hosting/Hosting/src/Internal/HostingEnvironment.cs</a></td></tr><tr><td>HostingEnvironment</td><td>Microsoft.Extensions.Hosting.Internal</td><td><a href="https://github.com/dotnet">https://github.com/dotnet</a></td><td><a href="https://github.com/dotnet/runtime/blob/main/src/libraries/Microsoft.Extensions.Hosting/src/Internal/HostingEnvironment.cs">src/libraries/Microsoft.Extensions.Hosting/src/Internal/HostingEnvironment.cs</a></td></tr></tbody></table><figure class="highlight csharp"><table><tr><td class="gutter"><pre><span class="line">1</span><br><span class="line">2</span><br><span class="line">3</span><br><span class="line">4</span><br><span class="line">5</span><br><span class="line">6</span><br><span class="line">7</span><br><span class="line">8</span><br><span class="line">9</span><br><span class="line">10</span><br><span class="line">11</span><br><span class="line">12</span><br><span class="line">13</span><br><span class="line">14</span><br><span class="line">15</span><br><span class="line">16</span><br><span class="line">17</span><br><span class="line">18</span><br><span class="line">19</span><br><span class="line">20</span><br><span class="line">21</span><br><span class="line">22</span><br><span class="line">23</span><br><span class="line">24</span><br></pre></td><td class="code"><pre><span class="line"><span class="keyword">namespace</span> <span class="title">Microsoft.AspNetCore.Hosting</span></span><br><span class="line">&#123;</span><br><span class="line">    <span class="keyword">internal</span> <span class="keyword">class</span> <span class="title">HostingEnvironment</span> : <span class="title">IHostingEnvironment</span>, <span class="title">Extensions.Hosting.IHostingEnvironment</span>,</span><br><span class="line">                                        <span class="title">IWebHostEnvironment</span></span><br><span class="line">    &#123;</span><br><span class="line">        <span class="keyword">public</span> <span class="built_in">string</span> EnvironmentName &#123; <span class="keyword">get</span>; <span class="keyword">set</span>; &#125; = Extensions.Hosting.Environments.Production;</span><br><span class="line">        <span class="keyword">public</span> <span class="built_in">string</span> ApplicationName &#123; <span class="keyword">get</span>; <span class="keyword">set</span>; &#125;</span><br><span class="line">        <span class="keyword">public</span> <span class="built_in">string</span> WebRootPath &#123; <span class="keyword">get</span>; <span class="keyword">set</span>; &#125;</span><br><span class="line">        <span class="keyword">public</span> IFileProvider WebRootFileProvider &#123; <span class="keyword">get</span>; <span class="keyword">set</span>; &#125;</span><br><span class="line">        <span class="keyword">public</span> <span class="built_in">string</span> ContentRootPath &#123; <span class="keyword">get</span>; <span class="keyword">set</span>; &#125;</span><br><span class="line">        <span class="keyword">public</span> IFileProvider ContentRootFileProvider &#123; <span class="keyword">get</span>; <span class="keyword">set</span>; &#125;</span><br><span class="line">    &#125;</span><br><span class="line">&#125;</span><br><span class="line"></span><br><span class="line"><span class="keyword">namespace</span> <span class="title">Microsoft.Extensions.Hosting.Internal</span></span><br><span class="line">&#123;</span><br><span class="line">    <span class="keyword">public</span> <span class="keyword">class</span> <span class="title">HostingEnvironment</span> : <span class="title">IHostingEnvironment</span>, <span class="title">IHostEnvironment</span></span><br><span class="line">    &#123;</span><br><span class="line">        <span class="keyword">public</span> <span class="built_in">string</span> EnvironmentName &#123; <span class="keyword">get</span>; <span class="keyword">set</span>; &#125;</span><br><span class="line">        <span class="keyword">public</span> <span class="built_in">string</span> ApplicationName &#123; <span class="keyword">get</span>; <span class="keyword">set</span>; &#125;</span><br><span class="line">        <span class="keyword">public</span> <span class="built_in">string</span> ContentRootPath &#123; <span class="keyword">get</span>; <span class="keyword">set</span>; &#125;</span><br><span class="line">        <span class="keyword">public</span> IFileProvider ContentRootFileProvider &#123; <span class="keyword">get</span>; <span class="keyword">set</span>; &#125;</span><br><span class="line">    &#125;</span><br><span class="line">&#125;</span><br></pre></td></tr></table></figure><h3 id="Generic-Host-取代-Web-Host"><a href="#Generic-Host-取代-Web-Host" class="headerlink" title="Generic Host 取代 Web Host"></a>Generic Host 取代 Web Host</h3><p>时间来到了.NET Core 3.0发布。微软重构了Generic Host，使之成为一个真正的通用的Host——可同时运行Worker Services和Web Applications。这大大简化了Host的模型及相关的类，开发者理解和使用起来更加容易了。</p><p><img src="/images/202104/dotnet-core-hosting-history.png" alt=".NET Core Hosting History">图片来自<a href="https://www.pluralsight.com/courses/building-aspnet-core-hosted-services-net-core-worker-services">PluralSight课程</a></p><h3 id="小结"><a href="#小结" class="headerlink" title="小结"></a>小结</h3><ul><li>尽可能地使用<code>IHostEnvironment</code></li><li>官方不建议在.NET Core 3.0及以上的版本中使用Web Host</li><li>对于ASP.NET Core Web Application来说，Kestrel Web Server被包装在<a href="https://github.com/dotnet/aspnetcore/blob/main/src/Hosting/Hosting/src/GenericHost/GenericWebHostedService.cs">GenericWebHostService</a>中被Generic Host<a href="https://github.com/dotnet/aspnetcore/blob/main/src/Servers/Kestrel/Kestrel/src/WebHostBuilderKestrelExtensions.cs#L30">初始化</a>并<a href="https://github.com/dotnet/aspnetcore/blob/main/src/Hosting/Hosting/src/GenericHost/GenericWebHostedService.cs#L119">启动</a></li></ul><blockquote><p>微软于2020年11月发布了<code>.NET 5</code>。<code>.NET 5</code>是.NET Core的下一个版本，被描述为.NET统一之旅中的第一个版本，它是为了使更多的开发人员能够将.NET框架代码和应用迁移到<code>.NET 5</code>。该平台将来自.NET Framework、.NET Core和Mono的代码组合在一起，为所有现代.NET应用提供一个单一的平台。本文所讨论的<code>.NET Generic Host</code>同样适用于<code>.NET 5</code>。</p></blockquote><h2 id="CreateDefaultBuilder与ConfigureWebHostDefaults"><a href="#CreateDefaultBuilder与ConfigureWebHostDefaults" class="headerlink" title="CreateDefaultBuilder与ConfigureWebHostDefaults"></a>CreateDefaultBuilder与ConfigureWebHostDefaults</h2><p>一般情况下，我们使用静态辅助类<code>Host</code>中的<code>CreateDefaultBuilder</code>方法来创建<code>IHostBuilder</code>的实例。对于ASP.NET Core Web Application，我们还会调用<code>ConfigureWebHostDefaults</code>方法。我们需要了解这两个方法到底做了哪些默认的设置，以便减少不必要、多余的设置。</p><h3 id="CreateDefaultBuilder-方法"><a href="#CreateDefaultBuilder-方法" class="headerlink" title="CreateDefaultBuilder 方法"></a>CreateDefaultBuilder 方法</h3><ul><li>将内容根目录设置为由 GetCurrentDirectory 返回的路径</li><li>通过以下项加载主机配置：<ul><li>前缀为 DOTNET_ 的环境变量</li><li>命令行参数</li></ul></li><li>通过以下项加载应用配置：<ul><li>appsettings.json</li><li>appsettings.{Environment}.json</li><li>在 Development 环境中运行时的用户机密配置信息(secrets.json)</li><li>环境变量</li><li>命令行参数</li></ul></li><li>添加以下日志提供程序：<ul><li>控制台</li><li>调试</li><li>EventSource</li><li>EventLog（仅当在 Windows 上运行时）</li></ul></li><li>在 Development 环境中，启用<a href="https://docs.microsoft.com/en-us/dotnet/core/extensions/dependency-injection#scope-validation">范围验证</a>和<a href="https://docs.microsoft.com/en-us/dotnet/api/microsoft.extensions.dependencyinjection.serviceprovideroptions.validateonbuild">依赖关系验证</a></li></ul><blockquote><p><img src="/images/202104/host-builder-defaults.png" alt="HostBuilder Defaults">图片来自<a href="https://www.pluralsight.com/courses/building-aspnet-core-hosted-services-net-core-worker-services">PluralSight课程</a></p></blockquote><h3 id="ConfigureWebHostDefaults-方法"><a href="#ConfigureWebHostDefaults-方法" class="headerlink" title="ConfigureWebHostDefaults 方法"></a>ConfigureWebHostDefaults 方法</h3><ul><li>从前缀为 ASPNETCORE_ 的环境变量加载主机配置。</li><li>使用应用的托管配置提供程序将 Kestrel 服务器设置为 web 服务器并对其进行配置。</li><li>如果 ASPNETCORE_FORWARDEDHEADERS_ENABLED 等于 true，则添加转接头中间件(ForwardedHeadersStartupFilter)。</li><li>添加 IIS 集成。</li></ul><h3 id="推荐阅读源代码了解更多的实现细节"><a href="#推荐阅读源代码了解更多的实现细节" class="headerlink" title="推荐阅读源代码了解更多的实现细节"></a>推荐阅读源代码了解更多的实现细节</h3><ul><li><a href="https://github.com/dotnet/runtime/blob/main/src/libraries/Microsoft.Extensions.Hosting/src/Host.cs#L53">CreateDefaultBuilder</a><ul><li><a href="https://github.com/dotnet/runtime/blob/e6bb456e608ad24a55f3fef2d1ee4ede07d6c729/src/libraries/Microsoft.Extensions.Hosting/src/HostingHostBuilderExtensions.cs#L189">ConfigureDefaults</a></li></ul></li><li><a href="https://github.com/dotnet/aspnetcore/blob/main/src/DefaultBuilder/src/GenericHostBuilderExtensions.cs#L31">ConfigureWebHostDefaults</a><ul><li><a href="https://github.com/dotnet/aspnetcore/blob/main/src/Hosting/Hosting/src/GenericHostWebHostBuilderExtensions.cs#L31">ConfigureWebHost</a><ul><li><a href="https://github.com/dotnet/aspnetcore/blob/main/src/Hosting/Hosting/src/GenericHost/GenericWebHostBuilder.cs#L32">GenericWebHostBuilder</a></li><li><a href="https://github.com/dotnet/aspnetcore/blob/main/src/DefaultBuilder/src/WebHost.cs#L215">ConfigureWebDefaults</a></li></ul></li></ul></li></ul><h2 id="Generic-Host-的启动与停止"><a href="#Generic-Host-的启动与停止" class="headerlink" title="Generic Host 的启动与停止"></a>Generic Host 的启动与停止</h2><h3 id="启动"><a href="#启动" class="headerlink" title="启动"></a>启动</h3><p>Generic Host 的启动步骤如下：</p><ol><li>在<code>Program.cs</code>文件中，通过<code>CreateDefaultBuilder</code>构建一个<code>IHost</code>的实例</li><li>调用<code>IHost</code>上的静态扩展方法<a href="https://github.com/dotnet/runtime/blob/main/src/libraries/Microsoft.Extensions.Hosting.Abstractions/src/HostingAbstractionsHostExtensions.cs#L60">Run或RunAsync</a>，这会间接调用到<code>IHost</code>的<code>StartAsync</code>方法</li><li><code>IHost</code>的<a href="https://github.com/dotnet/runtime/blob/main/src/libraries/Microsoft.Extensions.Hosting/src/Internal/Host.cs#L50">StartAsync</a>方法则会遍历所有注册的<code>IHostedService</code>，调用它的<code>StartAsync</code>方法</li><li><code>IHost</code>上的静态扩展方法[Run或RunAsync]会调用另一个扩展方法——<a href="https://github.com/dotnet/runtime/blob/main/src/libraries/Microsoft.Extensions.Hosting.Abstractions/src/HostingAbstractionsHostExtensions.cs#L87">WaitForShutdownAsync</a>，等待程序结束的信号</li></ol><blockquote><p><img src="/images/202104/host-startup.png" alt="Host Startup">图片来自<a href="https://www.pluralsight.com/courses/building-aspnet-core-hosted-services-net-core-worker-services">PluralSight课程</a><br>.NET Core 应用程序运行后会创建名为<code>.NET Host(dotnet.exe)</code>的后台进程。<br><img src="/images/202104/dotnet-host-process.png" alt=".NET Host"></p></blockquote><h3 id="停止"><a href="#停止" class="headerlink" title="停止"></a>停止</h3><p>Generic Host 的停止步骤如下：</p><ol><li>用户使用Ctrl + C或者应用程序使用代码来发出程序结束的信号</li><li><code>IHost</code>的<a href="https://github.com/dotnet/runtime/blob/main/src/libraries/Microsoft.Extensions.Hosting/src/Internal/Host.cs#L96">StopAsync</a>方法在<code>WaitForShutdownAsync</code>中被调用</li><li>所有注册的<code>IHostedService</code>的<code>StopAsync</code>方法被调用</li><li>应用程序退出</li></ol><blockquote><p><img src="/images/202104/host-shutdown.png" alt="Host Shutdown">图片来自<a href="https://www.pluralsight.com/courses/building-aspnet-core-hosted-services-net-core-worker-services">PluralSight课程</a><br>需要指出的是，<code>IHostedService</code>的注册顺序是非常重要的，启动的时候是按注册顺序，停止的时候则是倒序。</p></blockquote><h2 id="其它的Host"><a href="#其它的Host" class="headerlink" title="其它的Host"></a>其它的Host</h2><p>在Windows操作系统中，你还会看到很多其它的Host。</p><h3 id="Console-Window-Host-conhost-exe"><a href="#Console-Window-Host-conhost-exe" class="headerlink" title="Console Window Host(conhost.exe)"></a>Console Window Host(conhost.exe)</h3><p>Console Window Host, 即命令行程序的宿主进程。典型的命令行程序有cmd.exe、nslookup.exe等。Console Window Host负责绘制命令行程序的图形化窗口，管理<code>输入缓冲区</code>和<code>屏幕缓冲区</code>。</p><h3 id="Service-Host-svchost-exe"><a href="#Service-Host-svchost-exe" class="headerlink" title="Service Host(svchost.exe)"></a>Service Host(svchost.exe)</h3><p>Service Host是一个共有的宿主进程的名称，它用来运行DLL文件中的服务，特别是很多系统服务。为了使这些服务之间保持隔离，减少相互影响导致的程序错误，系统会运行很多个Service Host的进程实例。你可以使用<a href="https://docs.microsoft.com/en-us/sysinternals/downloads/process-explorer">Process Explorer</a>这个工具，通过<code>Command Line</code>列来区分它们。</p><p><img src="/images/202104/svchost-process.png" alt="Service Host Process"></p><h3 id="DLL-Host-dllhost-exe"><a href="#DLL-Host-dllhost-exe" class="headerlink" title="DLL Host(dllhost.exe)"></a>DLL Host(dllhost.exe)</h3><p>DLL Host程序又称为<code>COM Surrogate</code>，它是COM组件的宿主进程。COM（Component Object Model，组件对象模型）是微软于1993年提出的一种软件开发技术，它定义了组件对象进行交互的二进制接口标准。COM组件大多以动态链接库（DLL）的形式发布，DLL Host(dllhost.exe)则正是加载这些COM组件的宿主程序。与Service Host类似，系统会运行很多个DLL Host的进程实例。你可以使用<a href="https://docs.microsoft.com/en-us/sysinternals/downloads/process-explorer">Process Explorer</a>这个工具，通过<code>Command Line</code>列来区分它们。</p><p><img src="/images/202104/dllhost-process.png" alt="DLL Host Process"></p><h2 id="参考资料"><a href="#参考资料" class="headerlink" title="参考资料"></a>参考资料</h2><ul><li><a href="https://docs.microsoft.com/en-us/aspnet/core/fundamentals/host/web-host">ASP.NET Core Web Host</a></li><li><a href="https://docs.microsoft.com/en-us/aspnet/core/fundamentals/host/generic-host">.NET Generic Host in ASP.NET Core</a></li><li><a href="https://www.pluralsight.com/courses/building-aspnet-core-hosted-services-net-core-worker-services">Building ASP.NET Core Hosted Services and .NET Core Worker Services</a></li><li><a href="https://devblogs.microsoft.com/dotnet/introducing-net-core">Introducing .NET Core</a></li><li><a href="https://devblogs.microsoft.com/dotnet/announcing-net-core-1-0">Announcing .NET Core 1.0</a></li><li><a href="https://devblogs.microsoft.com/dotnet/announcing-net-5-0">Announcing .NET 5.0</a></li><li><a href="https://sahansera.dev/dotnet-core-generic-host/">Understanding .NET Generic Host Model</a></li><li><a href="https://wakeupandcode.com/generic-host-builder-in-asp-net-core-3-1/">Generic Host Builder in ASP .NET Core 3.1</a></li><li><a href="https://docs.microsoft.com/en-us/windows/application-management/svchost-service-refactoring">Changes to Service Host grouping in Windows 10</a></li></ul>]]>
    </content>
    <id>https://johnnyqian.net/blog/hosting-in-dotnet-core.html</id>
    <link href="https://johnnyqian.net/blog/hosting-in-dotnet-core.html"/>
    <published>2021-04-22T11:26:19.000Z</published>
    <summary>
      <![CDATA[<style>
.table-container {
    font-size: 0.66em;
}

.table-container .gutter, .table-container .code{
    font-size: 1.5em;
}
</style>

<p>在.NET Core中，Host负责应用程序的启动和生命周期管理。除此之外，在Host中还可以设置日志(Logging)、配置(Configuration)和依赖关系注入(Dependency Injection)等。Host将一个常规的控制台应用程序(Console Application)变成了一个可以长时间运行的服务(Long-running Service)。</p>]]>
    </summary>
    <title>Hosting in .NET Core</title>
    <updated>2026-11-04T15:17:54.167Z</updated>
  </entry>
  <entry>
    <author>
      <name>Johnny Qian</name>
    </author>
    <content>
      <![CDATA[<style>table th:first-of-type {    width: 30%;}table th:nth-of-type(2) {    width: 70%;}</style><p>下面是一张我自己画的ASP.NET Core 3.1 中关于Authentication与Authorization的主要流程线框图(Wireframe)和对象继承调用关系图，<a href="/images/202004/aspnet-core-3.1-request-processing-pipeline.png" target="_blank">点击查看全图</a>。<a id="more"></a></p><img src="/images/202004/aspnet-core-3.1-request-processing-pipeline.png" width="900px" alt="ASP.NET Core 3.1 Request Processing Pipeline" style="margin:5px 0; border: 1px solid #C3C3C3" /><h2 id="重要组件"><a href="#重要组件" class="headerlink" title="重要组件"></a>重要组件</h2><p>一些重要的组件及其源码链接如下：</p><h3 id="Authentication"><a href="#Authentication" class="headerlink" title="Authentication"></a>Authentication</h3><table><thead><tr><th>Component</th><th>Source Code</th></tr></thead><tbody><tr><td>AuthenticationMiddleware</td><td><a href="https://github.com/dotnet/aspnetcore/blob/master/src/Security/Authentication/Core/src/AuthenticationMiddleware.cs">src/Security/Authentication/Core/src/AuthenticationMiddleware.cs</a></td></tr><tr><td>AuthenticationHandler</td><td><a href="https://github.com/dotnet/aspnetcore/blob/master/src/Security/Authentication/Core/src/AuthenticationHandler.cs">src/Security/Authentication/Core/src/AuthenticationHandler.cs</a></td></tr><tr><td>&nbsp;&nbsp;&nbsp;&nbsp;JwtBearerHandler</td><td><a href="https://github.com/dotnet/aspnetcore/blob/master/src/Security/Authentication/JwtBearer/src/JwtBearerHandler.cs">src/Security/Authentication/JwtBearer/src/JwtBearerHandler.cs</a></td></tr><tr><td>&nbsp;&nbsp;&nbsp;&nbsp;RemoteAuthenticationHandler</td><td><a href="https://github.com/dotnet/aspnetcore/blob/master/src/Security/Authentication/Core/src/RemoteAuthenticationHandler.cs">src/Security/Authentication/Core/src/RemoteAuthenticationHandler.cs</a></td></tr><tr><td>&nbsp;&nbsp;&nbsp;&nbsp;&nbsp;&nbsp;&nbsp;&nbsp;OAuthHandler</td><td><a href="https://github.com/dotnet/aspnetcore/blob/master/src/Security/Authentication/OAuth/src/OAuthHandler.cs">src/Security/Authentication/OAuth/src/OAuthHandler.cs</a></td></tr><tr><td>&nbsp;&nbsp;&nbsp;&nbsp;&nbsp;&nbsp;&nbsp;&nbsp;&nbsp;&nbsp;&nbsp;&nbsp;MicrosoftAccountHandler</td><td><a href="https://github.com/dotnet/aspnetcore/blob/master/src/Security/Authentication/MicrosoftAccount/src/MicrosoftAccountHandler.cs">src/Security/Authentication/MicrosoftAccount/src/MicrosoftAccountHandler.cs</a></td></tr><tr><td>&nbsp;&nbsp;&nbsp;&nbsp;&nbsp;&nbsp;&nbsp;&nbsp;&nbsp;&nbsp;&nbsp;&nbsp;GoogleHandler</td><td><a href="https://github.com/dotnet/aspnetcore/blob/master/src/Security/Authentication/Google/src/GoogleHandler.cs">src/Security/Authentication/Google/src/GoogleHandler.cs</a></td></tr><tr><td>&nbsp;&nbsp;&nbsp;&nbsp;&nbsp;&nbsp;&nbsp;&nbsp;&nbsp;&nbsp;&nbsp;&nbsp;FacebookHandler</td><td><a href="https://github.com/dotnet/aspnetcore/blob/master/src/Security/Authentication/Facebook/src/FacebookHandler.cs">src/Security/Authentication/Facebook/src/FacebookHandler.cs</a></td></tr><tr><td>AuthenticationHandlerProvider</td><td><a href="https://github.com/dotnet/aspnetcore/blob/master/src/Http/Authentication.Core/src/AuthenticationHandlerProvider.cs">src/Http/Authentication.Core/src/AuthenticationHandlerProvider.cs</a></td></tr><tr><td>AuthenticationService</td><td><a href="https://github.com/dotnet/aspnetcore/blob/master/src/Http/Authentication.Core/src/AuthenticationService.cs">src/Http/Authentication.Core/src/AuthenticationService.cs</a></td></tr></tbody></table><h3 id="Authorization"><a href="#Authorization" class="headerlink" title="Authorization"></a>Authorization</h3><table><thead><tr><th>Component</th><th>Source Code</th></tr></thead><tbody><tr><td>AuthorizationMiddleware</td><td><a href="https://github.com/dotnet/aspnetcore/blob/master/src/Security/Authorization/Policy/src/AuthorizationMiddleware.cs">src/Security/Authorization/Policy/src/AuthorizationMiddleware.cs</a></td></tr><tr><td>AuthorizationHandler</td><td><a href="https://github.com/dotnet/aspnetcore/blob/master/src/Security/Authorization/Core/src/AuthorizationHandler.cs">src/Security/Authorization/Core/src/AuthorizationHandler.cs</a></td></tr><tr><td>DefaultAuthorizationHandlerProvider</td><td><a href="https://github.com/dotnet/aspnetcore/blob/master/src/Security/Authorization/Core/src/DefaultAuthorizationHandlerProvider.cs">src/Security/Authorization/Core/src/DefaultAuthorizationHandlerProvider.cs</a></td></tr><tr><td>DefaultAuthorizationService</td><td><a href="https://github.com/dotnet/aspnetcore/blob/master/src/Security/Authorization/Core/src/DefaultAuthorizationService.cs">src/Security/Authorization/Core/src/DefaultAuthorizationService.cs</a></td></tr></tbody></table><p>Middleware与这些Components之间通过一些扩展方法链接起来：</p><ul><li><a href="https://github.com/dotnet/aspnetcore/blob/master/src/Http/Authentication.Abstractions/src/AuthenticationHttpContextExtensions.cs">src/Http/Authentication.Abstractions/src/AuthenticationHttpContextExtensions.cs</a><br>&nbsp;</li><li><a href="https://github.com/dotnet/aspnetcore/blob/master/src/Security/Authentication/Core/src/AuthAppBuilderExtensions.cs">src/Security/Authentication/Core/src/AuthAppBuilderExtensions.cs</a></li><li><a href="https://github.com/dotnet/aspnetcore/blob/master/src/Security/Authentication/Core/src/AuthenticationServiceCollectionExtensions.cs">src/Security/Authentication/Core/src/AuthenticationServiceCollectionExtensions.cs</a></li><li><a href="https://github.com/dotnet/aspnetcore/blob/master/src/Http/Authentication.Core/src/AuthenticationCoreServiceCollectionExtensions.cs">src/Http/Authentication.Core/src/AuthenticationCoreServiceCollectionExtensions.cs</a><br>&nbsp;</li><li><a href="https://github.com/dotnet/aspnetcore/blob/master/src/Security/Authorization/Policy/src/AuthorizationAppBuilderExtensions.cs">src/Security/Authorization/Policy/src/AuthorizationAppBuilderExtensions.cs</a></li><li><a href="https://github.com/dotnet/aspnetcore/blob/master/src/Security/Authorization/Policy/src/PolicyServiceCollectionExtensions.cs">src/Security/Authorization/Policy/src/PolicyServiceCollectionExtensions.cs</a></li><li><a href="https://github.com/dotnet/aspnetcore/blob/master/src/Security/Authorization/Core/src/AuthorizationServiceCollectionExtensions.cs">src/Security/Authorization/Core/src/AuthorizationServiceCollectionExtensions.cs</a></li></ul><h2 id="几点分析"><a href="#几点分析" class="headerlink" title="几点分析"></a>几点分析</h2><ul><li><p>与<code>Authentication</code>和<code>Authorization</code>相关的组件基本是对称存在的，有几个命名不一致。</p></li><li><p>与<code>AuthenticationHandler</code>相关的具体实现有很多，这是因为<code>认证</code>的逻辑是通用的，可以由外部的身份提供者来完成。</p></li><li><p>从<code>AuthorizationMiddleware</code>的路径可以看出，ASP.NET Core中的<a href="https://docs.microsoft.com/en-us/aspnet/core/security/authorization/policies?view=aspnetcore-3.1">Authorization是基于Policy的</a>。</p></li><li><p><code>IAuthenticationHandlerProvider</code>中的接口<code>GetHandlerAsync</code>，它是根据<code>authenticationScheme</code>来获取某一个Handler，只要这个Handler认证成功则整个认证流程完成；相对应的<code>IAuthorizationHandlerProvider</code>中的接口<code>GetHandlersAsync</code>则是获取一批Handlers（注意是复数）来共同决定授权的结果。</p></li><li><p>个人认为有一些Components放置的目录不合理，例如<code>AuthenticationHandlerProvider</code>，<code>AuthenticationService</code>，<code>AuthenticationCoreServiceCollectionExtensions</code>。</p></li><li><p>基于安全的考虑，ASP.NET Core 不再内置支持<code>Basic Authentication</code>，开发者可以<a href="https://github.com/blowdart/idunno.Authentication">自行编写</a>相应的<code>AuthenticationHandler</code>。</p></li><li><p>这两个Middleware都是面向接口开发的，借助于DI，开发者可以改变Pipeline的处理逻辑。</p></li></ul><h2 id="几个问题"><a href="#几个问题" class="headerlink" title="几个问题"></a>几个问题</h2><ul><li><p><strong><code>Authentication</code>的结果存放在哪里？</strong></p><p>  <code>Authentication</code>的结果由<code>AuthenticationMiddleware</code>中的如下<a href="https://github.com/dotnet/aspnetcore/blob/23a1b8b3c412513eff0ffa8b0c55afdfa94b722a/src/Security/Authentication/Core/src/AuthenticationMiddleware.cs#L54">代码片段</a>确定：</p>  <figure class="highlight csharp"><table><tr><td class="gutter"><pre><span class="line">1</span><br><span class="line">2</span><br><span class="line">3</span><br><span class="line">4</span><br><span class="line">5</span><br><span class="line">6</span><br><span class="line">7</span><br><span class="line">8</span><br><span class="line">9</span><br><span class="line">10</span><br><span class="line">11</span><br></pre></td><td class="code"><pre><span class="line"><span class="keyword">var</span> defaultAuthenticate = <span class="keyword">await</span> Schemes.GetDefaultAuthenticateSchemeAsync();</span><br><span class="line"><span class="keyword">if</span> (defaultAuthenticate != <span class="literal">null</span>)</span><br><span class="line">&#123;</span><br><span class="line">    <span class="keyword">var</span> result = <span class="keyword">await</span> context.AuthenticateAsync(defaultAuthenticate.Name);</span><br><span class="line">    <span class="keyword">if</span> (result?.Principal != <span class="literal">null</span>)</span><br><span class="line">    &#123;</span><br><span class="line">        context.User = result.Principal;</span><br><span class="line">    &#125;</span><br><span class="line">&#125;</span><br><span class="line"></span><br><span class="line"><span class="keyword">await</span> _next(context);</span><br></pre></td></tr></table></figure><p>  这段代码先获取默认的认证<code>Scheme</code>，接着调用<code>HttpContext</code>的扩展方法<code>AuthenticateAsync</code>（该方法实际由<code>IAuthenticationService</code>来提供）来获取<code>AuthenticateResult</code>，然后将认证结果中的<code>Principal</code>赋给<code>HttpContext</code>的<code>User</code>属性，最后将请求传递给下一个Middleware（通常是<code>AuthorizationMiddleware</code>）。</p><blockquote><p>从上面的代码段可以看出，在一个注册了<code>AuthenticationMiddleware</code>和<code>AuthorizationMiddleware</code>的ASP.NET Core项目中，即使<code>Authentication</code>过程失败了（即<code>context.User</code>为<code>null</code>），<code>AuthorizationMiddleware</code>也是会运行的。</p></blockquote></li><li><p><strong>如何判断<code>Authorization</code>的成功与否？</strong></p><p>  同样的，<code>Authorization</code>的成功与否是由<code>AuthorizationMiddleware</code>来确定的，相关的<a href="https://github.com/dotnet/aspnetcore/blob/23a1b8b3c412513eff0ffa8b0c55afdfa94b722a/src/Security/Authorization/Policy/src/AuthorizationMiddleware.cs#L67">代码片段</a>如下：</p>  <figure class="highlight csharp"><table><tr><td class="gutter"><pre><span class="line">1</span><br><span class="line">2</span><br><span class="line">3</span><br><span class="line">4</span><br><span class="line">5</span><br><span class="line">6</span><br><span class="line">7</span><br><span class="line">8</span><br><span class="line">9</span><br><span class="line">10</span><br><span class="line">11</span><br><span class="line">12</span><br><span class="line">13</span><br><span class="line">14</span><br><span class="line">15</span><br><span class="line">16</span><br><span class="line">17</span><br><span class="line">18</span><br><span class="line">19</span><br><span class="line">20</span><br><span class="line">21</span><br><span class="line">22</span><br><span class="line">23</span><br><span class="line">24</span><br><span class="line">25</span><br><span class="line">26</span><br><span class="line">27</span><br><span class="line">28</span><br><span class="line">29</span><br><span class="line">30</span><br><span class="line">31</span><br><span class="line">32</span><br><span class="line">33</span><br><span class="line">34</span><br><span class="line">35</span><br><span class="line">36</span><br><span class="line">37</span><br></pre></td><td class="code"><pre><span class="line"><span class="keyword">var</span> authorizeResult =</span><br><span class="line">    <span class="keyword">await</span> policyEvaluator.AuthorizeAsync(policy, authenticateResult, context, resource: endpoint);</span><br><span class="line"></span><br><span class="line"><span class="keyword">if</span> (authorizeResult.Challenged)</span><br><span class="line">&#123;</span><br><span class="line">    <span class="keyword">if</span> (policy.AuthenticationSchemes.Count &gt; <span class="number">0</span>)</span><br><span class="line">    &#123;</span><br><span class="line">        <span class="keyword">foreach</span> (<span class="keyword">var</span> scheme <span class="keyword">in</span> policy.AuthenticationSchemes)</span><br><span class="line">        &#123;</span><br><span class="line">            <span class="keyword">await</span> context.ChallengeAsync(scheme);</span><br><span class="line">        &#125;</span><br><span class="line">    &#125;</span><br><span class="line">    <span class="keyword">else</span></span><br><span class="line">    &#123;</span><br><span class="line">        <span class="keyword">await</span> context.ChallengeAsync();</span><br><span class="line">    &#125;</span><br><span class="line"></span><br><span class="line">    <span class="keyword">return</span>;</span><br><span class="line">&#125;</span><br><span class="line"><span class="keyword">else</span> <span class="keyword">if</span> (authorizeResult.Forbidden)</span><br><span class="line">&#123;</span><br><span class="line">    <span class="keyword">if</span> (policy.AuthenticationSchemes.Count &gt; <span class="number">0</span>)</span><br><span class="line">    &#123;</span><br><span class="line">        <span class="keyword">foreach</span> (<span class="keyword">var</span> scheme <span class="keyword">in</span> policy.AuthenticationSchemes)</span><br><span class="line">        &#123;</span><br><span class="line">            <span class="keyword">await</span> context.ForbidAsync(scheme);</span><br><span class="line">        &#125;</span><br><span class="line">    &#125;</span><br><span class="line">    <span class="keyword">else</span></span><br><span class="line">    &#123;</span><br><span class="line">        <span class="keyword">await</span> context.ForbidAsync();</span><br><span class="line">    &#125;</span><br><span class="line"></span><br><span class="line">    <span class="keyword">return</span>;</span><br><span class="line">&#125;</span><br><span class="line"></span><br><span class="line"><span class="keyword">await</span> _next(context);</span><br></pre></td></tr></table></figure><p>  这段代码先调用<code>policyEvaluator</code>的<code>AuthorizeAsync</code>方法（<a href="https://github.com/dotnet/aspnetcore/blob/16a47948f80fede807fabe3c291d793590e8fd17/src/Security/Authorization/Policy/src/PolicyEvaluator.cs#L77">该方法</a>会调用<code>IAuthorizationService</code>的<code>AuthorizeAsync</code>方法）来获取<code>PolicyAuthorizationResult</code>:</p>  <figure class="highlight csharp"><table><tr><td class="gutter"><pre><span class="line">1</span><br><span class="line">2</span><br><span class="line">3</span><br><span class="line">4</span><br><span class="line">5</span><br><span class="line">6</span><br><span class="line">7</span><br><span class="line">8</span><br><span class="line">9</span><br><span class="line">10</span><br></pre></td><td class="code"><pre><span class="line"><span class="keyword">var</span> result = <span class="keyword">await</span> _authorization.AuthorizeAsync(context.User, resource, policy);</span><br><span class="line"><span class="keyword">if</span> (result.Succeeded)</span><br><span class="line">&#123;</span><br><span class="line">    <span class="keyword">return</span> PolicyAuthorizationResult.Success();</span><br><span class="line">&#125;</span><br><span class="line"></span><br><span class="line"><span class="comment">// If authentication was successful, return forbidden, otherwise challenge</span></span><br><span class="line"><span class="keyword">return</span> (authenticationResult.Succeeded)</span><br><span class="line">    ? PolicyAuthorizationResult.Forbid()</span><br><span class="line">    : PolicyAuthorizationResult.Challenge();</span><br></pre></td></tr></table></figure><blockquote><p>需要注意的是，在<code>Authorization</code>的流程中是需要借助于<code>Authentication</code>流程的结果以便确定在<code>Authorization</code>失败后是否返回Challenge（401）还是Forbid（403）。</p></blockquote><p>  然后这段代码根据<code>PolicyAuthorizationResult</code>来调用<code>HttpContext</code>的扩展方法<code>ChallengeAsync</code>或<code>ForbidAsync</code>，并<strong>终止</strong>整个请求处理流程；或者将请求传递给下一个Middleware（通常是<code>EndpointRoutingMiddleware</code>，也即是我们常说的<code>MVC Middleware</code>）。<code>HttpContext</code>的扩展方法<code>ChallengeAsync</code>和<code>ForbidAsync</code>是由<code>IAuthenticationService</code>来提供的。</p><p>  我们再深入到<code>DefaultAuthorizationService</code>中来了解下多个<code>AuthorizationHandler</code>是如何<a href="https://github.com/dotnet/aspnetcore/blob/3ec1676ac6c88f4ce43bf2e143889e6167fc3883/src/Security/Authorization/Core/src/DefaultAuthorizationService.cs#L80">一起工作</a>的：</p>  <figure class="highlight csharp"><table><tr><td class="gutter"><pre><span class="line">1</span><br><span class="line">2</span><br><span class="line">3</span><br><span class="line">4</span><br><span class="line">5</span><br><span class="line">6</span><br><span class="line">7</span><br><span class="line">8</span><br><span class="line">9</span><br><span class="line">10</span><br><span class="line">11</span><br><span class="line">12</span><br></pre></td><td class="code"><pre><span class="line"><span class="keyword">var</span> authContext = _contextFactory.CreateContext(requirements, user, resource);</span><br><span class="line"><span class="keyword">var</span> handlers = <span class="keyword">await</span> _handlers.GetHandlersAsync(authContext);</span><br><span class="line"><span class="keyword">foreach</span> (<span class="keyword">var</span> handler <span class="keyword">in</span> handlers)</span><br><span class="line">&#123;</span><br><span class="line">    <span class="keyword">await</span> handler.HandleAsync(authContext);</span><br><span class="line">    <span class="keyword">if</span> (!_options.InvokeHandlersAfterFailure &amp;&amp; authContext.HasFailed)</span><br><span class="line">    &#123;</span><br><span class="line">        <span class="keyword">break</span>;</span><br><span class="line">    &#125;</span><br><span class="line">&#125;</span><br><span class="line"></span><br><span class="line"><span class="keyword">var</span> result = _evaluator.Evaluate(authContext);</span><br></pre></td></tr></table></figure><p>  从上述代码可以看到，在<code>InvokeHandlersAfterFailure</code>为<code>true</code>的情况下（默认为<code>true</code>），所有注册了的<code>AuthorizationHandler</code>都会被执行。接着，代码调用<code>IAuthorizationEvaluator</code>中的<code>Evaluate</code>方法对整个授权流程进行评估，本质上是检查<code>AuthorizationHandlerContext</code>中的<code>HasSucceeded</code>属性，<a href="https://github.com/dotnet/aspnetcore/blob/62351067ff4c1401556725b401478e648b66acdc/src/Security/Authorization/Core/src/AuthorizationHandlerContext.cs#L70">其代码如下</a>：</p>  <figure class="highlight csharp"><table><tr><td class="gutter"><pre><span class="line">1</span><br><span class="line">2</span><br><span class="line">3</span><br><span class="line">4</span><br><span class="line">5</span><br><span class="line">6</span><br><span class="line">7</span><br><span class="line">8</span><br><span class="line">9</span><br><span class="line">10</span><br></pre></td><td class="code"><pre><span class="line"><span class="comment"><span class="doctag">///</span> <span class="doctag">&lt;summary&gt;</span></span></span><br><span class="line"><span class="comment"><span class="doctag">///</span> Flag indicating whether the current authorization processing has succeeded.</span></span><br><span class="line"><span class="comment"><span class="doctag">///</span> <span class="doctag">&lt;/summary&gt;</span></span></span><br><span class="line"><span class="keyword">public</span> <span class="keyword">virtual</span> <span class="built_in">bool</span> HasSucceeded</span><br><span class="line">&#123;</span><br><span class="line">    <span class="keyword">get</span></span><br><span class="line">    &#123;</span><br><span class="line">        <span class="keyword">return</span> !_failCalled &amp;&amp; _succeedCalled &amp;&amp; !PendingRequirements.Any();</span><br><span class="line">    &#125;</span><br><span class="line">&#125;</span><br></pre></td></tr></table></figure><p>可以看到，授权成功的条件是：</p><ol><li>没有任何一个<code>AuthorizationHandler</code>显式调用了<code>context.Fail</code></li><li>至少有一个<code>AuthorizationHandler</code>显式调用了<code>context.Succeed</code></li><li><code>PendingRequirements</code>这个集合为空，也即是所有的requirements都被满足了  </li></ol><p>基本原则是，<code>AuthorizationHandler</code>一般<strong>不需要</strong>显式调用<code>context.Fail</code>，除非开发者认为某一个<code>requirement</code>必须被当前的<code>AuthorizationHandler</code>满足。针对同一个<code>requirement</code>，其它的<code>AuthorizationHandler</code>可能会依据某些条件认为该<code>requirement</code>是满足的。</p><blockquote><p>这里有个问题是，如果某一个<code>AuthorizationHandler</code>显式调用了<code>context.Fail</code>，那么整个授权流程的结果就是失败的。那么此时为什么还要继续执行其它的<code>AuthorizationHandler</code>（<code>InvokeHandlersAfterFailure</code>默认为<code>true</code>），而不是快速失败（fail-fast）？<a href="https://docs.microsoft.com/en-us/aspnet/core/security/authorization/policies?view=aspnetcore-3.1#what-should-a-handler-return">官方文档给出的解释如下</a>：<br>If a handler calls context.Succeed or context.Fail, all other handlers are still called. <strong>This allows requirements to produce side effects</strong>, such as logging, which takes place even if another handler has successfully validated or failed a requirement. When set to false, the InvokeHandlersAfterFailure property (available in ASP.NET Core 1.1 and later) short-circuits the execution of handlers when context.Fail is called. InvokeHandlersAfterFailure defaults to true, in which case all handlers are called.</p></blockquote></li><li><p><strong><code>[AllowAnonymous]</code>属性是如何工作的？</strong></p><p>  <code>[AllowAnonymous]</code>属性可以<a href="https://docs.microsoft.com/en-us/aspnet/core/security/authorization/simple?view=aspnetcore-3.1">绕开（bypass）整个授权流程</a>，即使相应的<code>Controller</code>或者<code>Action</code>上有<code>[Authorize]</code>属性。这也是由<code>AuthorizationMiddleware</code>中的<a href="https://github.com/dotnet/aspnetcore/blob/23a1b8b3c412513eff0ffa8b0c55afdfa94b722a/src/Security/Authorization/Policy/src/AuthorizationMiddleware.cs#L60">一段代码</a>来实现的：</p>  <figure class="highlight csharp"><table><tr><td class="gutter"><pre><span class="line">1</span><br><span class="line">2</span><br><span class="line">3</span><br><span class="line">4</span><br><span class="line">5</span><br><span class="line">6</span><br></pre></td><td class="code"><pre><span class="line"><span class="comment">// Allow Anonymous skips all authorization</span></span><br><span class="line"><span class="keyword">if</span> (endpoint?.Metadata.GetMetadata&lt;IAllowAnonymous&gt;() != <span class="literal">null</span>)</span><br><span class="line">&#123;</span><br><span class="line">    <span class="keyword">await</span> _next(context);</span><br><span class="line">    <span class="keyword">return</span>;</span><br><span class="line">&#125;</span><br></pre></td></tr></table></figure><!-- break --></li></ul><h2 id="参考文章"><a href="#参考文章" class="headerlink" title="参考文章"></a>参考文章</h2><ul><li><p><a href="https://docs.microsoft.com/en-us/aspnet/core/fundamentals/middleware/?view=aspnetcore-3.1">ASP.NET Core Middleware</a></p></li><li><p><a href="https://docs.microsoft.com/en-us/aspnet/core/security/authentication/?view=aspnetcore-3.1">ASP.NET Core authentication</a></p></li><li><p><a href="https://docs.microsoft.com/en-us/aspnet/core/security/authorization/?view=aspnetcore-3.1">ASP.NET Core authorization</a></p></li><li><p><a href="https://docs.microsoft.com/en-us/aspnet/core/security/authorization/policies?view=aspnetcore-3.1">Policy-based authorization in ASP.NET Core</a></p></li><li><p><a href="https://www.tutorialsteacher.com/core/aspnet-core-middleware">ASP.NET Core - Middleware</a></p></li><li><p><a href="https://andrewlock.net/asp-net-core-in-action-what-is-middleware/">ASP.NET Core in Action - What is middleware?</a></p></li><li><p><a href="https://www.tpeczek.com/2019/01/aspnet-core-middleware-and-authorization.html">ASP.NET Core middleware and authorization</a></p></li><li><p><a href="https://www.cnblogs.com/savorboard/p/aspnetcore-authentication.html">ASP.NET Core 中的那些认证中间件及一些重要知识点</a></p></li><li><p><a href="https://www.cnblogs.com/hippieZhou/p/11205573.html">ASP.NET Core 中的管道机制</a></p></li></ul>]]>
    </content>
    <id>https://johnnyqian.net/blog/aspnet-core-3.1-authentication-and-authorization.html</id>
    <link href="https://johnnyqian.net/blog/aspnet-core-3.1-authentication-and-authorization.html"/>
    <published>2020-04-05T07:32:42.000Z</published>
    <summary>
      <![CDATA[<style>
table th:first-of-type {
    width: 30%;
}
table th:nth-of-type(2) {
    width: 70%;
}
</style>

<p>下面是一张我自己画的ASP.NET Core 3.1 中关于Authentication与Authorization的主要流程线框图(Wireframe)和对象继承调用关系图，<a href="/images/202004/aspnet-core-3.1-request-processing-pipeline.png" target="_blank">点击查看全图</a>。]]>
    </summary>
    <title>一张大图了解ASP.NET Core 3.1 中的Authentication与Authorization</title>
    <updated>2026-11-04T15:17:54.165Z</updated>
  </entry>
</feed>