一张大图了解ASP.NET Core 3.1 中的Authentication与Authorization
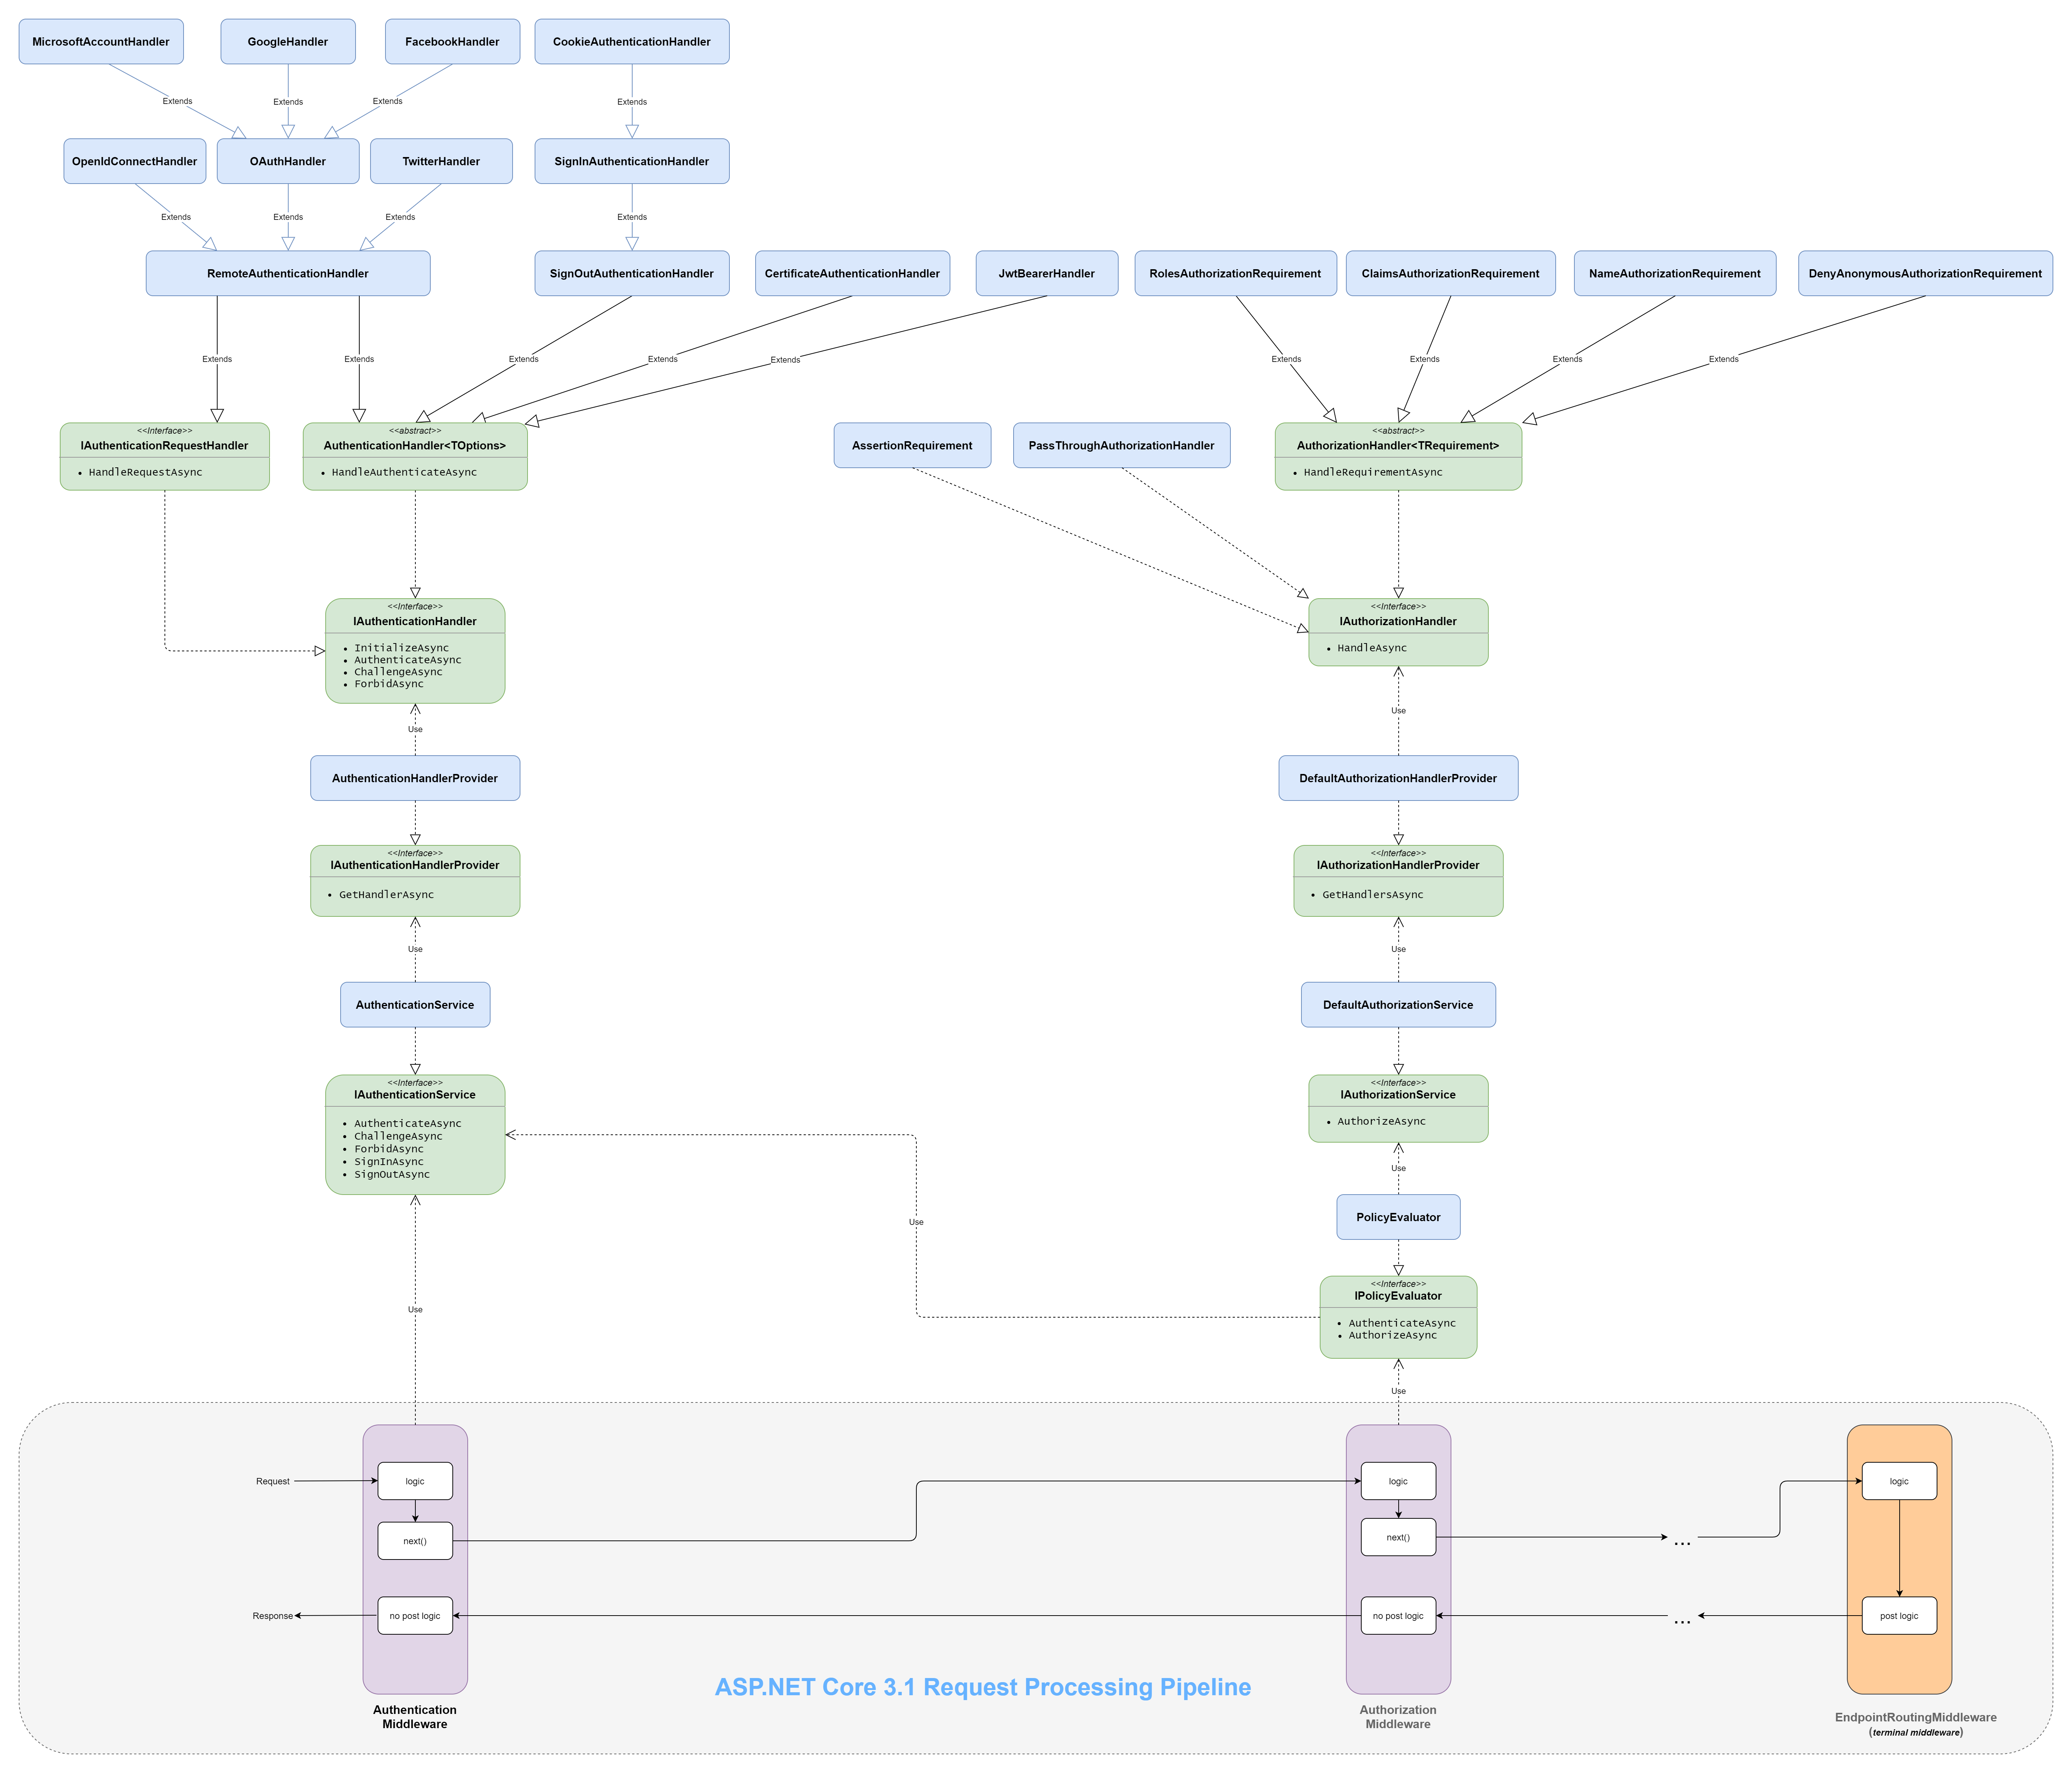
下面是一张我自己画的ASP.NET Core 3.1 中关于Authentication与Authorization的主要流程线框图(Wireframe)和对象继承调用关系图,点击查看全图。
重要组件
一些重要的组件及其源码链接如下:
Authentication
| Component | Source Code |
|---|---|
| AuthenticationMiddleware | src/Security/Authentication/Core/src/AuthenticationMiddleware.cs |
| AuthenticationHandler | src/Security/Authentication/Core/src/AuthenticationHandler.cs |
| JwtBearerHandler | src/Security/Authentication/JwtBearer/src/JwtBearerHandler.cs |
| RemoteAuthenticationHandler | src/Security/Authentication/Core/src/RemoteAuthenticationHandler.cs |
| OAuthHandler | src/Security/Authentication/OAuth/src/OAuthHandler.cs |
| MicrosoftAccountHandler | src/Security/Authentication/MicrosoftAccount/src/MicrosoftAccountHandler.cs |
| GoogleHandler | src/Security/Authentication/Google/src/GoogleHandler.cs |
| FacebookHandler | src/Security/Authentication/Facebook/src/FacebookHandler.cs |
| AuthenticationHandlerProvider | src/Http/Authentication.Core/src/AuthenticationHandlerProvider.cs |
| AuthenticationService | src/Http/Authentication.Core/src/AuthenticationService.cs |
Authorization
| Component | Source Code |
|---|---|
| AuthorizationMiddleware | src/Security/Authorization/Policy/src/AuthorizationMiddleware.cs |
| AuthorizationHandler | src/Security/Authorization/Core/src/AuthorizationHandler.cs |
| DefaultAuthorizationHandlerProvider | src/Security/Authorization/Core/src/DefaultAuthorizationHandlerProvider.cs |
| DefaultAuthorizationService | src/Security/Authorization/Core/src/DefaultAuthorizationService.cs |
Middleware与这些Components之间通过一些扩展方法链接起来:
- src/Http/Authentication.Abstractions/src/AuthenticationHttpContextExtensions.cs
- src/Security/Authentication/Core/src/AuthAppBuilderExtensions.cs
- src/Security/Authentication/Core/src/AuthenticationServiceCollectionExtensions.cs
- src/Http/Authentication.Core/src/AuthenticationCoreServiceCollectionExtensions.cs
- src/Security/Authorization/Policy/src/AuthorizationAppBuilderExtensions.cs
- src/Security/Authorization/Policy/src/PolicyServiceCollectionExtensions.cs
- src/Security/Authorization/Core/src/AuthorizationServiceCollectionExtensions.cs
几点分析
与
Authentication和Authorization相关的组件基本是对称存在的,有几个命名不一致。与
AuthenticationHandler相关的具体实现有很多,这是因为认证的逻辑是通用的,可以由外部的身份提供者来完成。从
AuthorizationMiddleware的路径可以看出,ASP.NET Core中的Authorization是基于Policy的。IAuthenticationHandlerProvider中的接口GetHandlerAsync,它是根据authenticationScheme来获取某一个Handler,只要这个Handler认证成功则整个认证流程完成;相对应的IAuthorizationHandlerProvider中的接口GetHandlersAsync则是获取一批Handlers(注意是复数)来共同决定授权的结果。个人认为有一些Components放置的目录不合理,例如
AuthenticationHandlerProvider,AuthenticationService,AuthenticationCoreServiceCollectionExtensions。基于安全的考虑,ASP.NET Core 不再内置支持
Basic Authentication,开发者可以自行编写相应的AuthenticationHandler。这两个Middleware都是面向接口开发的,借助于DI,开发者可以改变Pipeline的处理逻辑。
几个问题
Authentication的结果存放在哪里?Authentication的结果由AuthenticationMiddleware中的如下代码片段确定:1
2
3
4
5
6
7
8
9
10
11var defaultAuthenticate = await Schemes.GetDefaultAuthenticateSchemeAsync();
if (defaultAuthenticate != null)
{
var result = await context.AuthenticateAsync(defaultAuthenticate.Name);
if (result?.Principal != null)
{
context.User = result.Principal;
}
}
await _next(context);这段代码先获取默认的认证
Scheme,接着调用HttpContext的扩展方法AuthenticateAsync(该方法实际由IAuthenticationService来提供)来获取AuthenticateResult,然后将认证结果中的Principal赋给HttpContext的User属性,最后将请求传递给下一个Middleware(通常是AuthorizationMiddleware)。从上面的代码段可以看出,在一个注册了
AuthenticationMiddleware和AuthorizationMiddleware的ASP.NET Core项目中,即使Authentication过程失败了(即context.User为null),AuthorizationMiddleware也是会运行的。如何判断
Authorization的成功与否?同样的,
Authorization的成功与否是由AuthorizationMiddleware来确定的,相关的代码片段如下:1
2
3
4
5
6
7
8
9
10
11
12
13
14
15
16
17
18
19
20
21
22
23
24
25
26
27
28
29
30
31
32
33
34
35
36
37var authorizeResult =
await policyEvaluator.AuthorizeAsync(policy, authenticateResult, context, resource: endpoint);
if (authorizeResult.Challenged)
{
if (policy.AuthenticationSchemes.Count > 0)
{
foreach (var scheme in policy.AuthenticationSchemes)
{
await context.ChallengeAsync(scheme);
}
}
else
{
await context.ChallengeAsync();
}
return;
}
else if (authorizeResult.Forbidden)
{
if (policy.AuthenticationSchemes.Count > 0)
{
foreach (var scheme in policy.AuthenticationSchemes)
{
await context.ForbidAsync(scheme);
}
}
else
{
await context.ForbidAsync();
}
return;
}
await _next(context);这段代码先调用
policyEvaluator的AuthorizeAsync方法(该方法会调用IAuthorizationService的AuthorizeAsync方法)来获取PolicyAuthorizationResult:1
2
3
4
5
6
7
8
9
10var result = await _authorization.AuthorizeAsync(context.User, resource, policy);
if (result.Succeeded)
{
return PolicyAuthorizationResult.Success();
}
// If authentication was successful, return forbidden, otherwise challenge
return (authenticationResult.Succeeded)
? PolicyAuthorizationResult.Forbid()
: PolicyAuthorizationResult.Challenge();需要注意的是,在
Authorization的流程中是需要借助于Authentication流程的结果以便确定在Authorization失败后是否返回Challenge(401)还是Forbid(403)。然后这段代码根据
PolicyAuthorizationResult来调用HttpContext的扩展方法ChallengeAsync或ForbidAsync,并终止整个请求处理流程;或者将请求传递给下一个Middleware(通常是EndpointRoutingMiddleware,也即是我们常说的MVC Middleware)。HttpContext的扩展方法ChallengeAsync和ForbidAsync是由IAuthenticationService来提供的。我们再深入到
DefaultAuthorizationService中来了解下多个AuthorizationHandler是如何一起工作的:1
2
3
4
5
6
7
8
9
10
11
12var authContext = _contextFactory.CreateContext(requirements, user, resource);
var handlers = await _handlers.GetHandlersAsync(authContext);
foreach (var handler in handlers)
{
await handler.HandleAsync(authContext);
if (!_options.InvokeHandlersAfterFailure && authContext.HasFailed)
{
break;
}
}
var result = _evaluator.Evaluate(authContext);从上述代码可以看到,在
InvokeHandlersAfterFailure为true的情况下(默认为true),所有注册了的AuthorizationHandler都会被执行。接着,代码调用IAuthorizationEvaluator中的Evaluate方法对整个授权流程进行评估,本质上是检查AuthorizationHandlerContext中的HasSucceeded属性,其代码如下:1
2
3
4
5
6
7
8
9
10/// <summary>
/// Flag indicating whether the current authorization processing has succeeded.
/// </summary>
public virtual bool HasSucceeded
{
get
{
return !_failCalled && _succeedCalled && !PendingRequirements.Any();
}
}可以看到,授权成功的条件是:
- 没有任何一个
AuthorizationHandler显式调用了context.Fail - 至少有一个
AuthorizationHandler显式调用了context.Succeed PendingRequirements这个集合为空,也即是所有的requirements都被满足了
基本原则是,
AuthorizationHandler一般不需要显式调用context.Fail,除非开发者认为某一个requirement必须被当前的AuthorizationHandler满足。针对同一个requirement,其它的AuthorizationHandler可能会依据某些条件认为该requirement是满足的。这里有个问题是,如果某一个
AuthorizationHandler显式调用了context.Fail,那么整个授权流程的结果就是失败的。那么此时为什么还要继续执行其它的AuthorizationHandler(InvokeHandlersAfterFailure默认为true),而不是快速失败(fail-fast)?官方文档给出的解释如下:
If a handler calls context.Succeed or context.Fail, all other handlers are still called. This allows requirements to produce side effects, such as logging, which takes place even if another handler has successfully validated or failed a requirement. When set to false, the InvokeHandlersAfterFailure property (available in ASP.NET Core 1.1 and later) short-circuits the execution of handlers when context.Fail is called. InvokeHandlersAfterFailure defaults to true, in which case all handlers are called.- 没有任何一个
[AllowAnonymous]属性是如何工作的?[AllowAnonymous]属性可以绕开(bypass)整个授权流程,即使相应的Controller或者Action上有[Authorize]属性。这也是由AuthorizationMiddleware中的一段代码来实现的:1
2
3
4
5
6// Allow Anonymous skips all authorization
if (endpoint?.Metadata.GetMetadata<IAllowAnonymous>() != null)
{
await _next(context);
return;
}